Wallet
Overview
AccelByte Gaming Services (AGS) Starter Wallet are containers that hold virtual currency, referred to here as Coins, for your players. Each wallet can hold only one currency, so if your game contains multiple virtual currencies, players will have multiple wallets.
From the Admin Portal, you can credit coins to or debit coins from a wallet or view a wallet’s transaction history.
Prerequisites
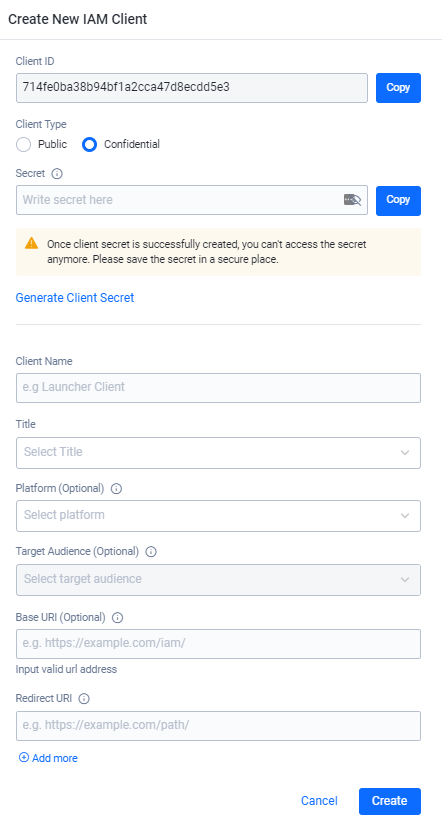
- You must create an IAM Client for each third-party platform virtual currency you want to support. You can set this up by entering each selected third-party platform into the Platform field.
You must create a virtual currency before you can begin working with wallets. You can check the Currency page in the Admin Portal to see if any virtual currencies already exist in your game titles.
Virtual currency is treated like an in-game item by our backend services, so you should create an item for your currency before working with wallets.
If you don’t have an in-game store yet, first you’ll need to create a draft store and then create an item in the new store for your currency. You can check whether or not an in-game draft store has been created in the Stores page in the Admin Portal.
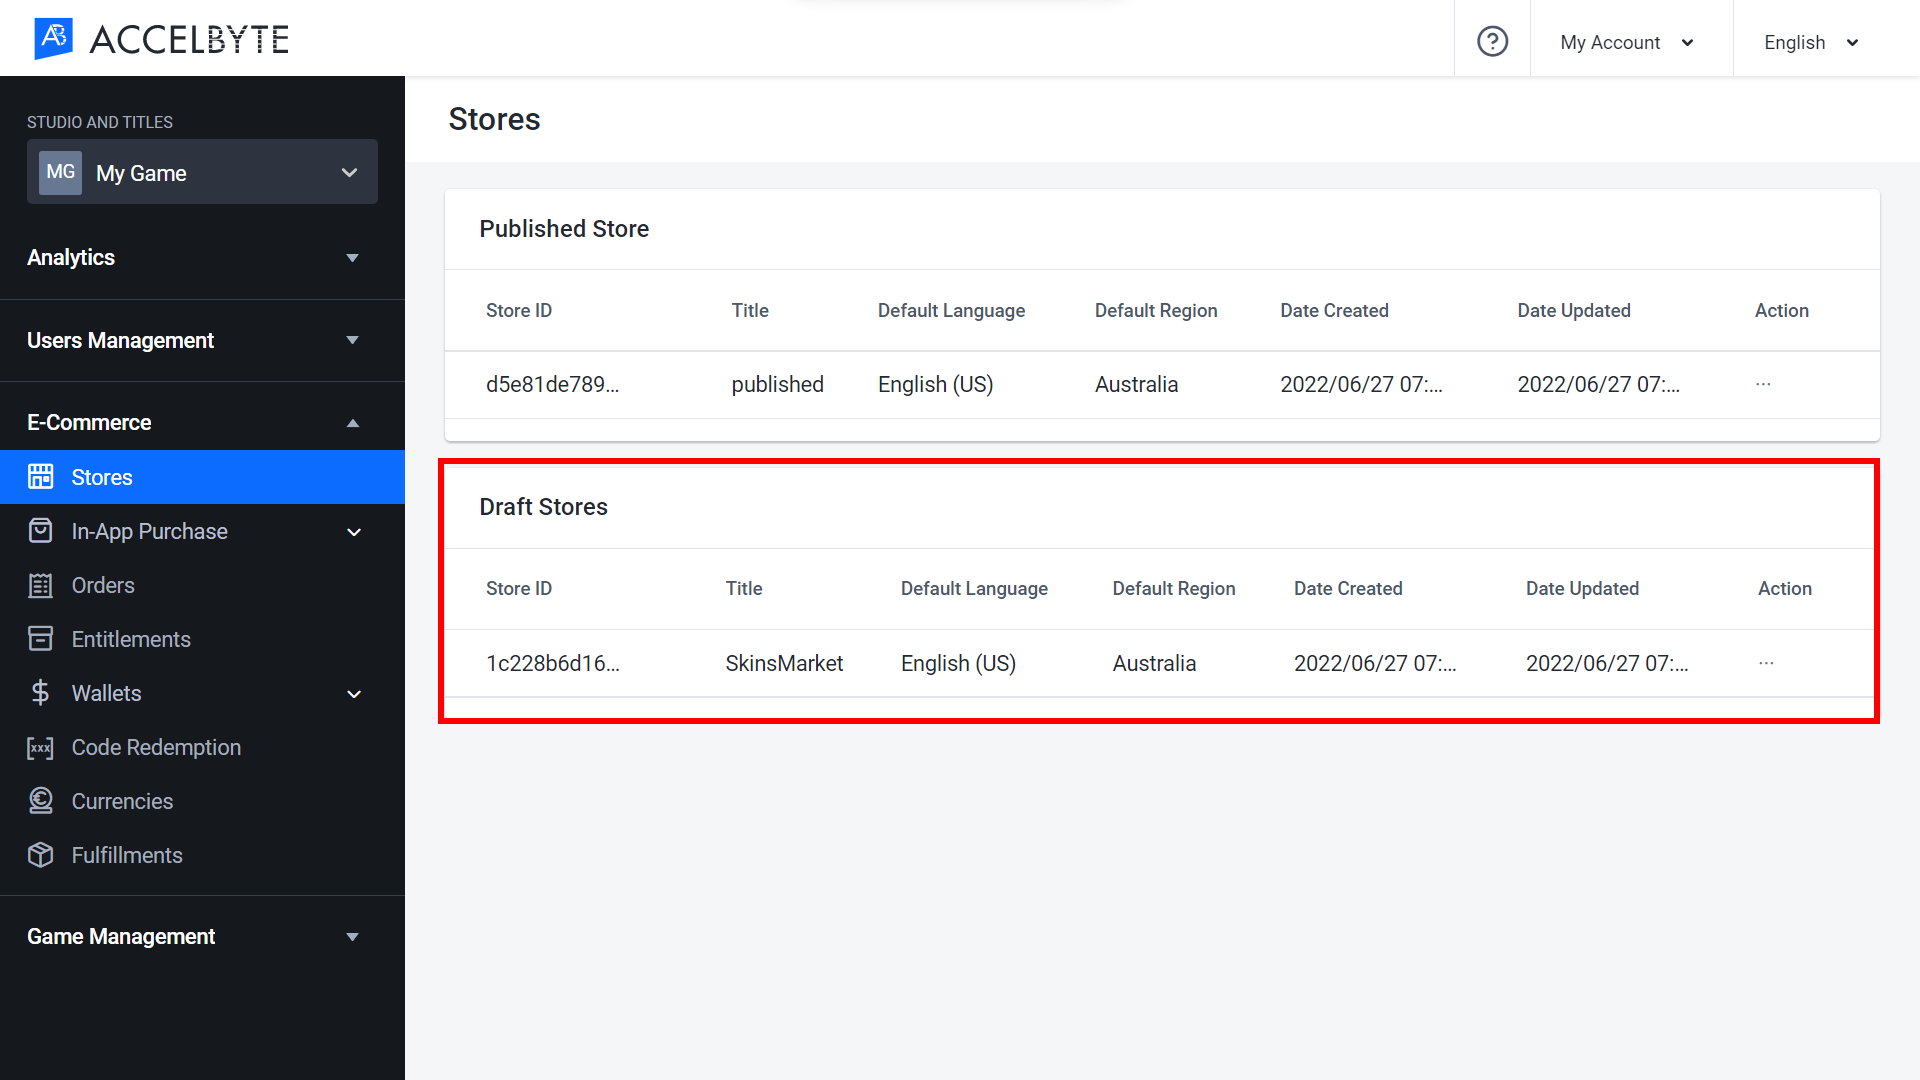
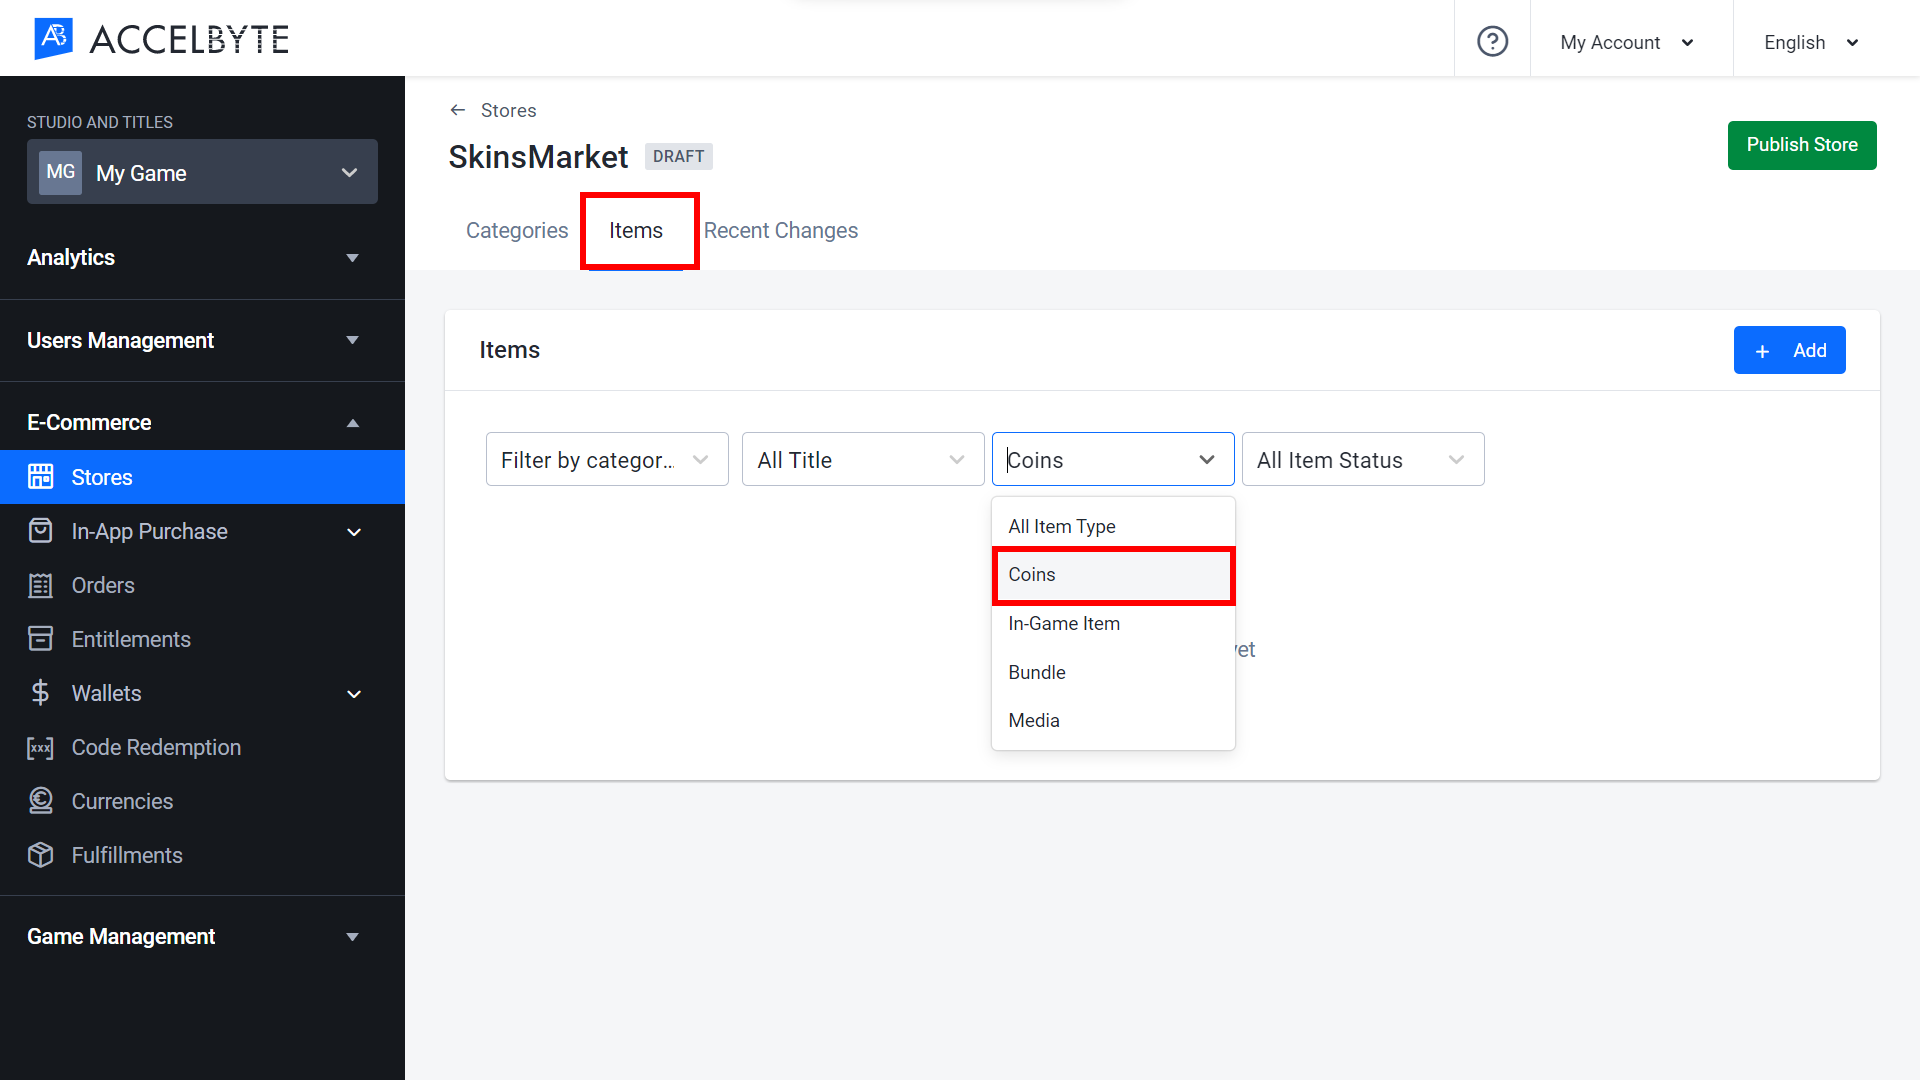
If you already have an in-game draft store, you’ll need to create an item in it for the currency if one doesn’t exist yet. To check whether or not an item already exists for your virtual currency, click View in the Action menu next to your in-game draft store in the Stores menu. Go to the Items tab, select Filter by categories, and then Coins in the second dropdown menu that appears. If no items are returned by the search, you’ll need to create an item for your currency.
Managing Payment Rules in the Admin Portal
You can cross-add virtual currency sources to another In-App Purchase platform. For example, you can add PlayStation and Steam as a source of payment to Xbox so you can make purchases on Xbox using your PlayStation or Steam balance. Below is a list of the default settings in the Admin Portal which you can adjust at any time. Choose Other if you want to add an In-App Purchase that are not listed here.
| Playing on Platform | Source of Balance |
| PlayStation | PlayStation + System |
| Xbox | All |
| Steam | All |
| Epic | All |
| Apple | All |
| Google Play | All |
| Nintendo | Nintendo + System |
| Other | All |
System (virtual currency) lets you use the balance from another service, such as Entitlements, Rewards, etc., to make purchases.
After adding a virtual currency source, you can sort these sources to prioritize which balance is used first when making purchases. For example, you can make PlayStation top priority, followed by Steam, meaning that the cost of any purchase will be debited first from a player’s PlayStation balance and then Steam (if there are insufficient funds in the player’s Playstation balance to cover the total purchase cost).
Wallets can hold two types of balances: a Permanent Balance and a Time-Limited Balance. Time-limited balances come with an expiration date, after which the player will lose this balance if it has not already been spent. Permanent balances have no expiration date.
Time-limited balances are prioritized in purchases and will be used to make purchases even if the source of the balance is not as highly-prioritized as another permanent balance, i.e., if Playstation is prioritized as the first source of currency but a player has a time-limited balance in their Steam wallet, this time-limited Steam balance will be used first, with any remaining costs then being taken from their Playstation wallet.
Currently, time-limited balances are only available in Japan.
You can read more about how to set expirations on time-limited balances in the Credit a Player’s Wallet section.
Add Origin of Virtual Currency
In the desired game title, expand the E-Commerce section, expand Wallets, and click Configurations.
Choose the platform you want to add from the tabs at the top of the page.
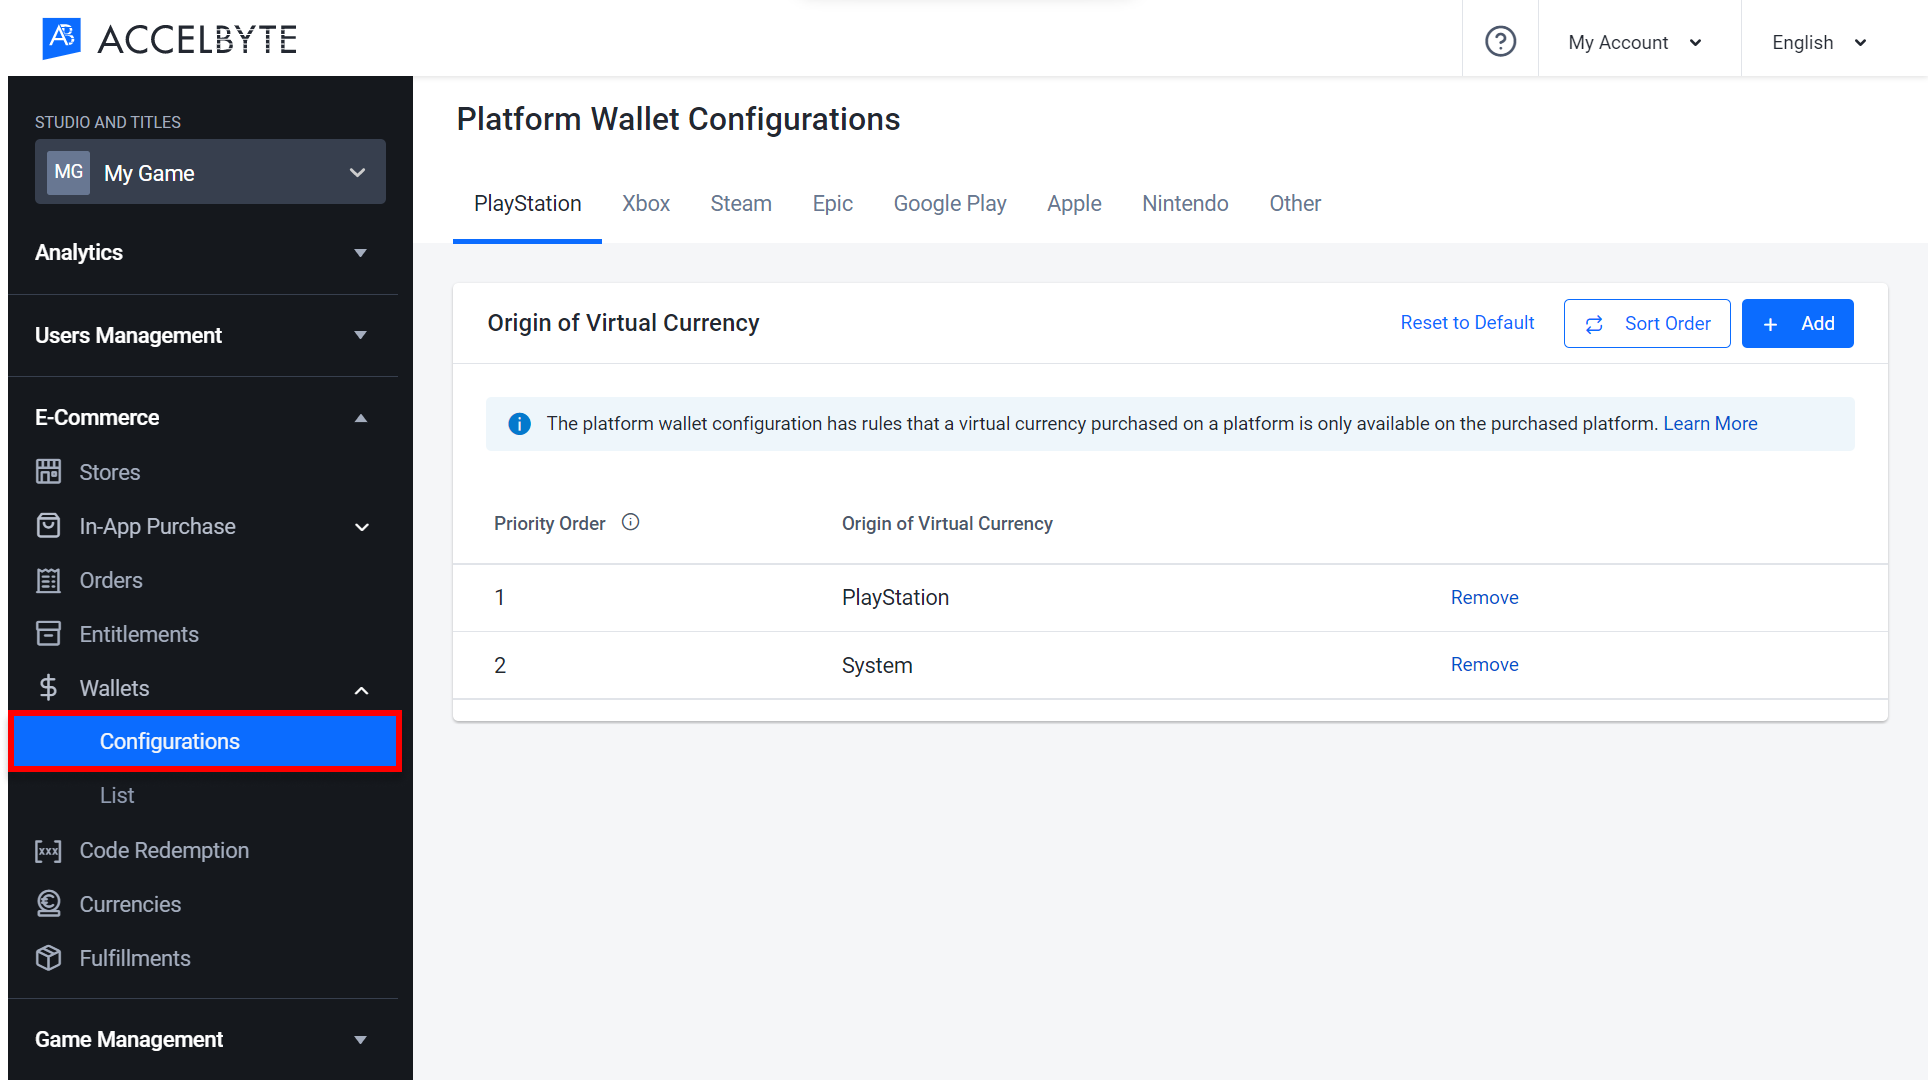
On your selected platform, click the Add button.
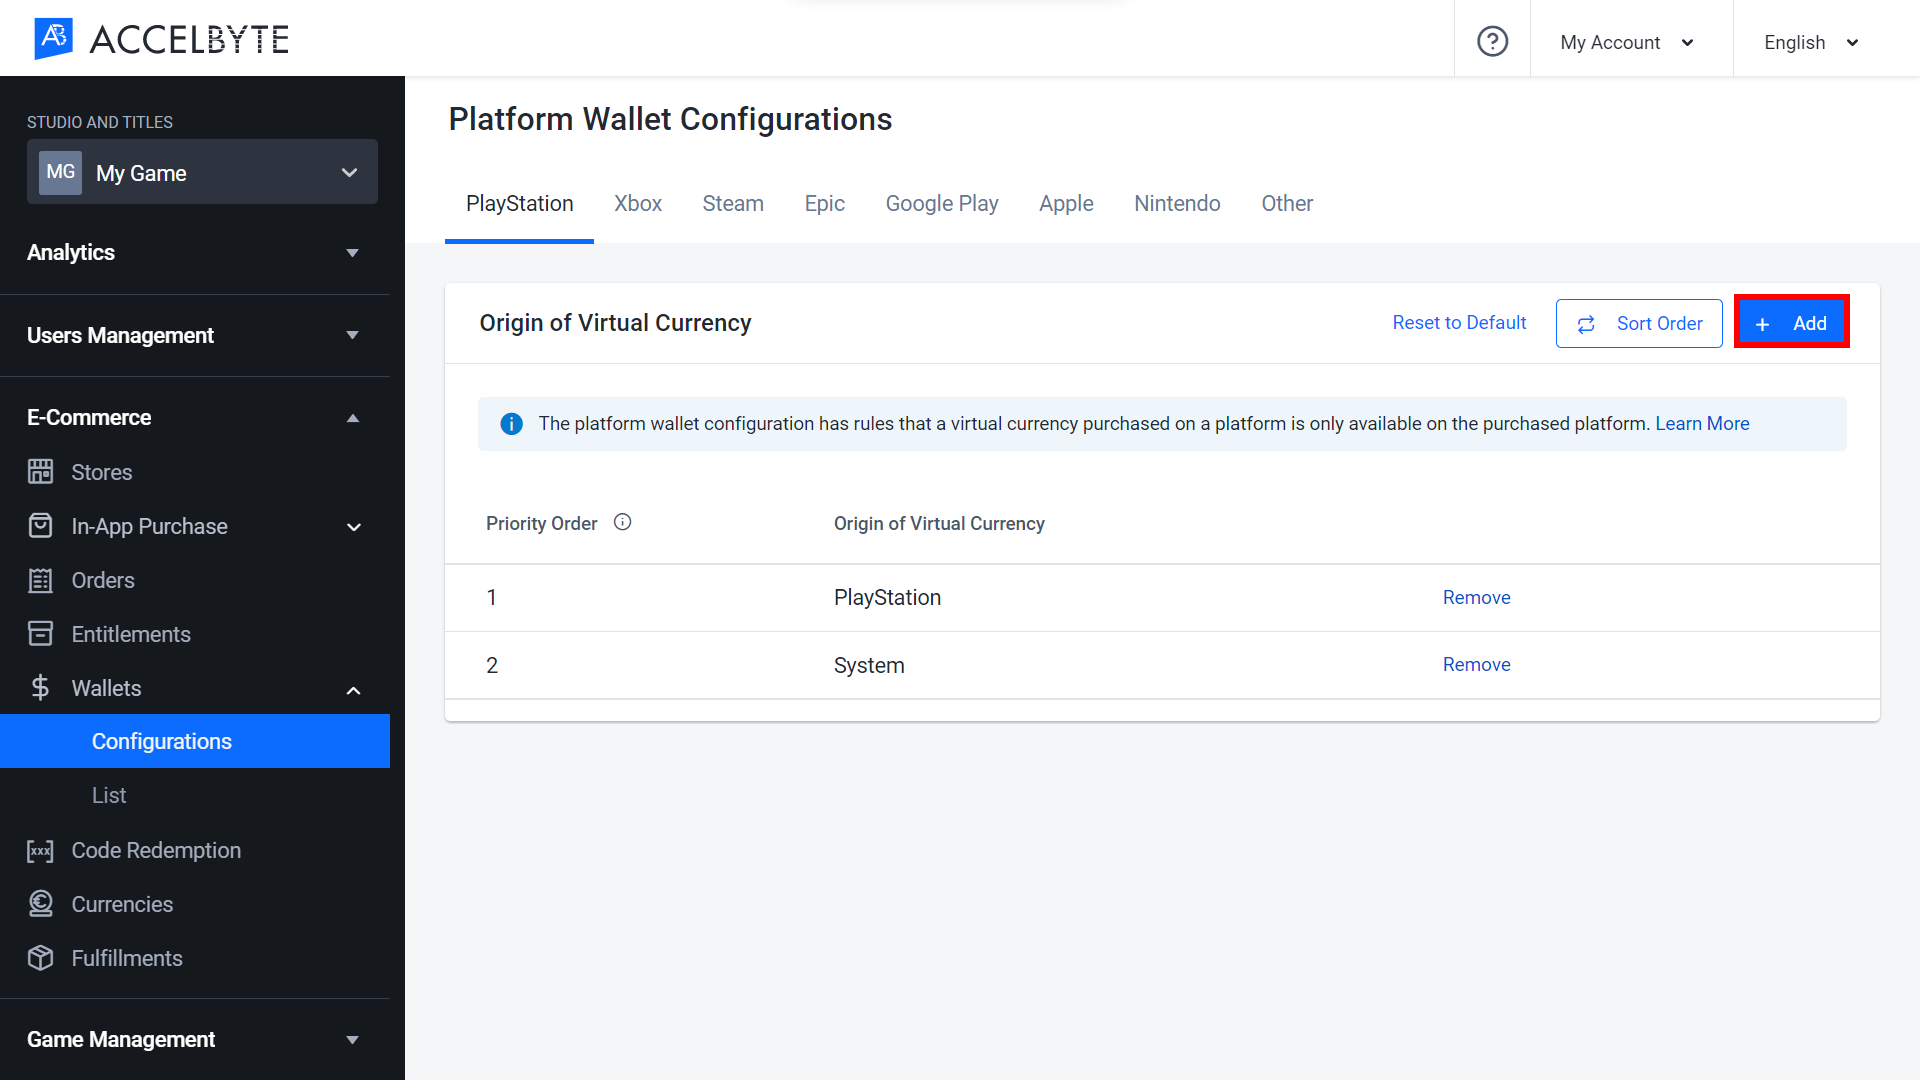
The Add Origin of Virtual Currency form will appear. Choose the origin of virtual currency you want to add from the dropdown.
Sort Payment Rule
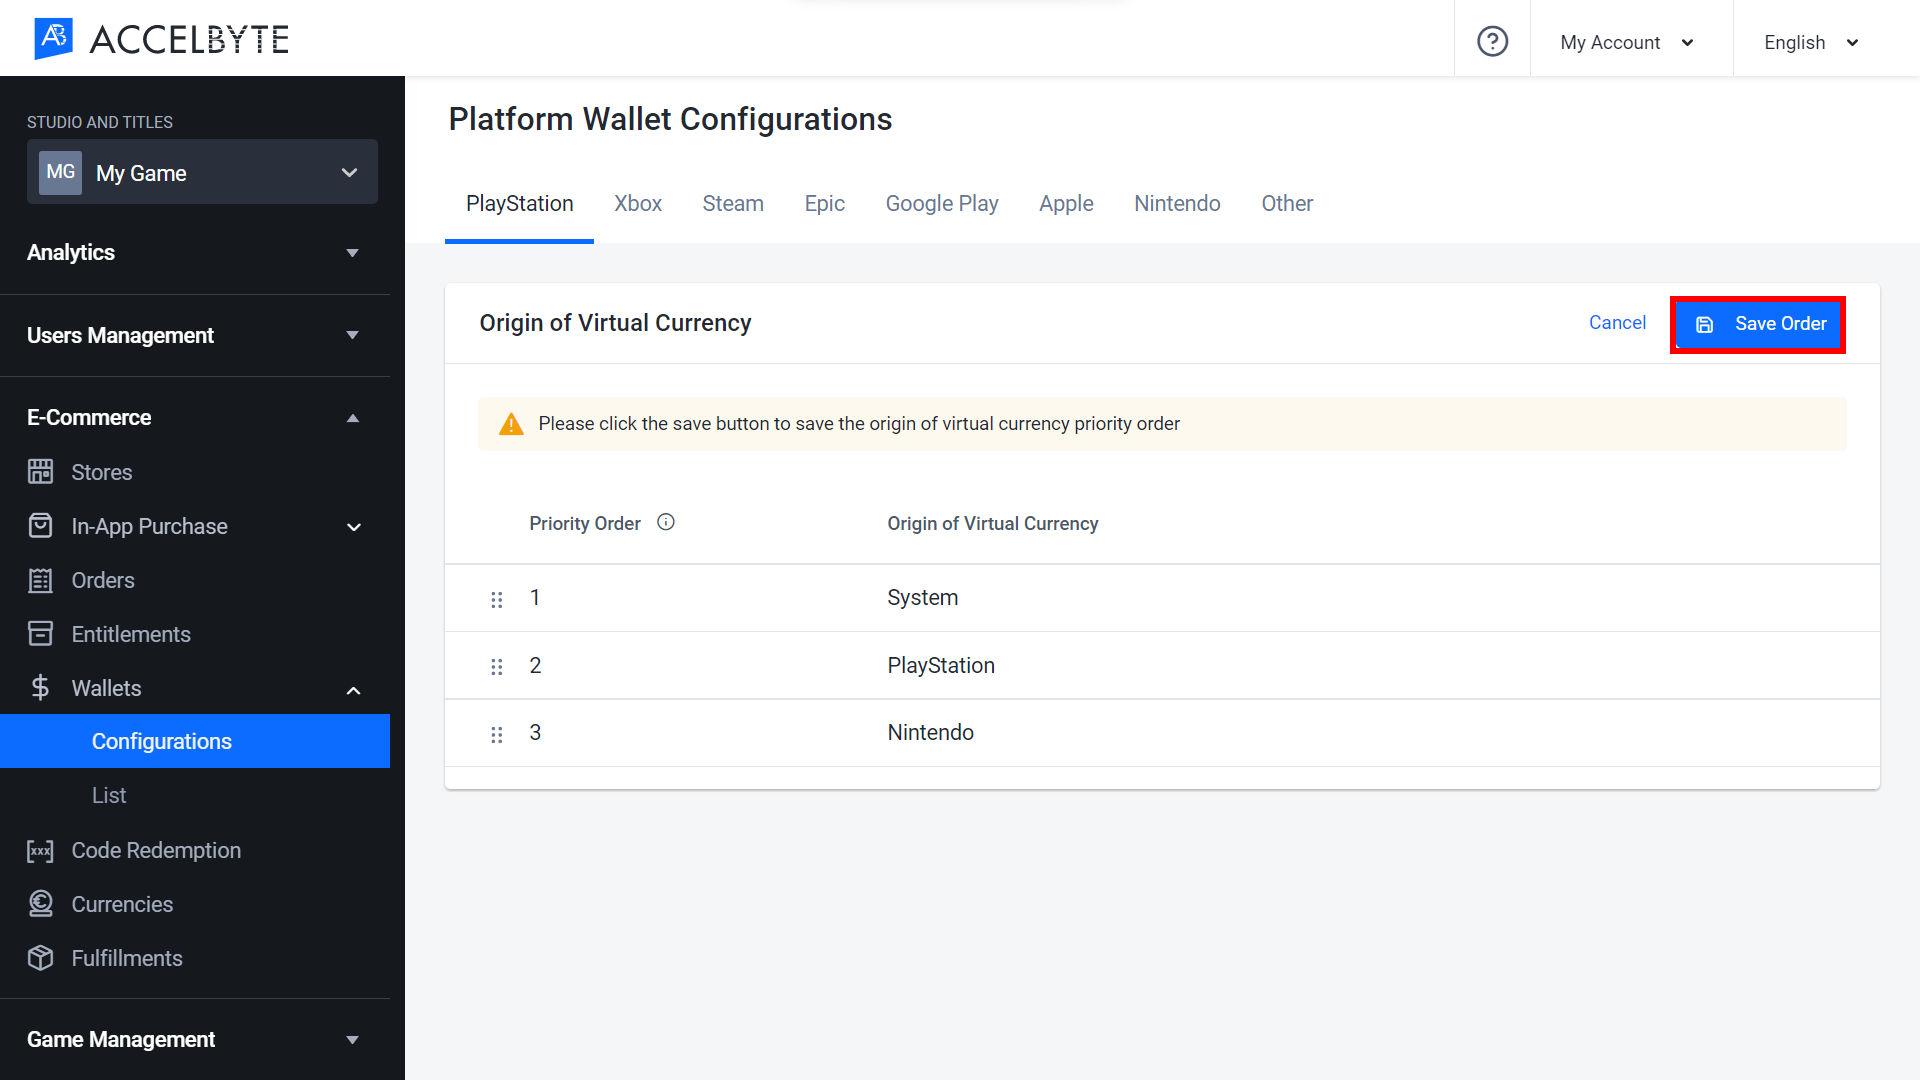
In the Admin Portal, expand the E-Commerce section, expand Wallets, and click Configurations. Open your selected platform from the tabs at the top of the page.
Click the Sort Order button, then click and drag each source to adjust its priority. The higher the source, the higher its priority (e.g., Priority Order 1 is higher than Priority Order 2, etc.). Once completed, click the Save Order button to commit your changes.
Managing Wallets in the Admin Portal
You can view a player’s transaction history, credit, and debit for each of their wallets in the Admin Portal.
View a Player’s Wallet Details
In the Admin Portal, go to the E-Commerce section, expand Wallets, and click List.
Select the appropriate search filter from the dropdown menu, depending on what player account information you have on hand. You can search by Email or User ID. Input this information into the search bar and click Enter to search.
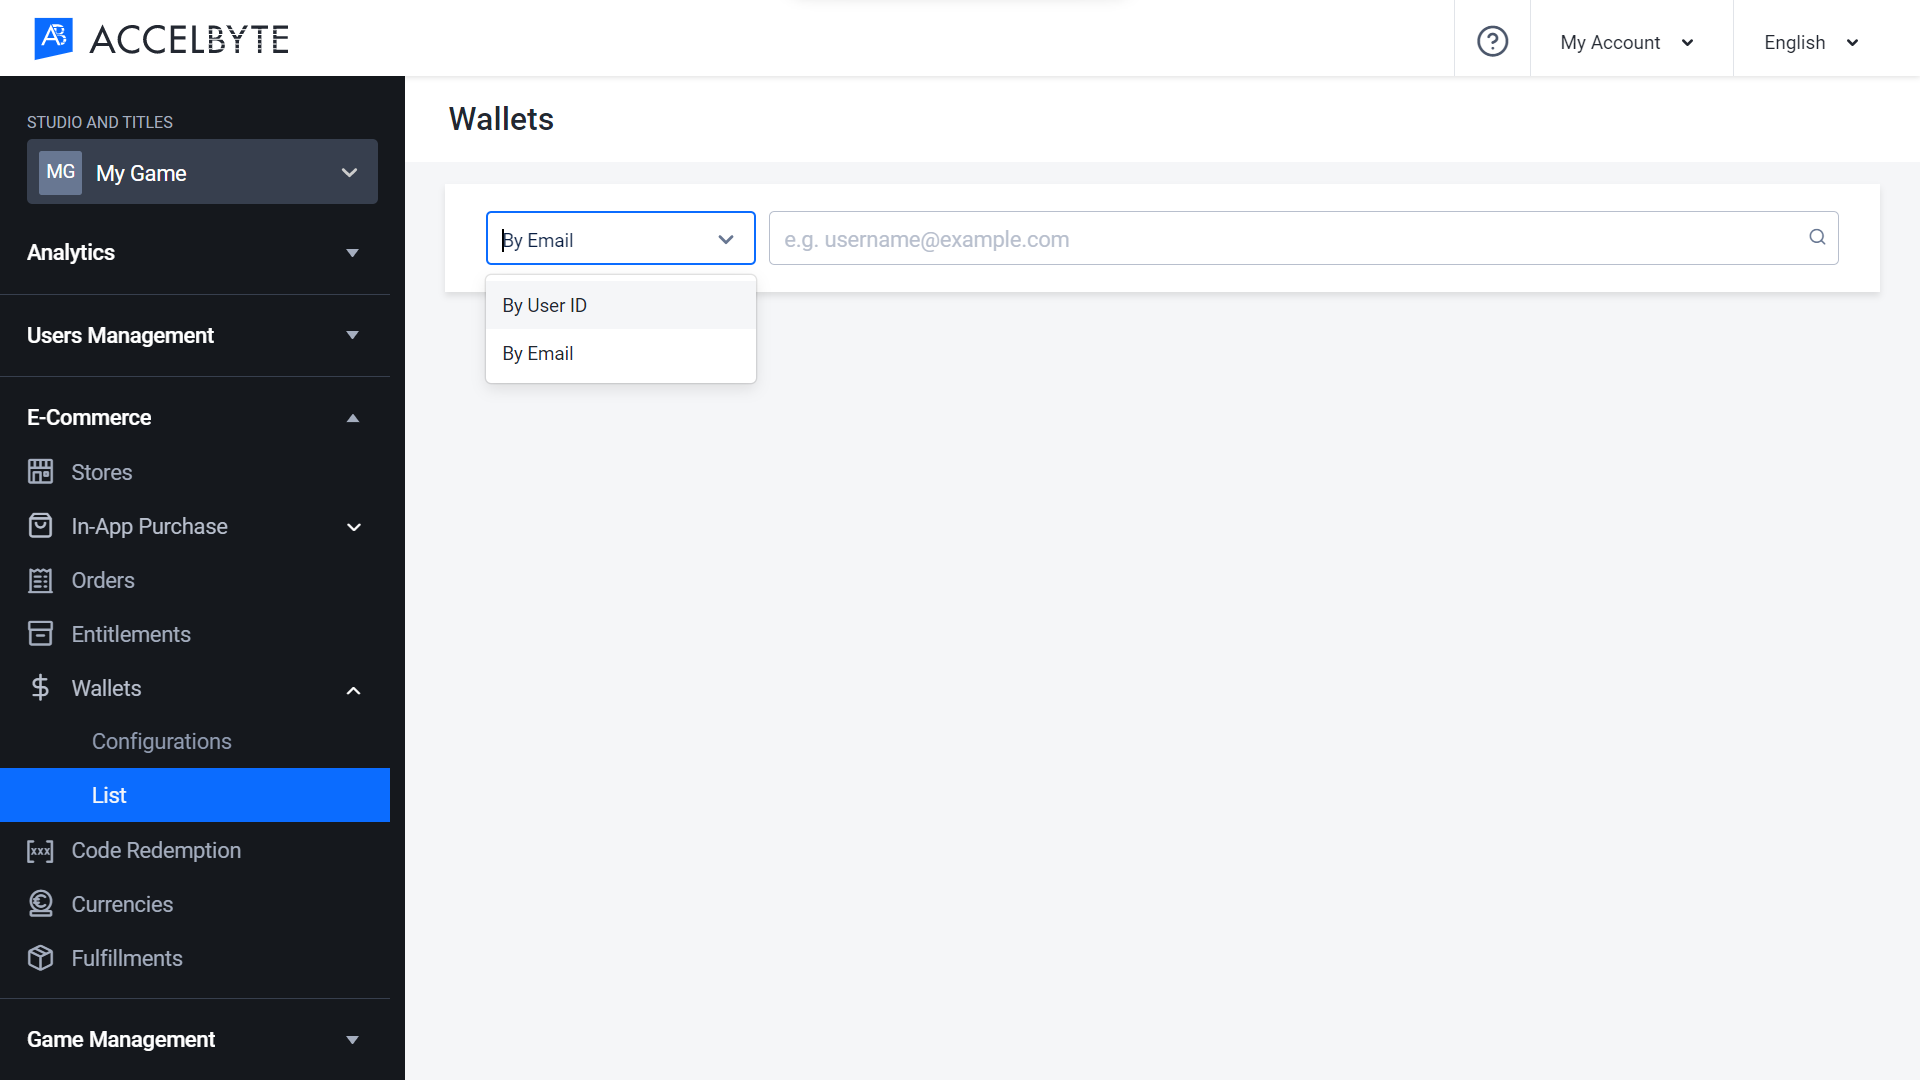
The search results will include a list of the wallets owned by the target player.
Select a wallet to view the list of the virtual currency origins available.
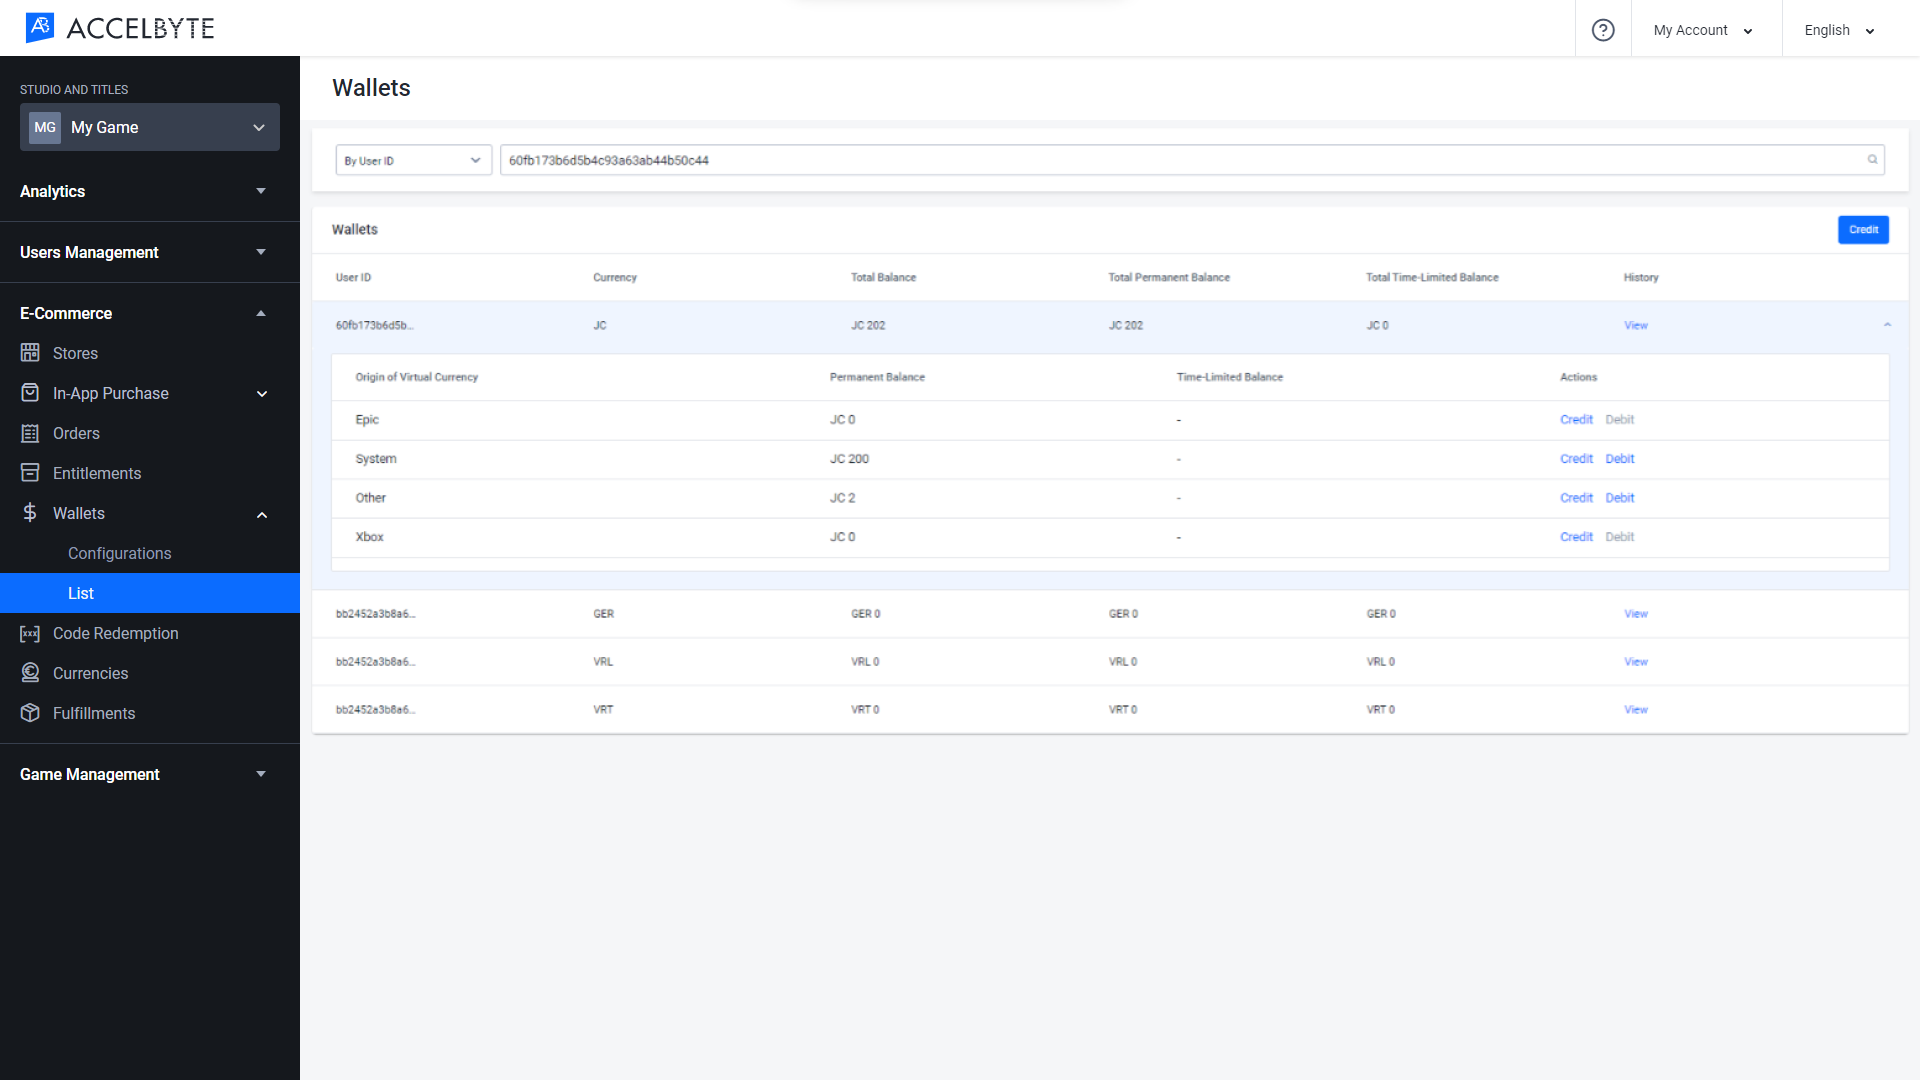
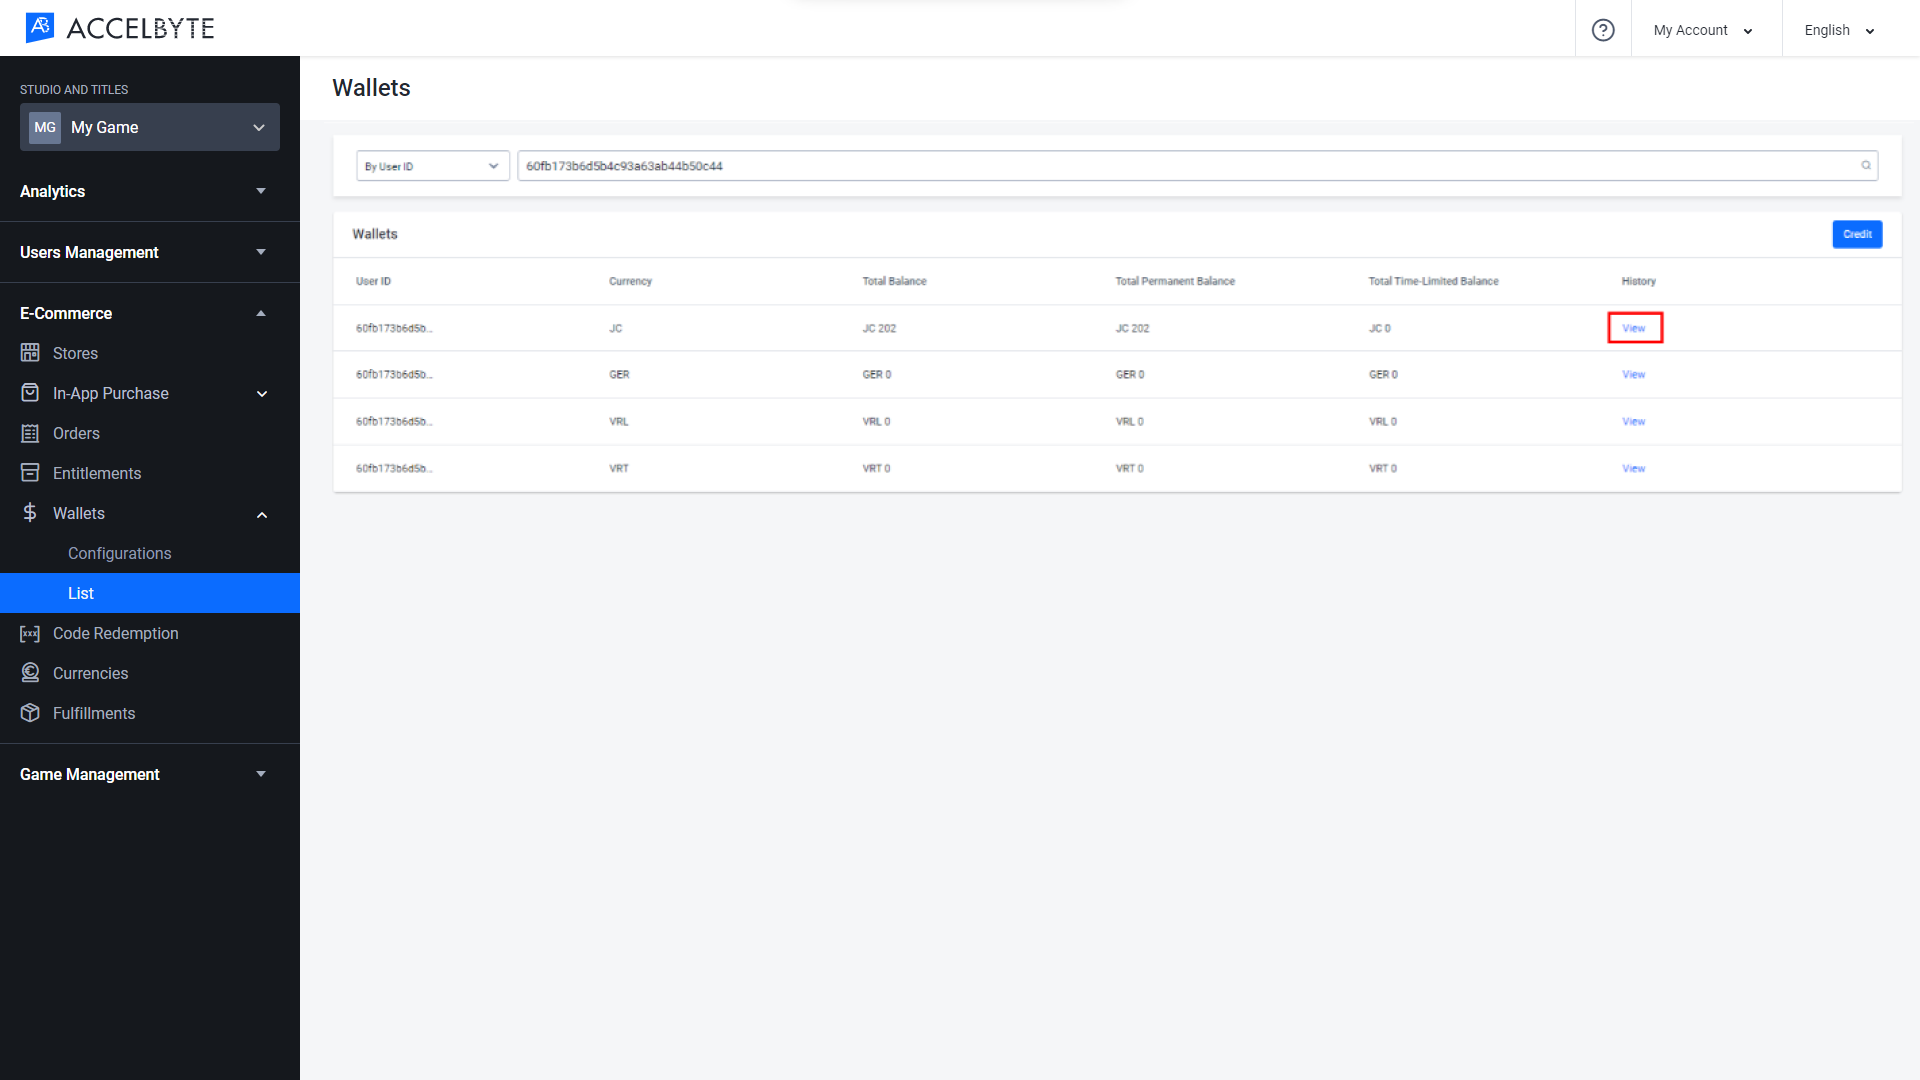
You can view the transaction history of the selected wallet. by clicking View in the History column on the right-hand side. The history is listed in descending order with the most recent transactions at the top.
 NOTE
NOTEYou can also search for a player's wallet on the Users page in the Users Management section of the Admin Portal.
Credit a Player’s Wallet
In the Admin Portal, go to the E-Commerce section, expand Wallets, and click List.
Select the search filter from the dropdown menu in the Search panel that corresponds to the player’s account information that you have on hand. Input that information in the search bar and click Enter to search.

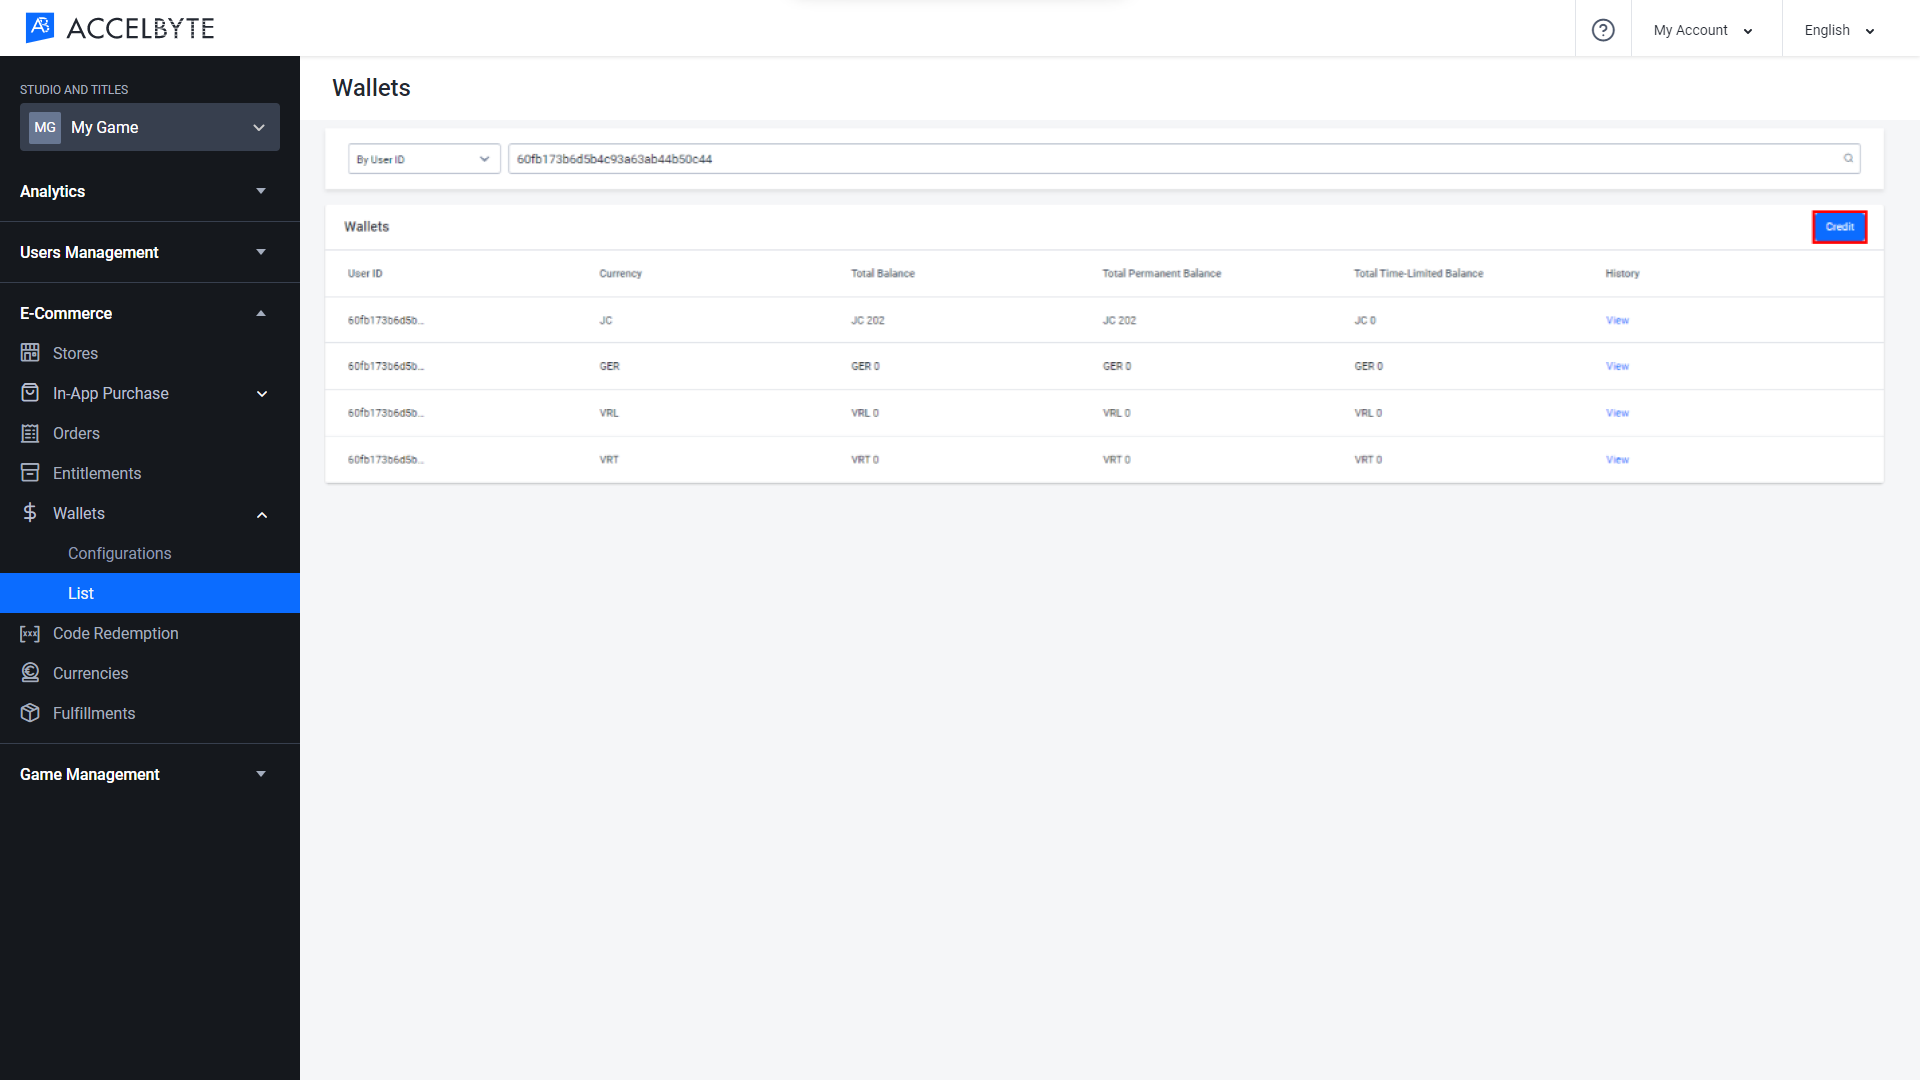
The results of your search will appear with a list of currencies in the wallet of the selected player. Click the Credit button.
The Credit Wallet form will appear. Input the following information:
Select the wallet of the specific currency you want to credit from the Currency field.
Input the amount you want to credit to the Credit field.
Select the source of the credit from the Source dropdown menu. This is a memo field to help you keep track of where credits originated. The options are as follows:
- Purchase: Credit from player purchase of virtual currency
- Promotion: Credit from promotional giveaway
- Achievement: Credit from the player earning an achievement
- Referral_Bonus: Credit from a referral bonus
- Redeem_Code: Credit from a redemption code
- Other: Any other source of credit
Select the Origin of Virtual Currency from the dropdown.
Define the time when the credit will expire using the Expired At field. This field is optional. If left blank, the credit will be a Permanent Balance.
Type the reason for the credit in the Reason field.
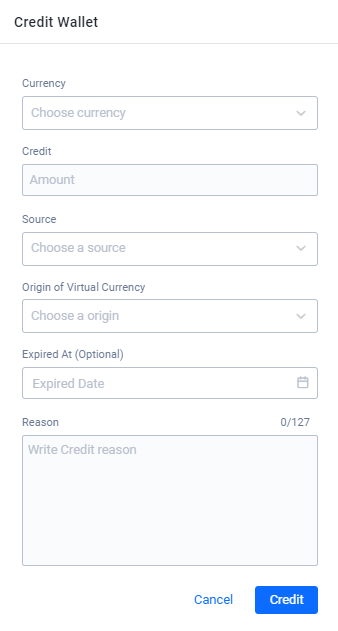
Once completed, click the Credit button. The credit will be granted to the selected wallet.
Credit a Player’s Sub-wallet
You can also credit a specific sub-wallet by clicking Credit on the selected sub-wallet under the Actions column on the Wallets page.
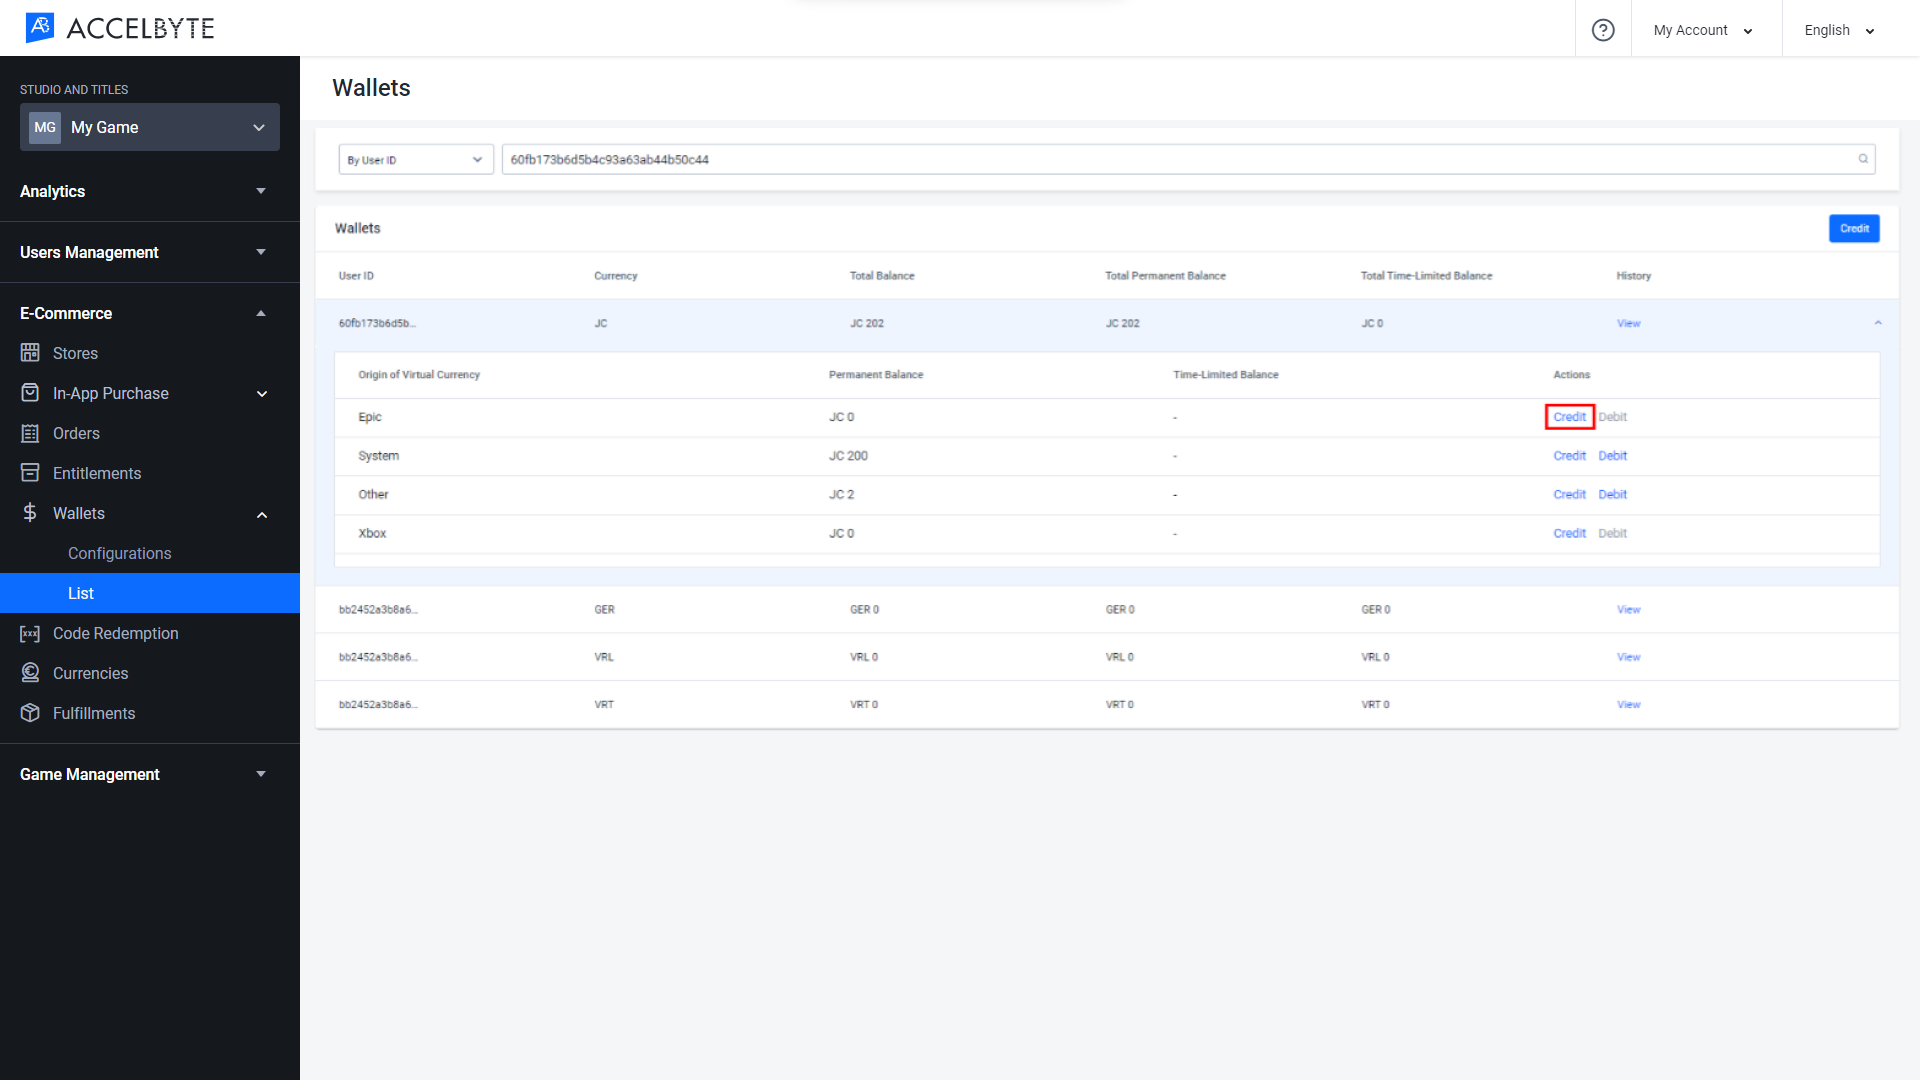
The Credit Wallet form will appear. Input the following information:
Input the amount you want to credit to the Credit field.
Select the source of the credit from the Source dropdown menu. This is a memo field to help you keep track of where credits originated. The options are as follows:
- Purchase: Credit from player purchase of virtual currency
- Promotion: Credit from promotional giveaway
- Achievement: Credit from the player earning an achievement
- Referral_Bonus: Credit from a referral bonus
- Redeem_Code: Credit from a redemption code
- Other: Any other source of credit
Define the time when the credit will expire using the Expired At field. This field is optional. If left blank, the credit will be a Permanent Balance.
Type the reason for the credit in the Reason field.
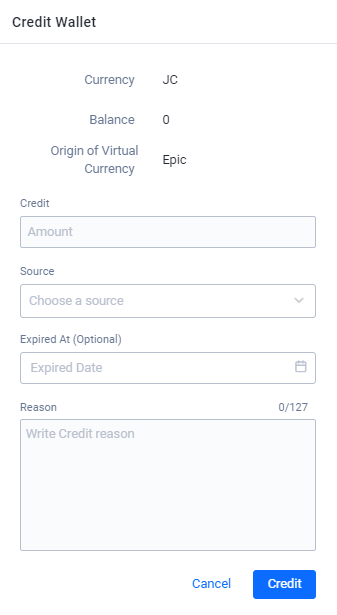
Once completed, click the Credit button. The credit will be granted to the selected sub-wallet.
Debit a Player’s Sub-wallet
In the Admin Portal, expand the E-Commerce section, expand Wallet, and click List.
Select the appropriate search filter from the dropdown menu, depending on what player account information you have on hand. You can search by Email or User ID. Input this information into the search bar and click Enter to search.

The search results will include a list of the wallets owned by the target player. Select the desired sub-wallet and click Debit under the Actions column on the right-hand side.
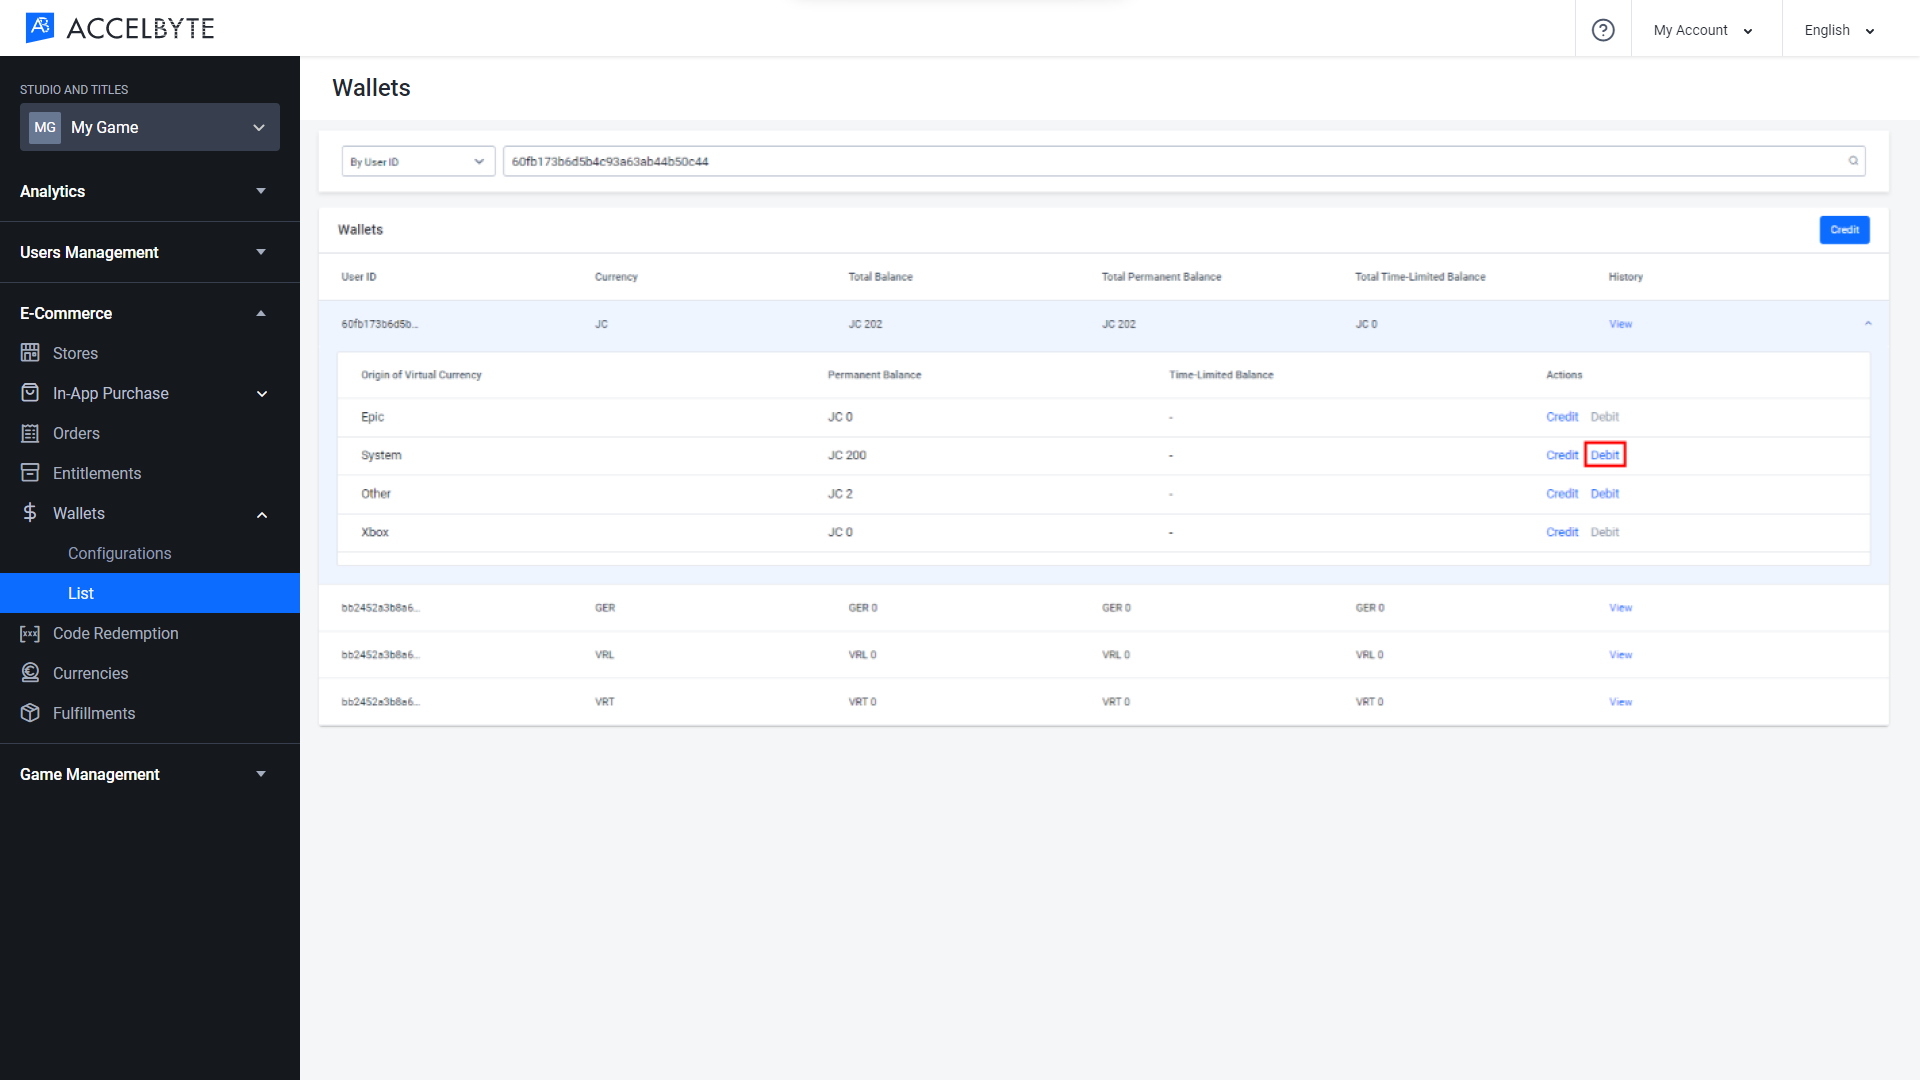
The Debit Wallet form will appear. Input the following information:
- Input the amount you want to debit from the player’s wallet in the Amount field.
- Type the reason for the debit in the Reason field.
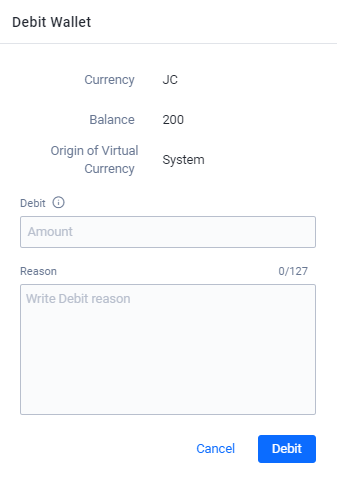
Once completed, click the Debit button. The debit will be subtracted from the selected sub-wallet.
Implementing Wallets Using the Client SDKs
Our SDK can also be used to allow a game client to retrieve wallet data.
Get Wallet Data
We now support multi-platform wallets.
You can call GetWalletInfoByCurrencyCodeV2 to retrieve a wallet’s transaction data based on the
currency it uses. The CurrencyCode parameter determines the currency that will be retrieved.
- Unreal Engine
- Unity
FString CurrencyCode = TEXT("SampleCurrencyCode");
FRegistry::Wallet.GetWalletInfoByCurrencyCodeV2(CurrencyCode,
   THandler<FAccelByteModelsWalletInfoResponse>::CreateLambda([&](const FAccelByteModelsWalletInfoResponse& Result)
   {
      UE_LOG(LogTemp, Log, TEXT("    Success"));
   }), FErrorHandler::CreateLambda([](int32 ErrorCode, const FString& ErrorMessage){
      UE_LOG(LogTemp, Log, TEXT("    Error %d: %s"), ErrorCode, *ErrorMessage);
   }));
string currencyCode = "sample-currency-code";
                AccelBytePlugin.GetWallet().GetWalletInfoByCurrencyCodeV2(
                    currencyCode,
                    result => {
                        if (result.IsError)
                        {
                            Debug.Log($"Failed : {result.Error.Message}, code: {result.Error.Code}");
                        }
                        else
                        {
                            Debug.Log("Success ");
                        }
                    });