E-Commerce
Overview
AccelByte Gaming Services (AGS) Starter E-Commerce service provides store management, allowing you to manage your store, in-game items, or add-ons, and sort these items into categories. E-Commerce service includes several features, such as:
- Item localization which lets you display different names and descriptions of your items for sale in different countries.
- Item regional data which allows items to have different currencies and prices for sale in different countries.
- Item bundling which allows you to sell items in groups for a lower price than if those items were purchased separately.
- Store isolation which allows for only one store to be published online at any time. If you want to make changes to your store, you can ensure those changes work as intended in your draft store before publishing, which reduces the chance of errors occurring.
- Store cloning which lets you create an exact copy of your store in its environment, for easy editing.
- Store import/export which lets you import a store from or export a store to a different environment as a .JSON file. If your store is working well in your development environment, you can export it as a .JSON file and import it to your production environment without having to recreate it.
- Image and item tags which can be created and assigned to images or items to determine where those objects will appear. For example, you can create a banner tag and define where banner images are displayed, and every banner image will behave the same way on its own page. Item tags are used to select which games or items for sale are featured on the main page of your store. Up to six objects can be featured.
- Purchase limitations which let you limit how many times a player can purchase a particular item.
Item Type
There are several item types you can use:
- In-Game : A durable or consumable item used by players in-game.
- Bundle : A package containing one or more items from your store combined into a single purchasable item. You must create at least two items before you can make a bundle.
- Coin : Credit that can be used to top up a player’s virtual currency wallet.
- Media : Items such as music, exclusive art, etc.
- Season : A limited-time-only event that uses passes and tiers to engage participating players. You can only create this type of item in a game namespace. For more information, see the Season Pass documentation.
- Option Box: Can be used as a reward that contains a collection of items. The player can choose one item from the option box as a reward.
- Extension: Can be used with custom services to allow players to purchase and fulfill custom items.
This feature can currently only be created using APIs.
Manage E-Commerce in the Admin Portal
Create a Store
In the desired game title, expand the E-Commerce section and click the Stores menu.
In the Draft Store section, click the Create Draft Store button. You can only have one draft store.
infoYou can only have one draft store in the Admin Portal.
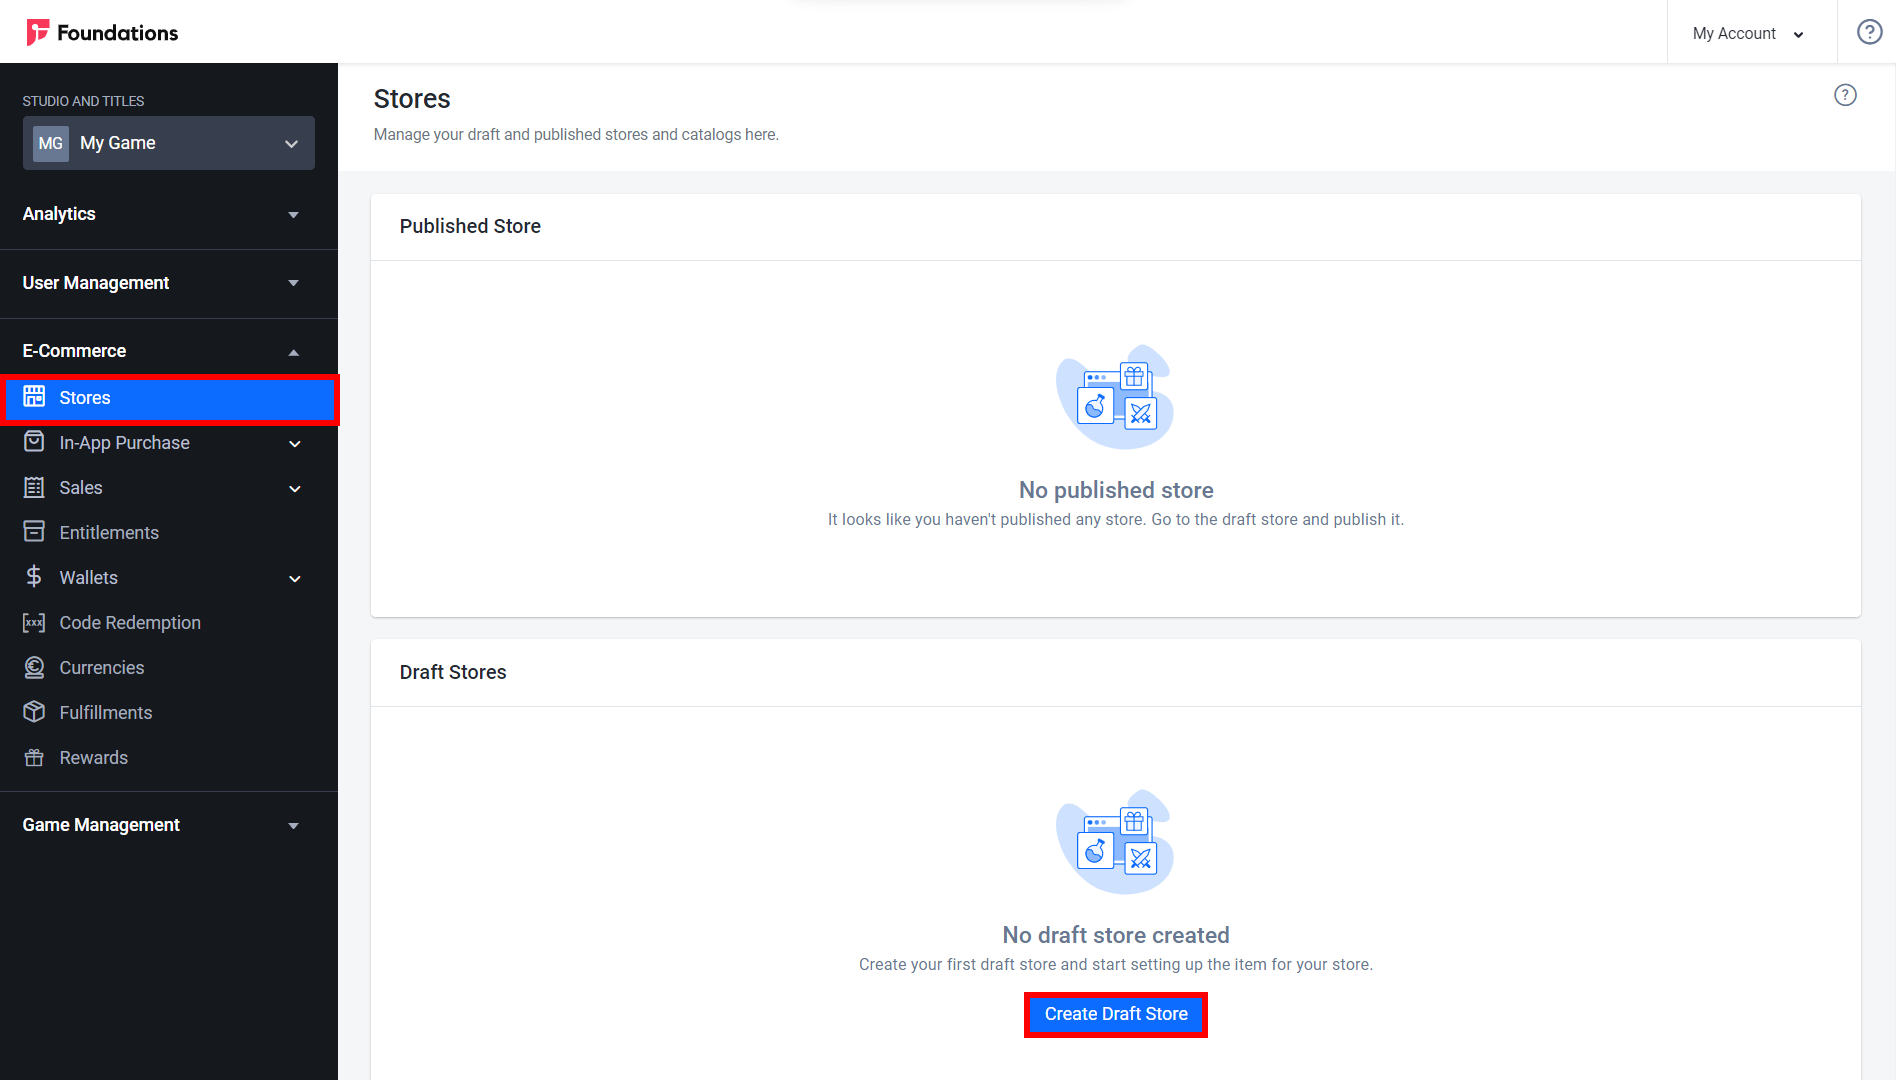
The Create Store form appears.
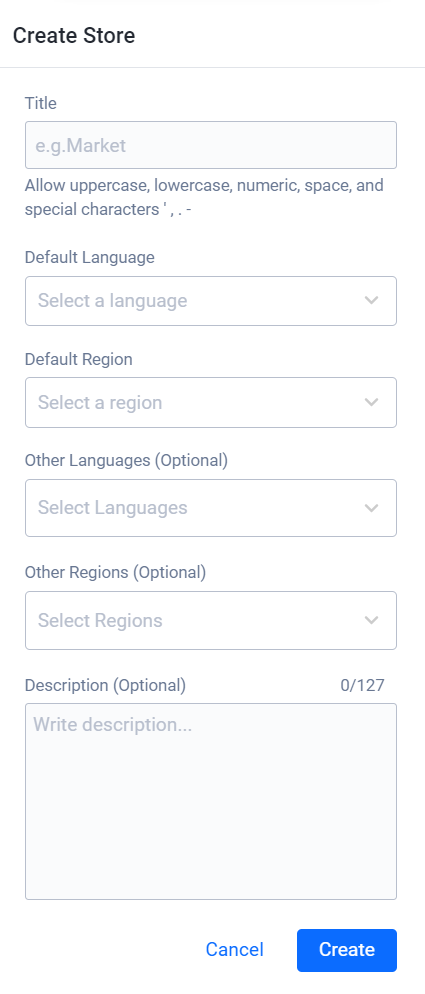
- Input your store Title.
- Select the Default Language.
- Select the Default Region.
- Select the Other Languages your store will support besides the default language, if desired.
- Select the Other Regions supported besides the default region, if desired.
- Input a Description for your store.
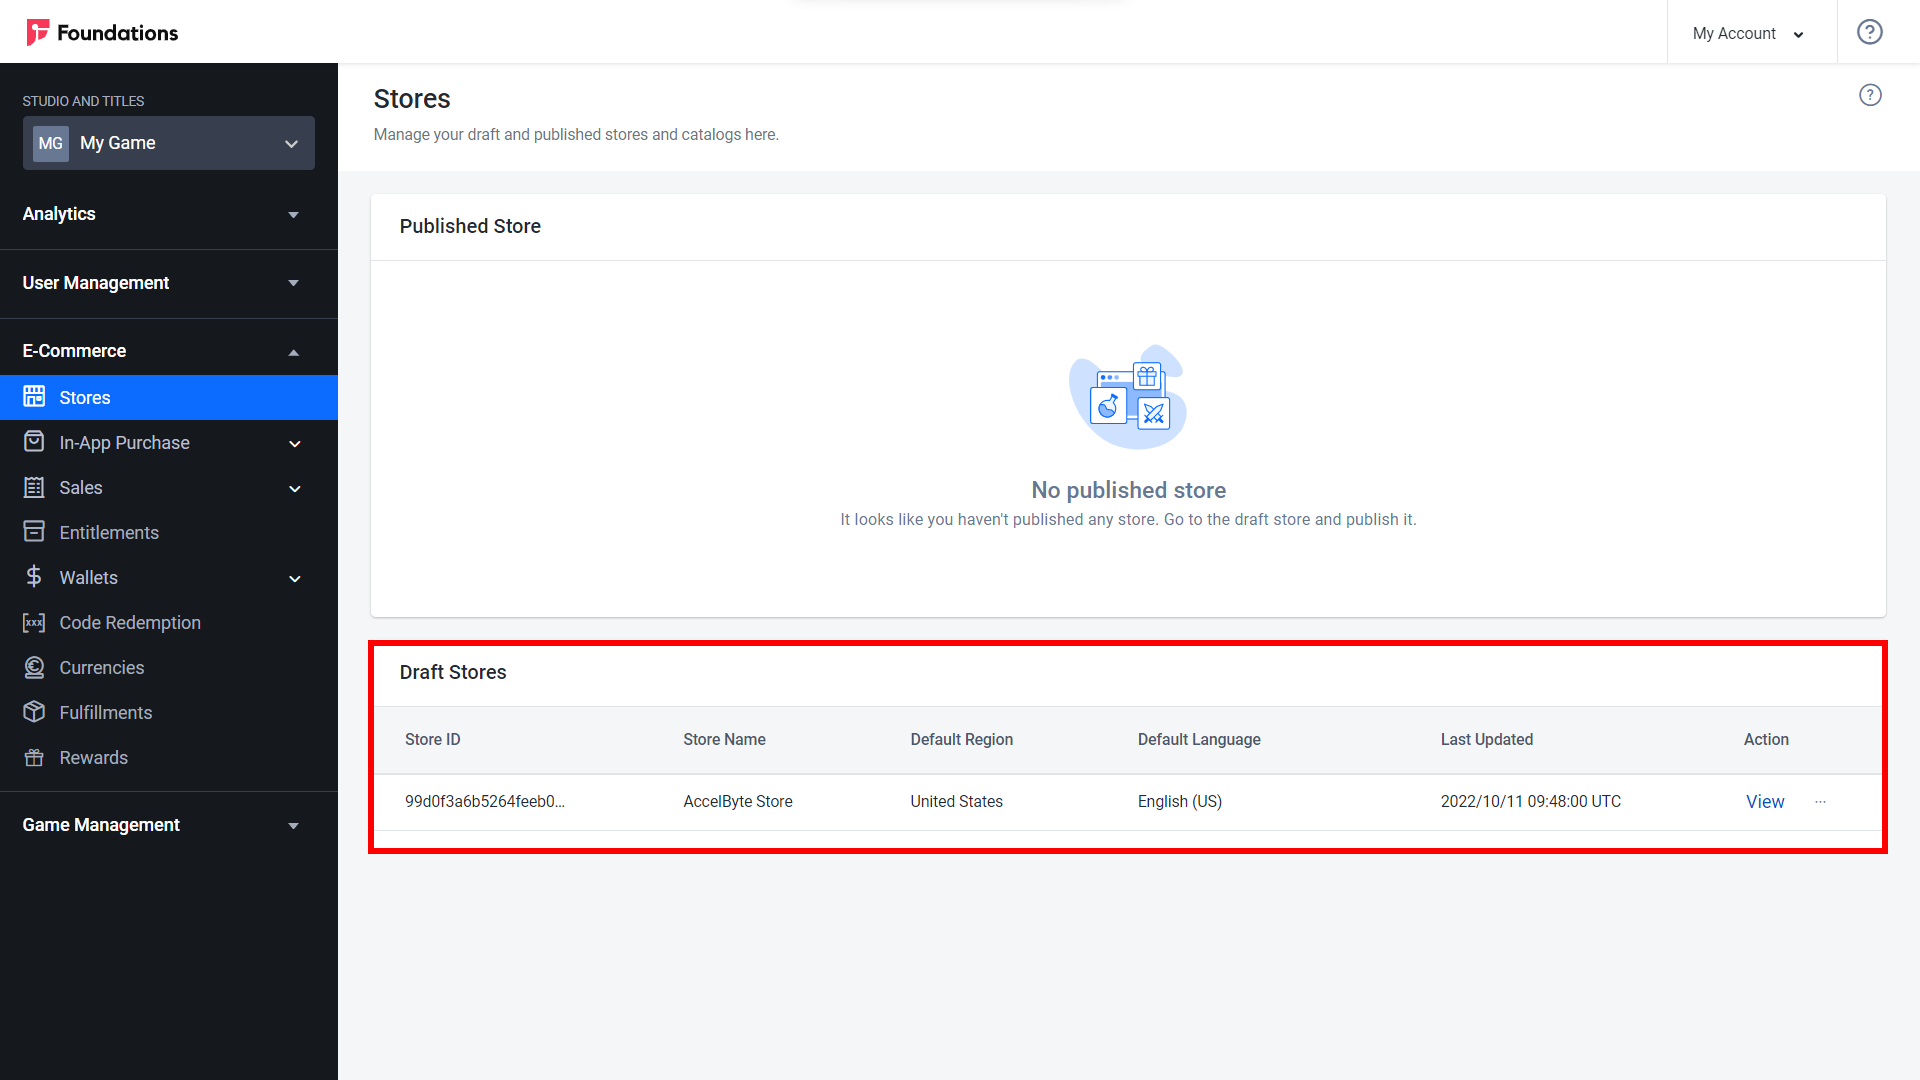
Once you have completed the form, click Create. The draft store appears on the Stores page.
Create a Category
In the Draft Stores section, click in the View under the Action column next to the store and select View.
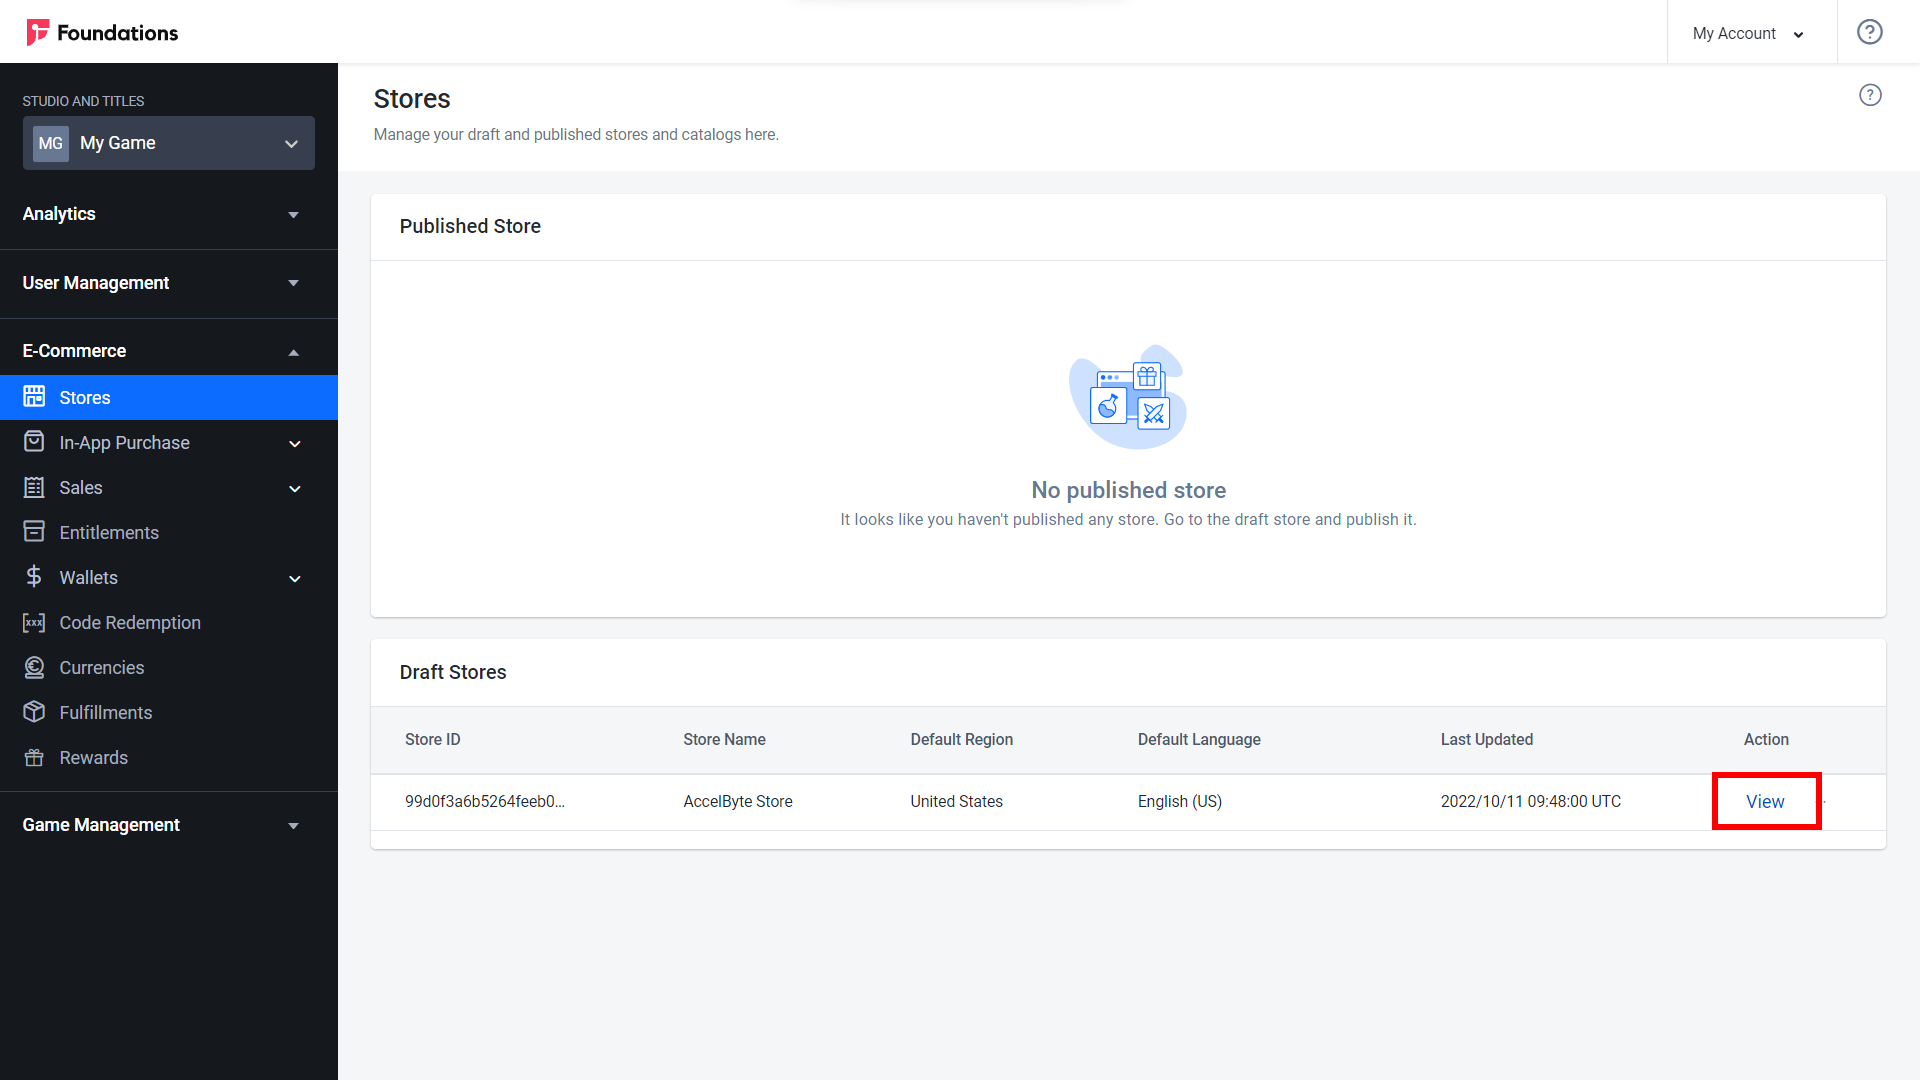
In your draft store, go to the Categories tab and click the Create Category button.
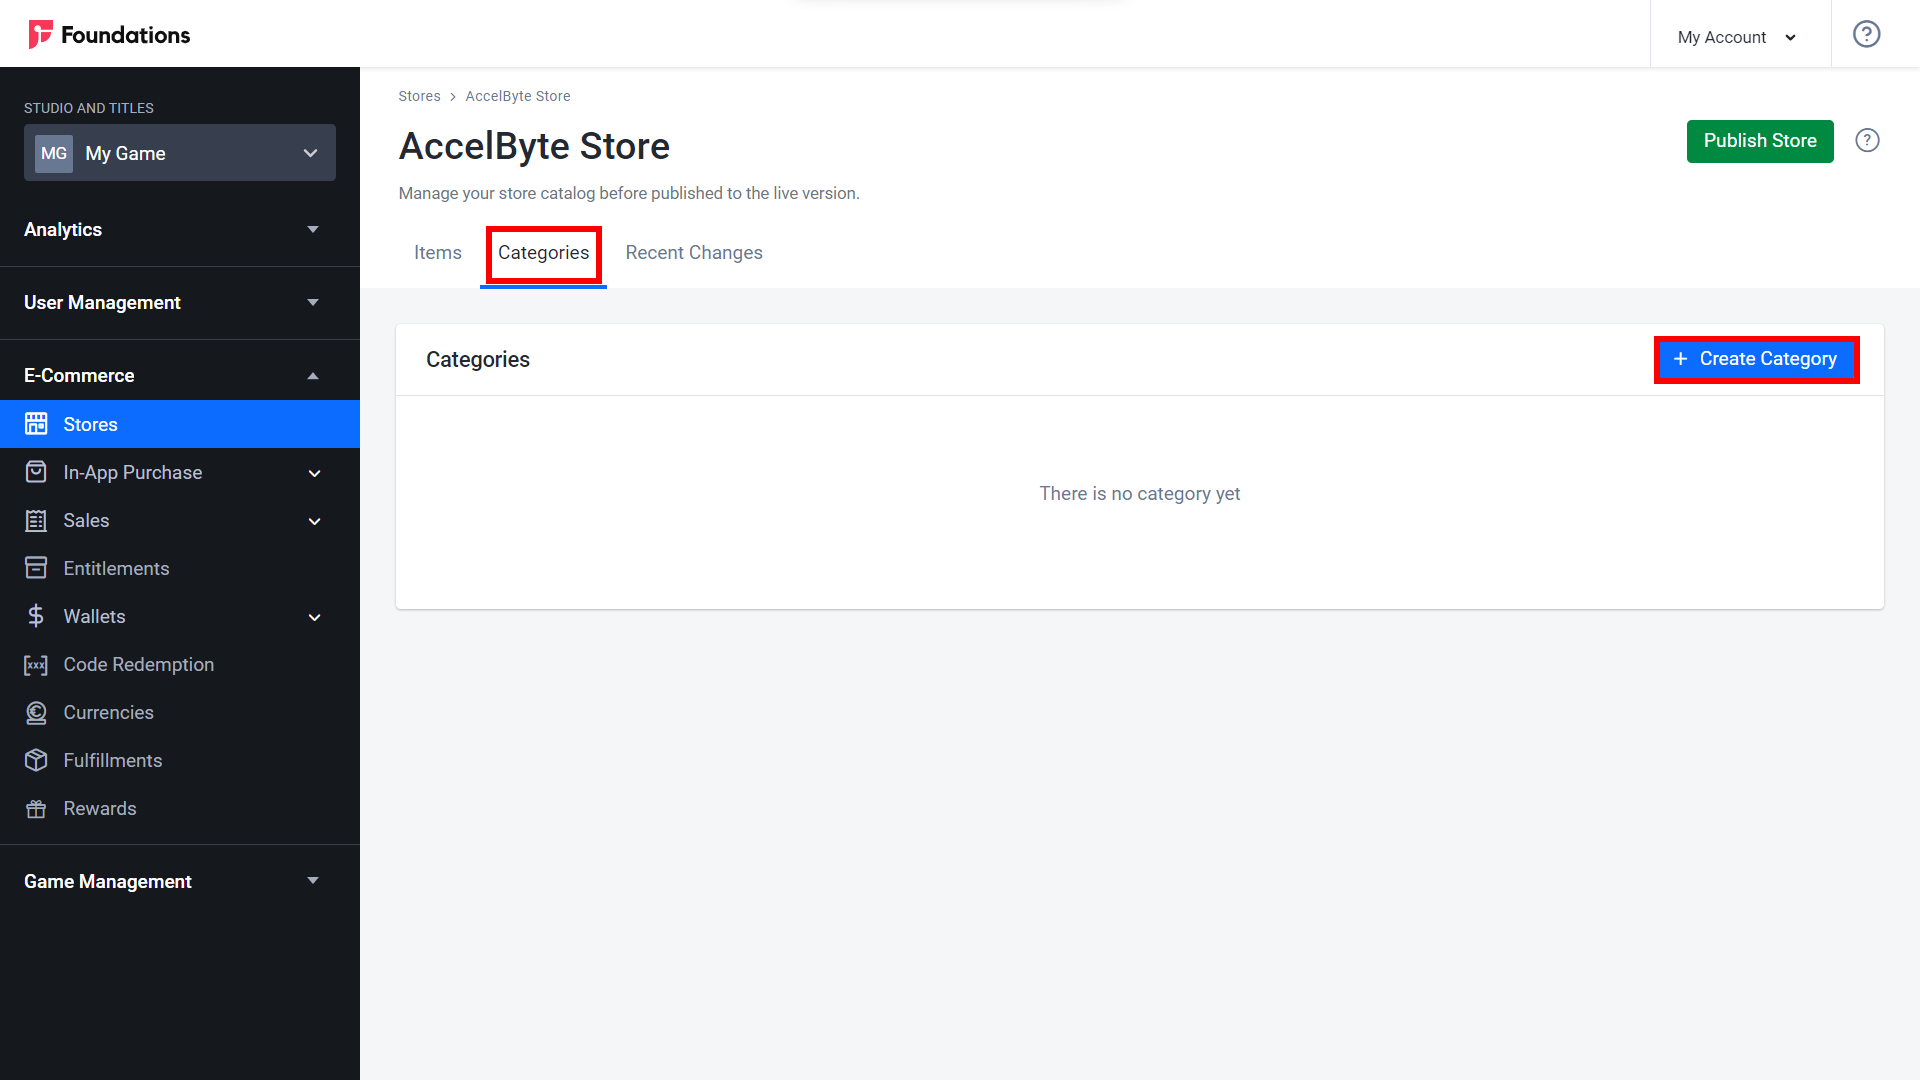
The Create Category form appears. Input the required information.
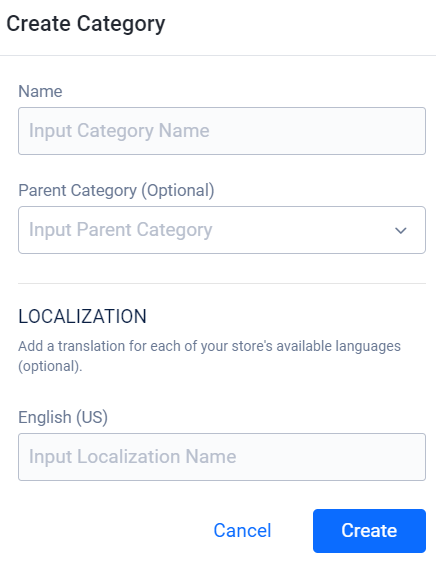
- Name: Type the category name. This name also serves as the item path. Add “/” before the item. Here are examples of categories you can use:
- /games for games in your store.
- /coins for virtual currency.
- /items for all in-game items. You can also separate in-game categories for every game in the store using subfolders, such as: /items/gameappId.
- Parent Category: Choose parent category from the dropdown if you want to make this category a sub-category of the parentpre-made category. For example: /items/equipment.
- Input the category name based on other languages and regions that have been registered in the Localization section.
- Name: Type the category name. This name also serves as the item path. Add “/” before the item. Here are examples of categories you can use:
Once you have completed the form, click Create. The new category is added to the list.
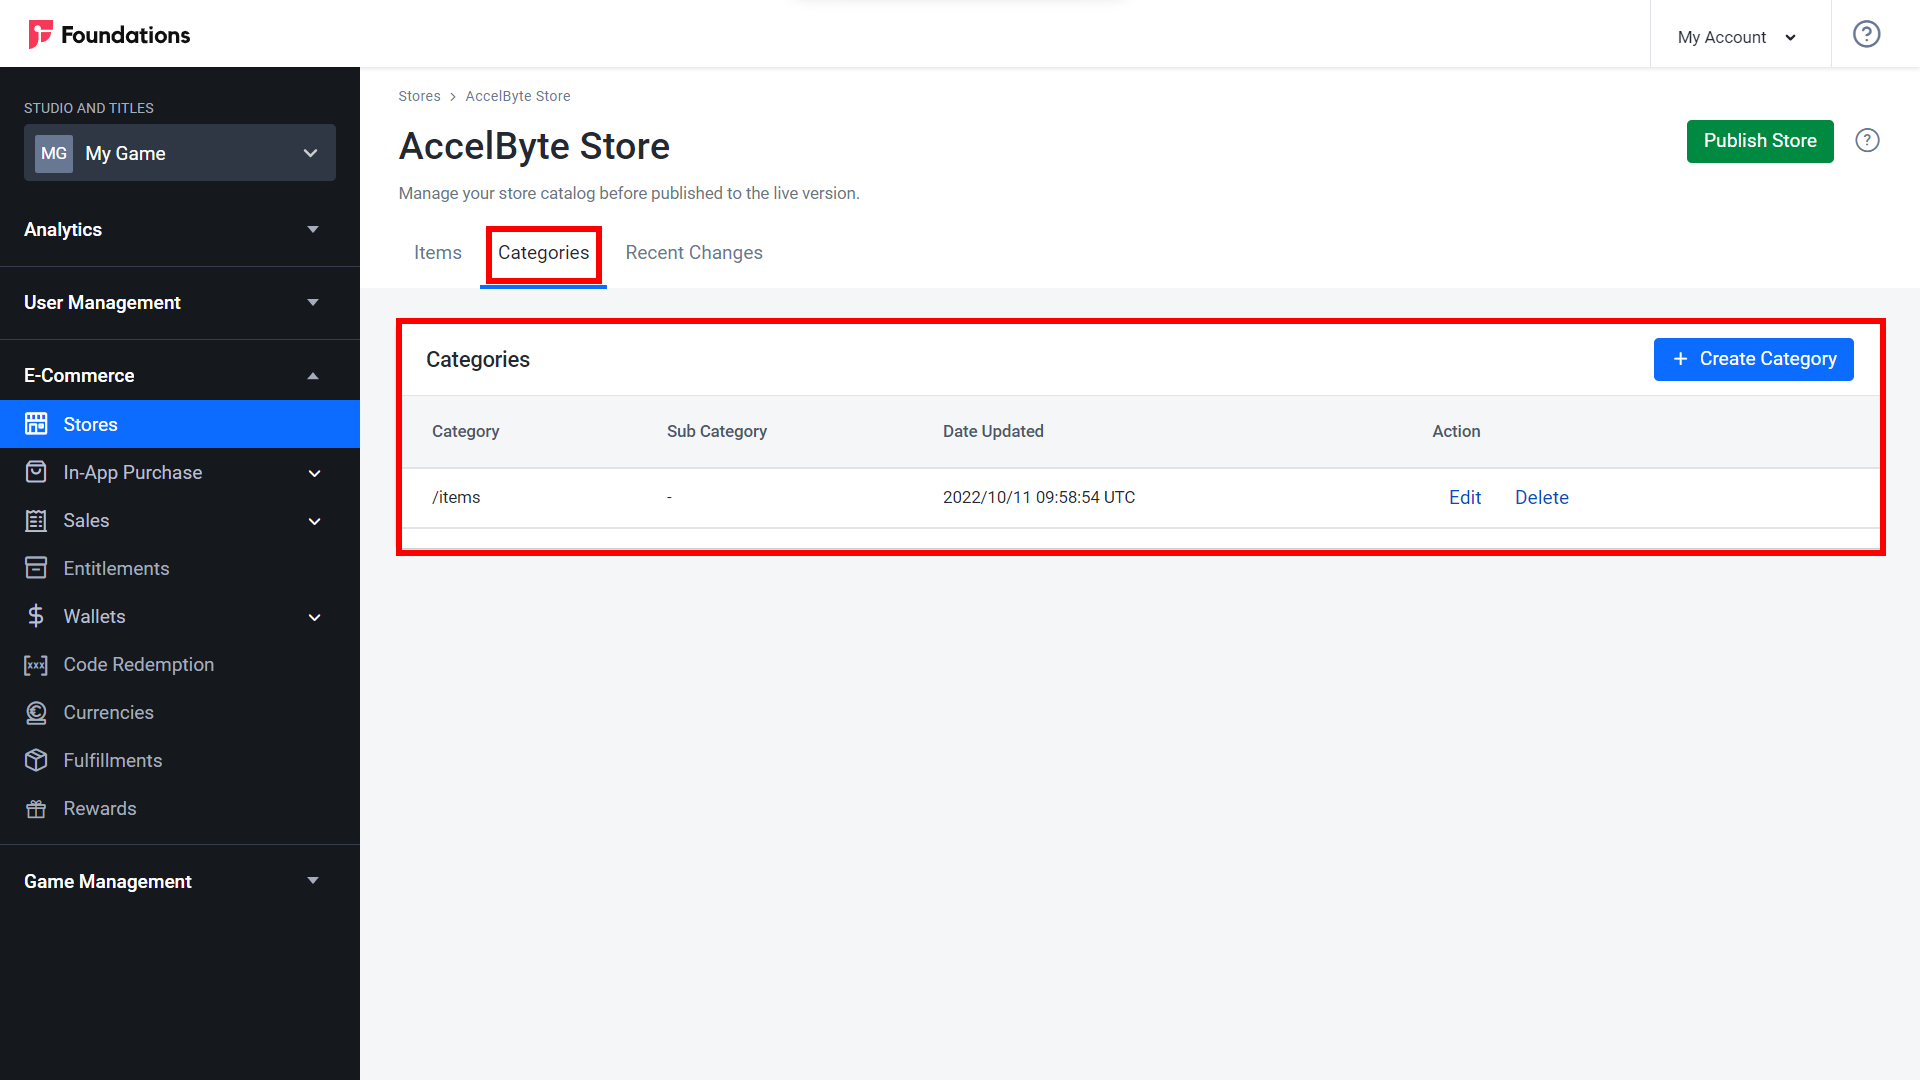
Create an Item in a Store
In the Draft Stores section, click in the View under the Action column next to the store and select View.

Go to the Items tab and click the Create Item button.
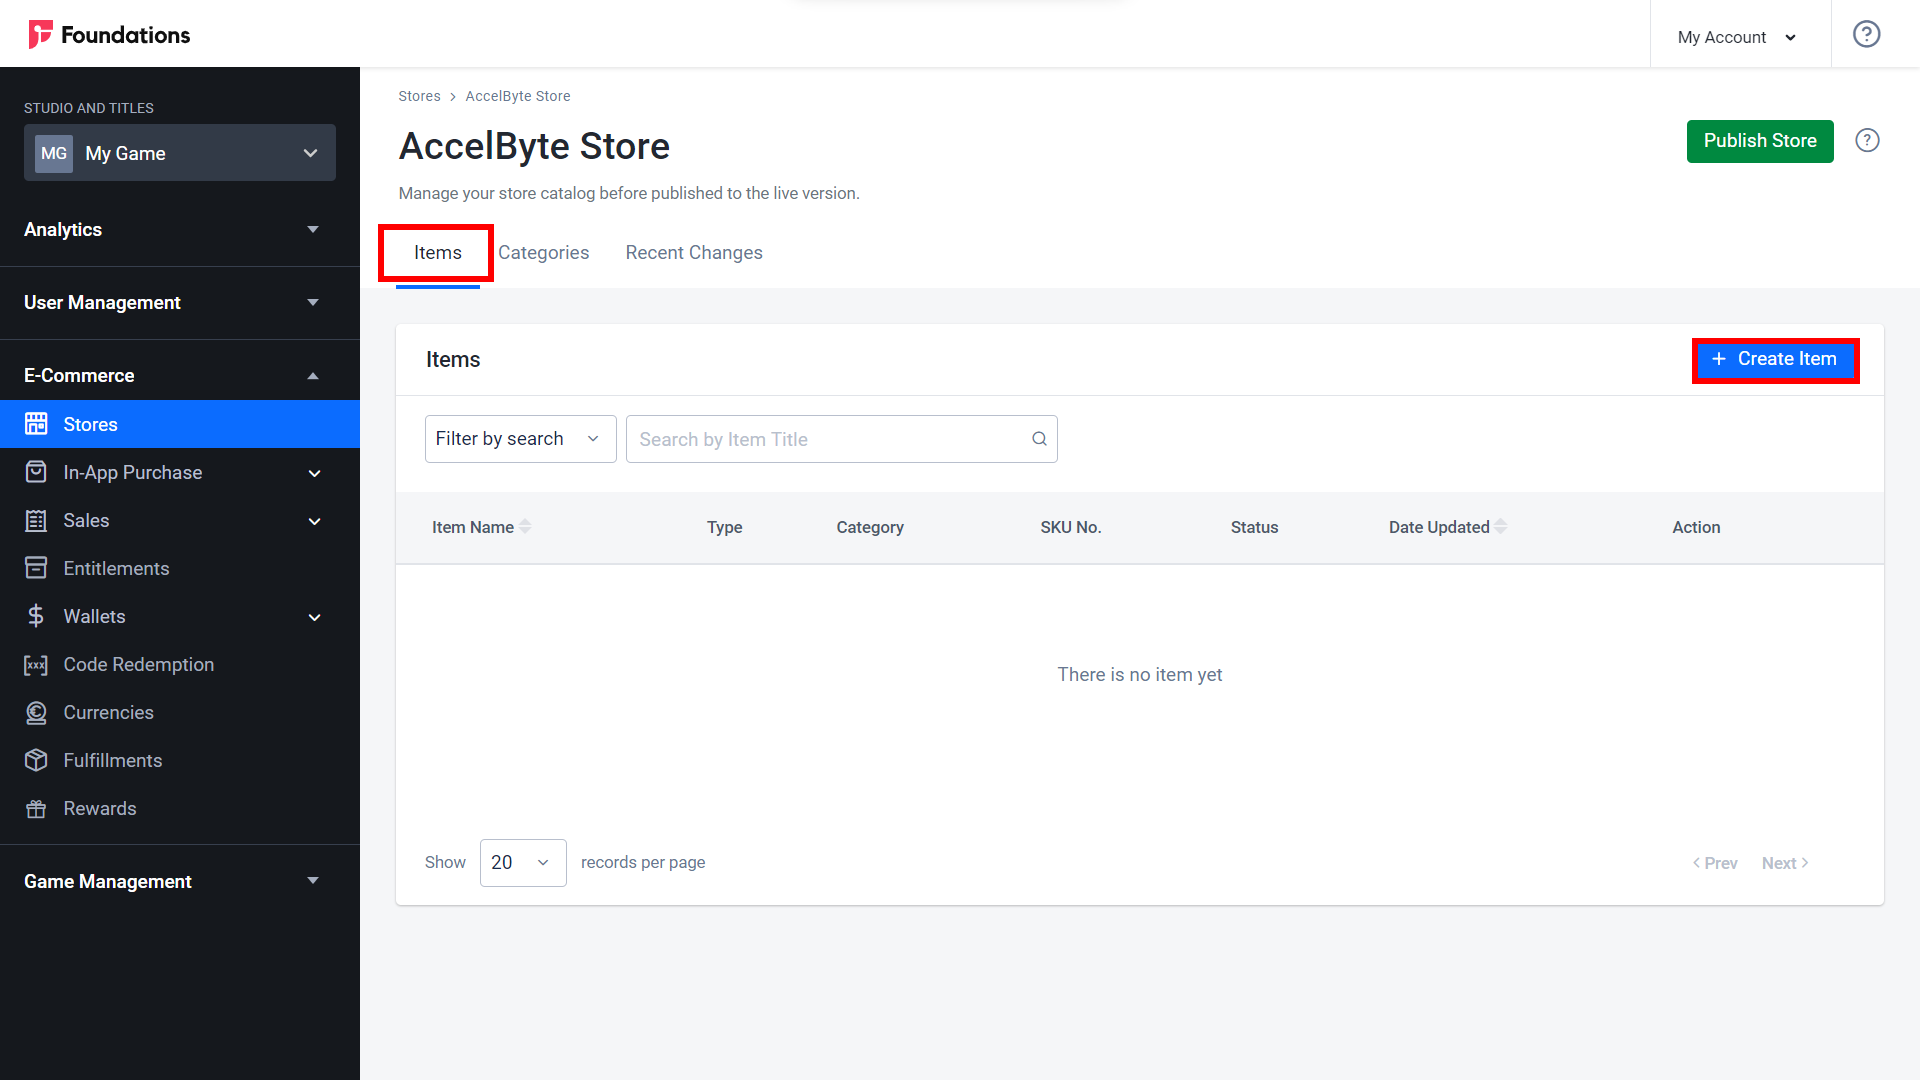
In the Basic Information page, select the intended item type.
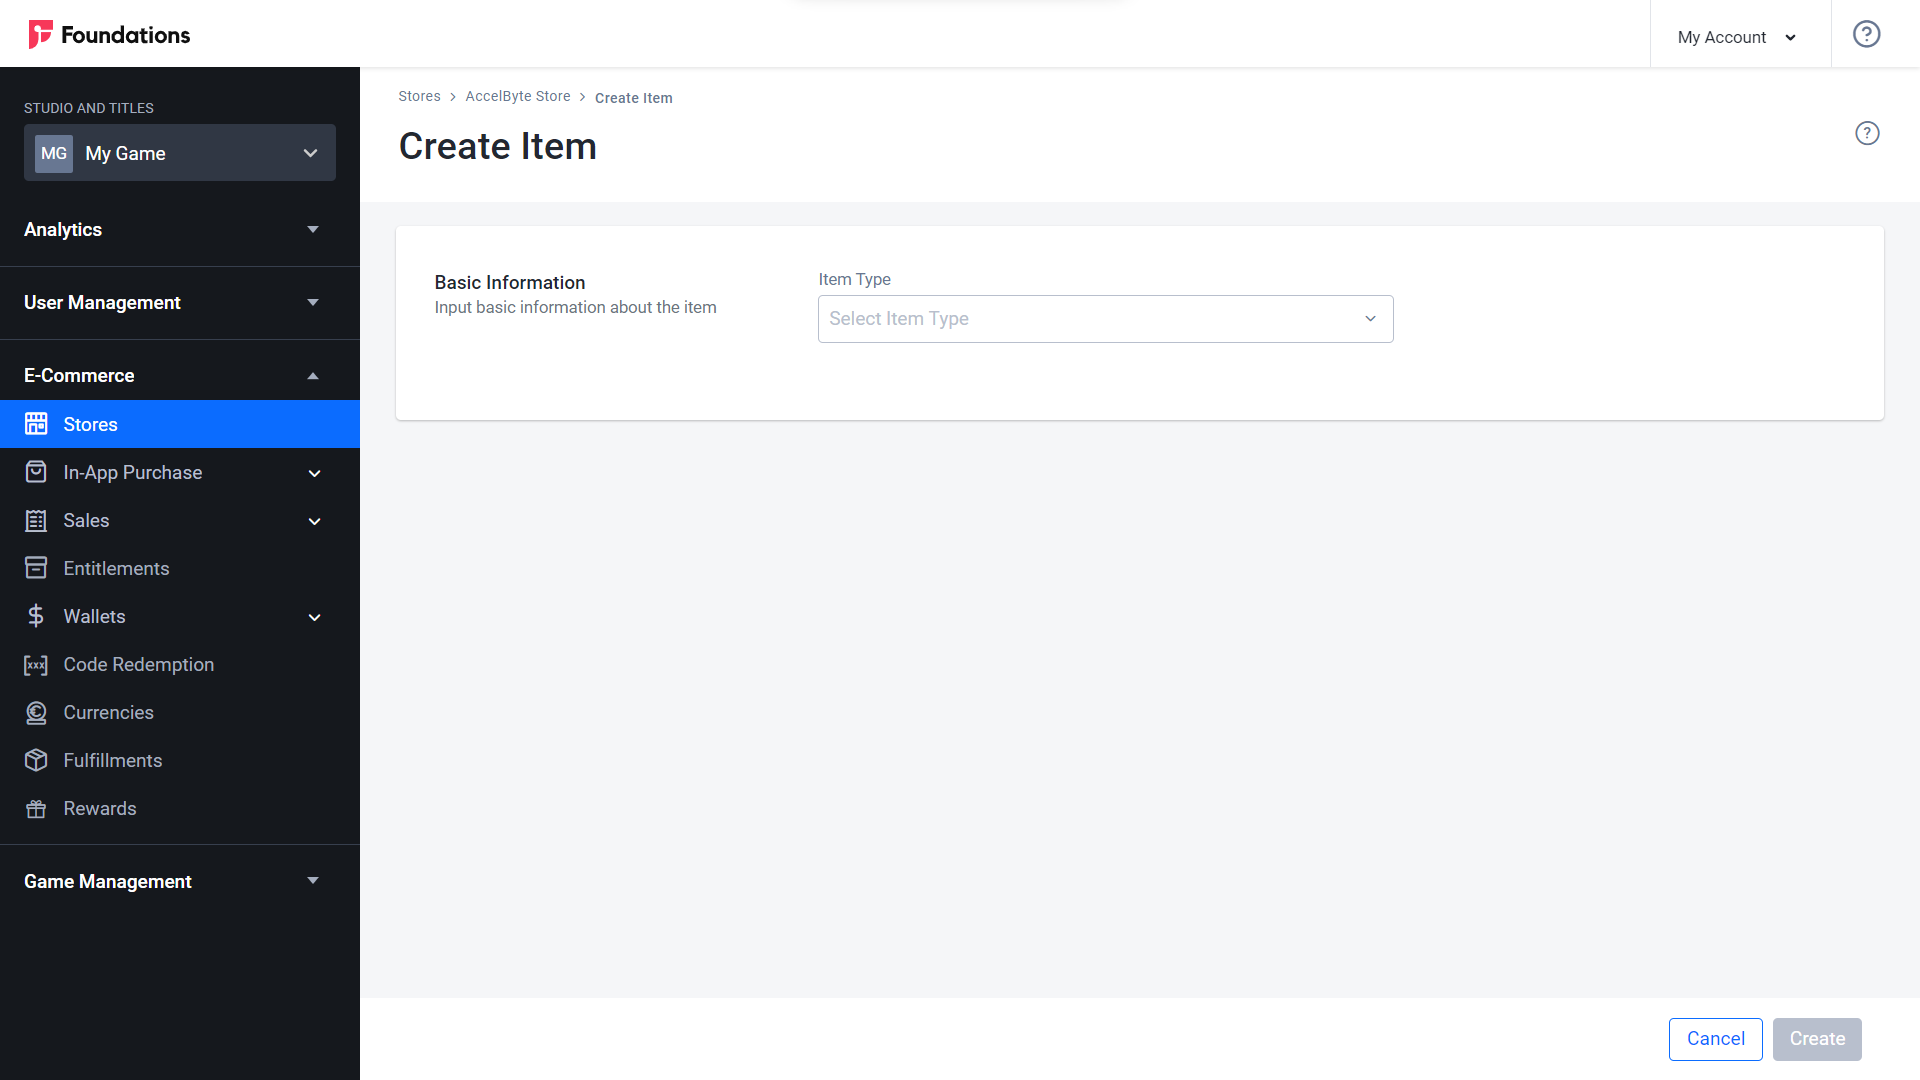
New fields appear on the page.
Fill in the rest of the required information.
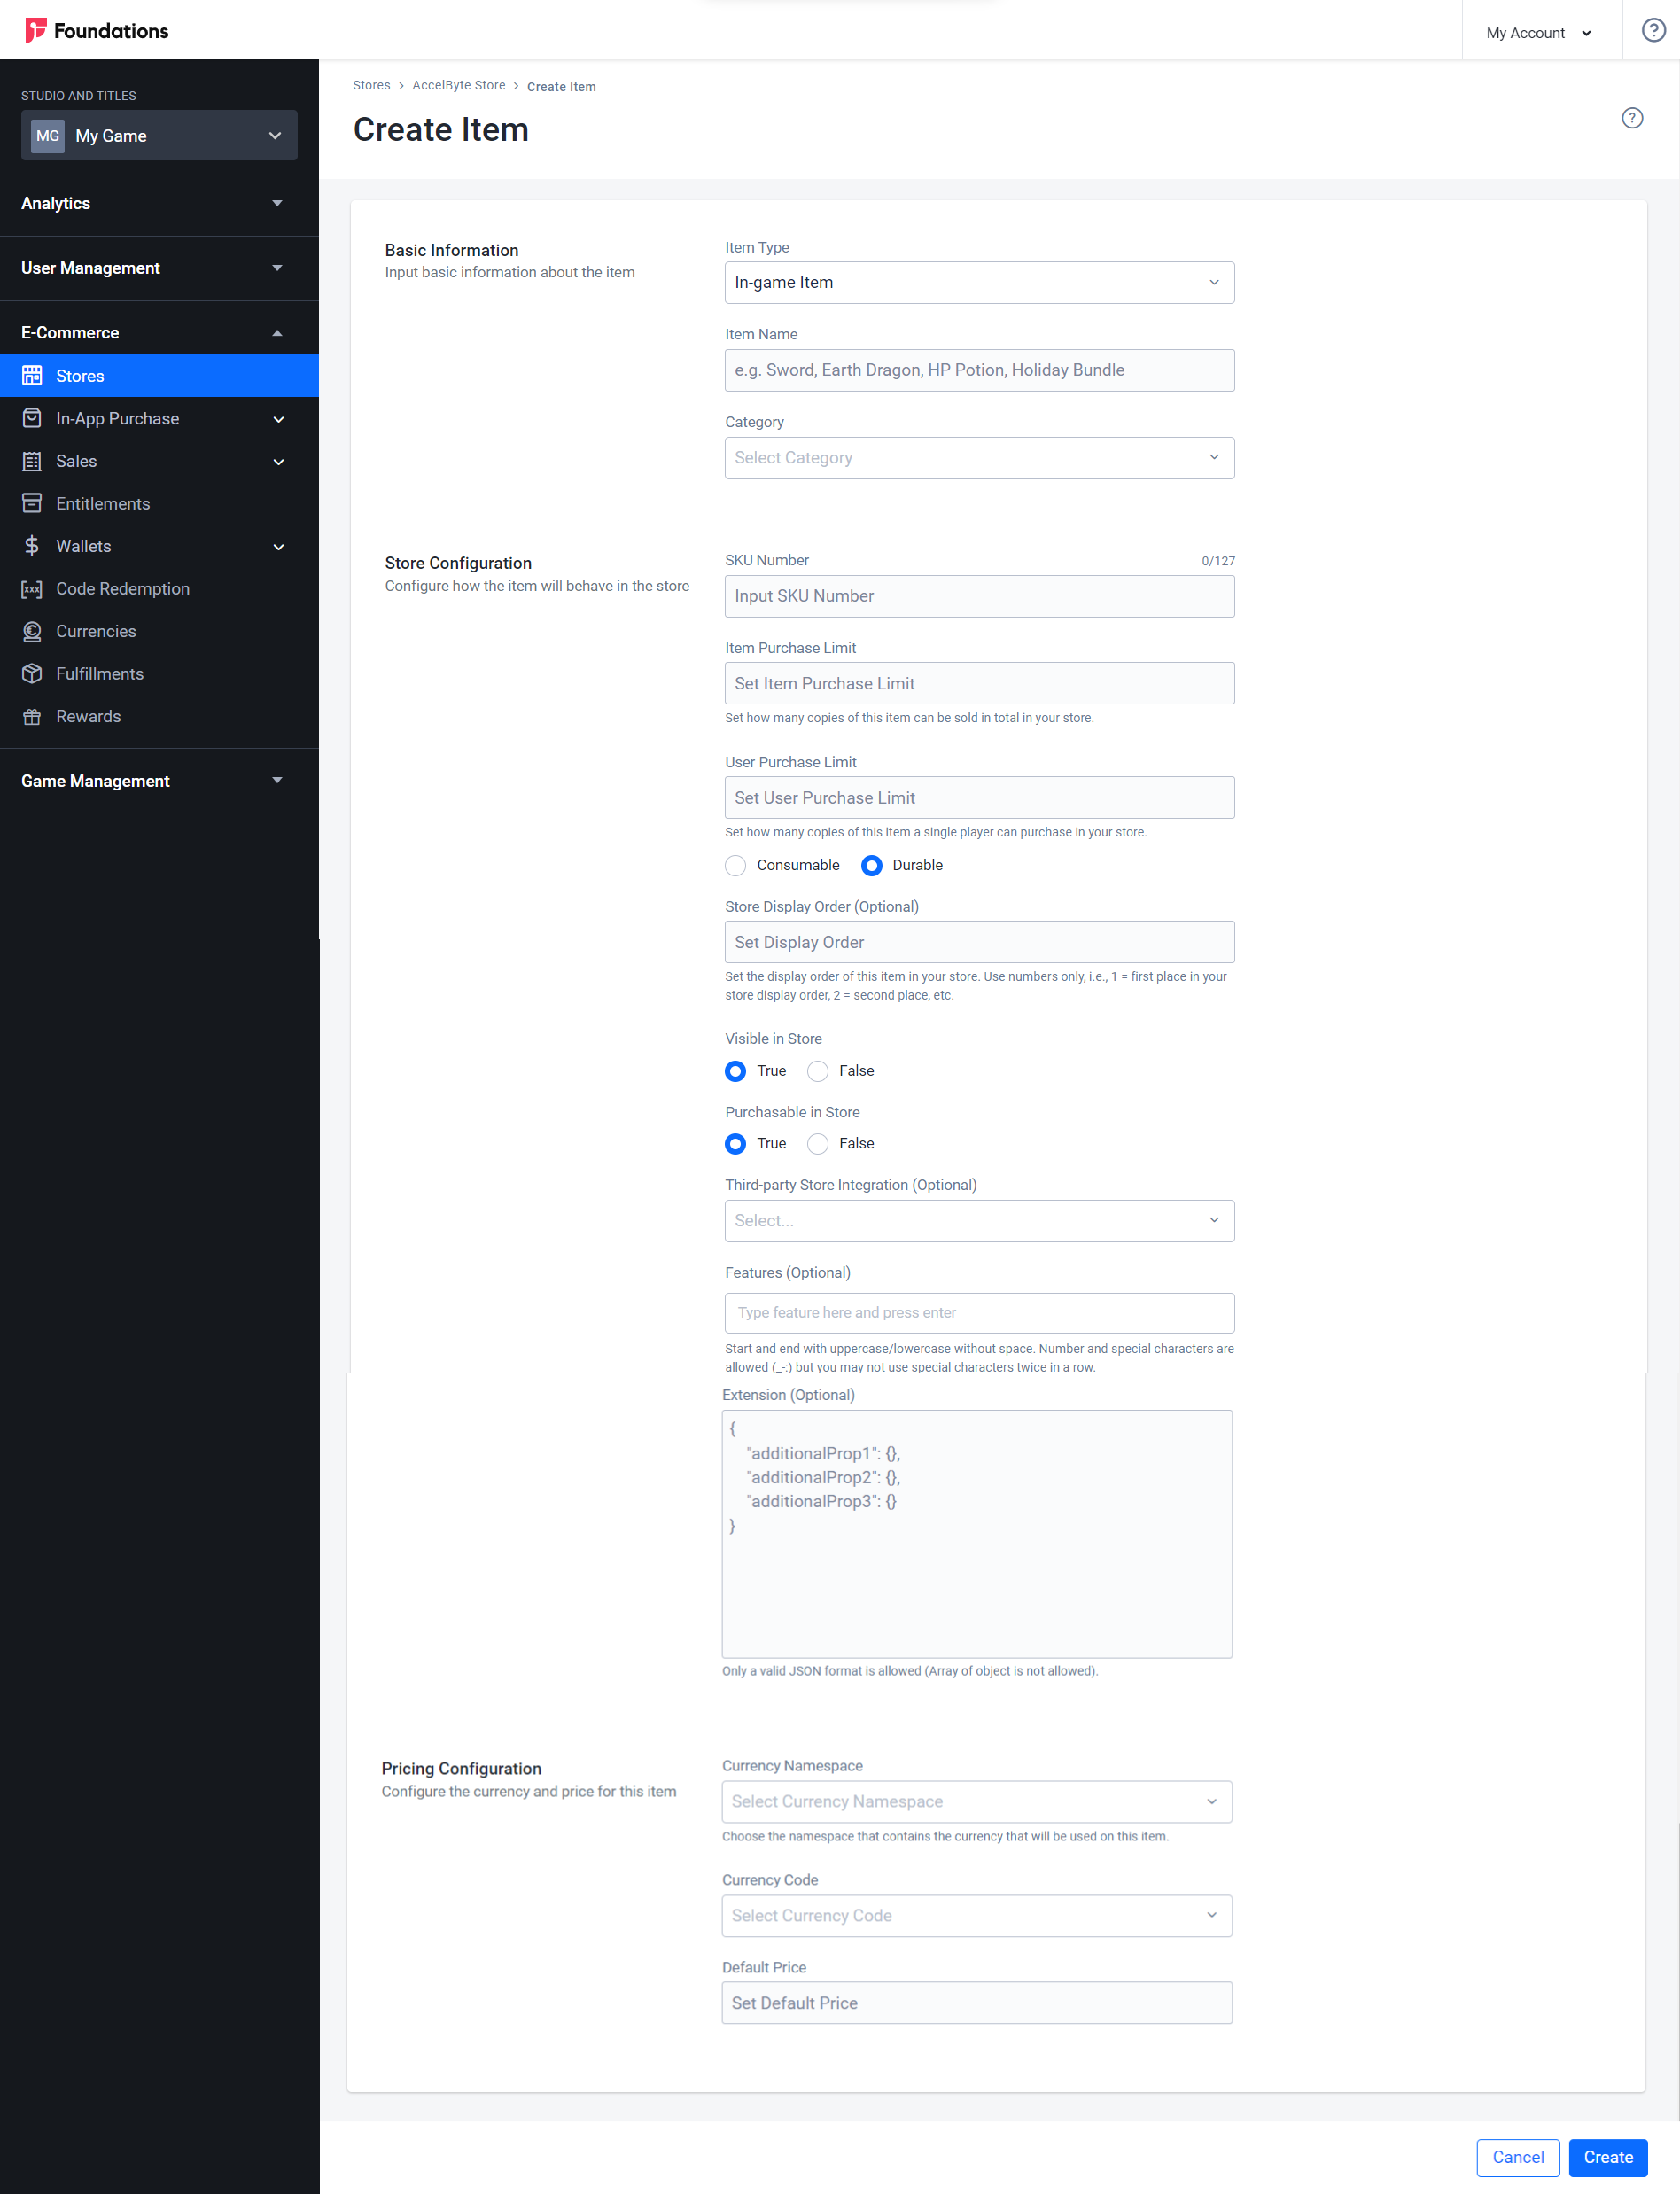
Basic Information
Input basic information about the item.
- Item Name: Input the Item Name that will be visible to your players.
- Category: Assign the item to one of the categories you created earlier.
Store Configuration
Configure how the item will behave in the store.
- SKU Number: this is the item’s ID from the 3rd-party platform that supports in-app purchases using an SKU Number. Fill this field if you want to map this item to one of the 3rd-party platforms in the following table.
3rd-party Platform Value PSN Entitlement Label Xbox StoreID Twitch Reward ID Google productId Apple productId Steam Item Def ID Epic productId Item Purchase Limit: set the maximum number of items that can be sold in your store. For example, if you set the value to 100, this means that 100 units of this item will be available for purchase. Type -1 to make the value unlimited. User Purchase Limit:limit the number of this item a single player can purchase. For example, if you set the purchase limit of this item to 100, this means that 100 units of that particular item will be available for purchase in your store, t. To make this value unlimited, input -1. Entitlement Type: select Consumable if you want the item to be single-use. For Consumable items:
- set the Item Use Count to define how many times the item can be used.
- set the Stack Entitlement value to True if the item should be stackable. If not, set it to False.
- If you want the item to be used repeatedly, choose Durable.
- Display Order: set the order in which the items in your store will be displayed.
- Visible in Store: select True if you want the item to be visible in your store, otherwise choose False.
- Purchasable in Store: select True if you want the item to be purchasable, otherwise choose False.
- 3rd-party Store Integration: use this field to show that this item is also available on a 3rd-party store.
- Features: This field works like a tag. Use this field to include a feature of the item, for example, Christmas Special Edition, Summer Beach, Blinky Mushroom Era, etc. Each item can have more than one feature. This field is optional.
- Extension: Use this field to add further information to an item for custom usage. Must be written in a valid JSON format. An array of objects is not allowed.
Pricing Configuration
Configure the price and currency applicable to this item.
- Currency Namespace: choose the source of the Currency that you chose in the Currencies service.
- Currency Code: set the code of the currency used to purchase the item.
- Price: Set a price in real currency, set the last two digits as decimals, i.e., if you have selected $ as your currency symbol, 1.99 will set the item as $1.99 in your store. If you want to make an item free, set the price as 0.
- Click Add and your item is added to the list.
Disable an Item in a Store
You can disable an item in your draft store. Here’s what will happened if you disable an item:
- Its status will change to inactive.
- The item will not be visible at your store.
- If the item is in a bundle, reward, or code redemption, users will not receive the inactive item.
- If the item is in an Optionbox, users will not be able to select the item.
To disable an item, follow the steps below:
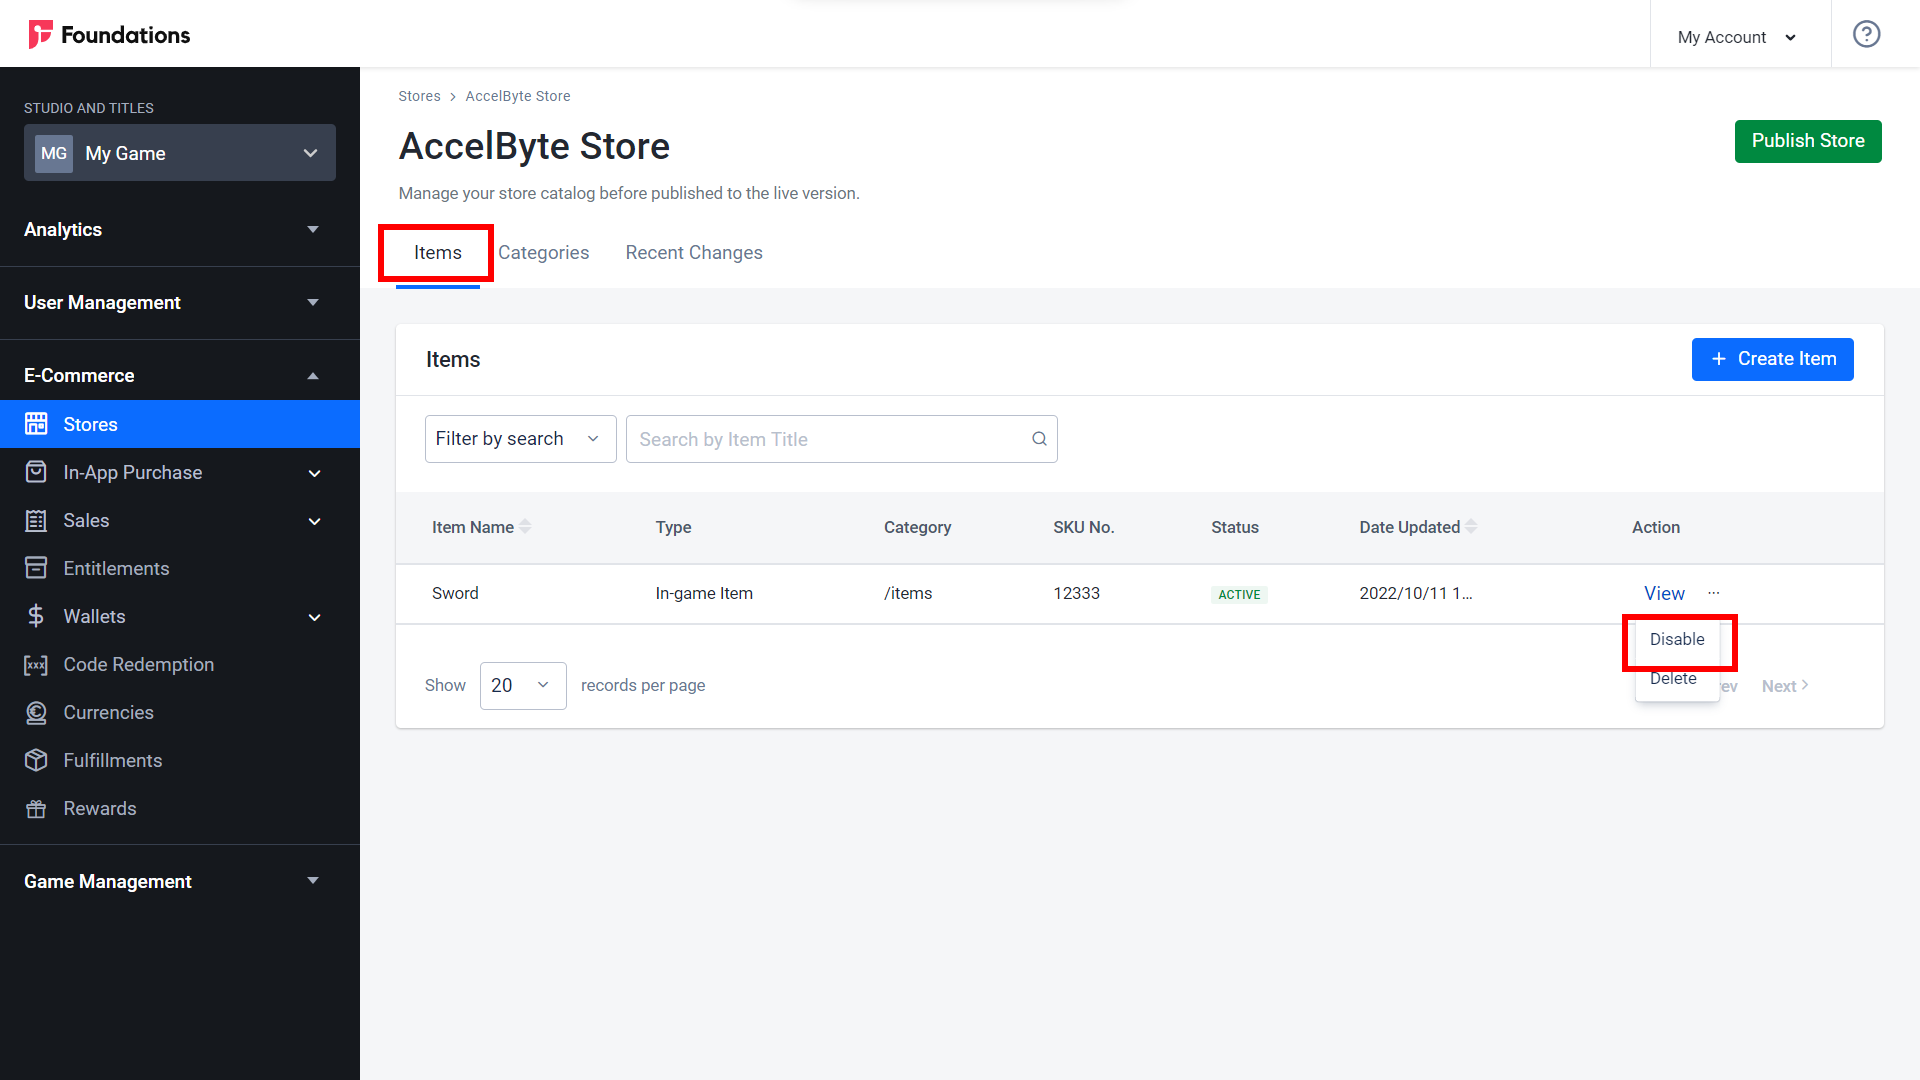
In the Admin Portal, go to your draft store and find the item you want to disable.
Click the More Options (...) icon in the Action column, then click Disable.
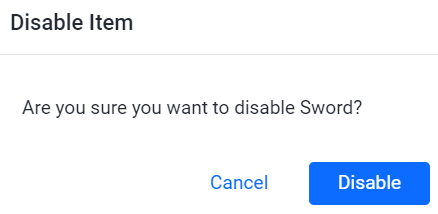
A Disable Item confirmation box appears.
Click the Disable button.
Delete an Item in a Store
You can delete an item in your draft store. Follow the steps below:
In the Admin Portal, go to your draft store and find the item you want to delete.
Click the More Options (...) icon in the Action column, then click Delete.
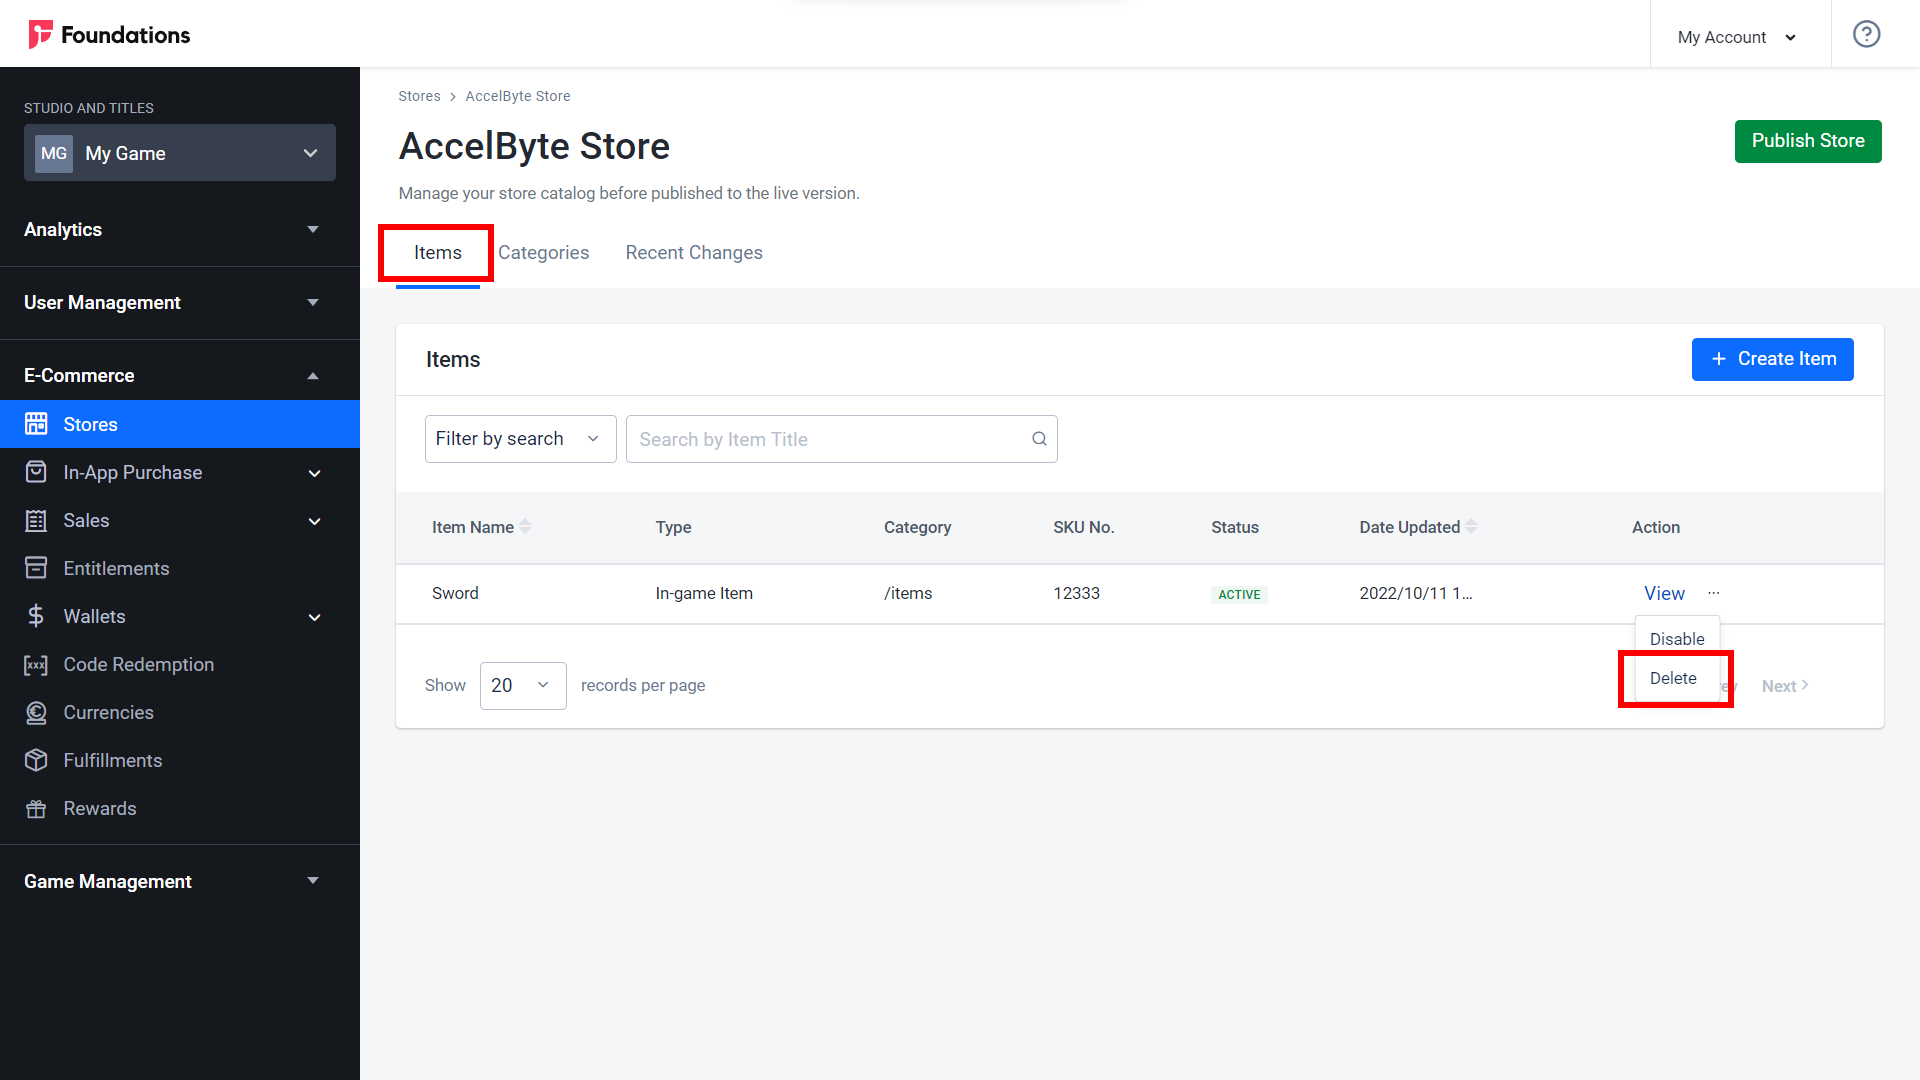
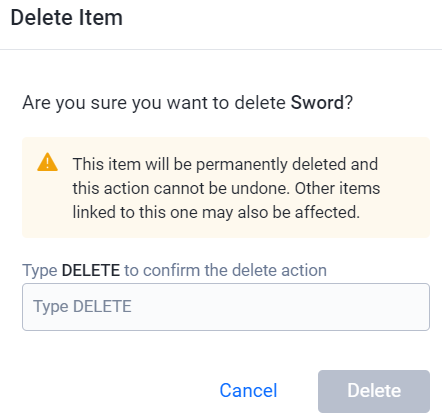
A Delete Item confirmation box appears.
Type DELETE to confirm that you want to delete the item, then click the Delete button.
Purchasing Requirements
You can set purchasing requirements for each item, meaning that the player can only purchase the item if they have satisfied the requirements.
Add Purchasing Requirements
You can create multiple purchasing requirements for each item you want to sell in your store. Each purchasing requirement stored in a group can consist of more than one requirement.
The interaction between groups is OR, meaning that a player could pass only one group to be able to purchase an item.
The interaction between requirements within the same group is AND, meaning that the player must fulfill every requirement in the group if that group is used to decide whether the player can purchase this item or not.
To add purchasing requirements to an item, follow the steps below:
In the Admin Portal, go to your draft store and find the item you want to add purchasing requirements to.
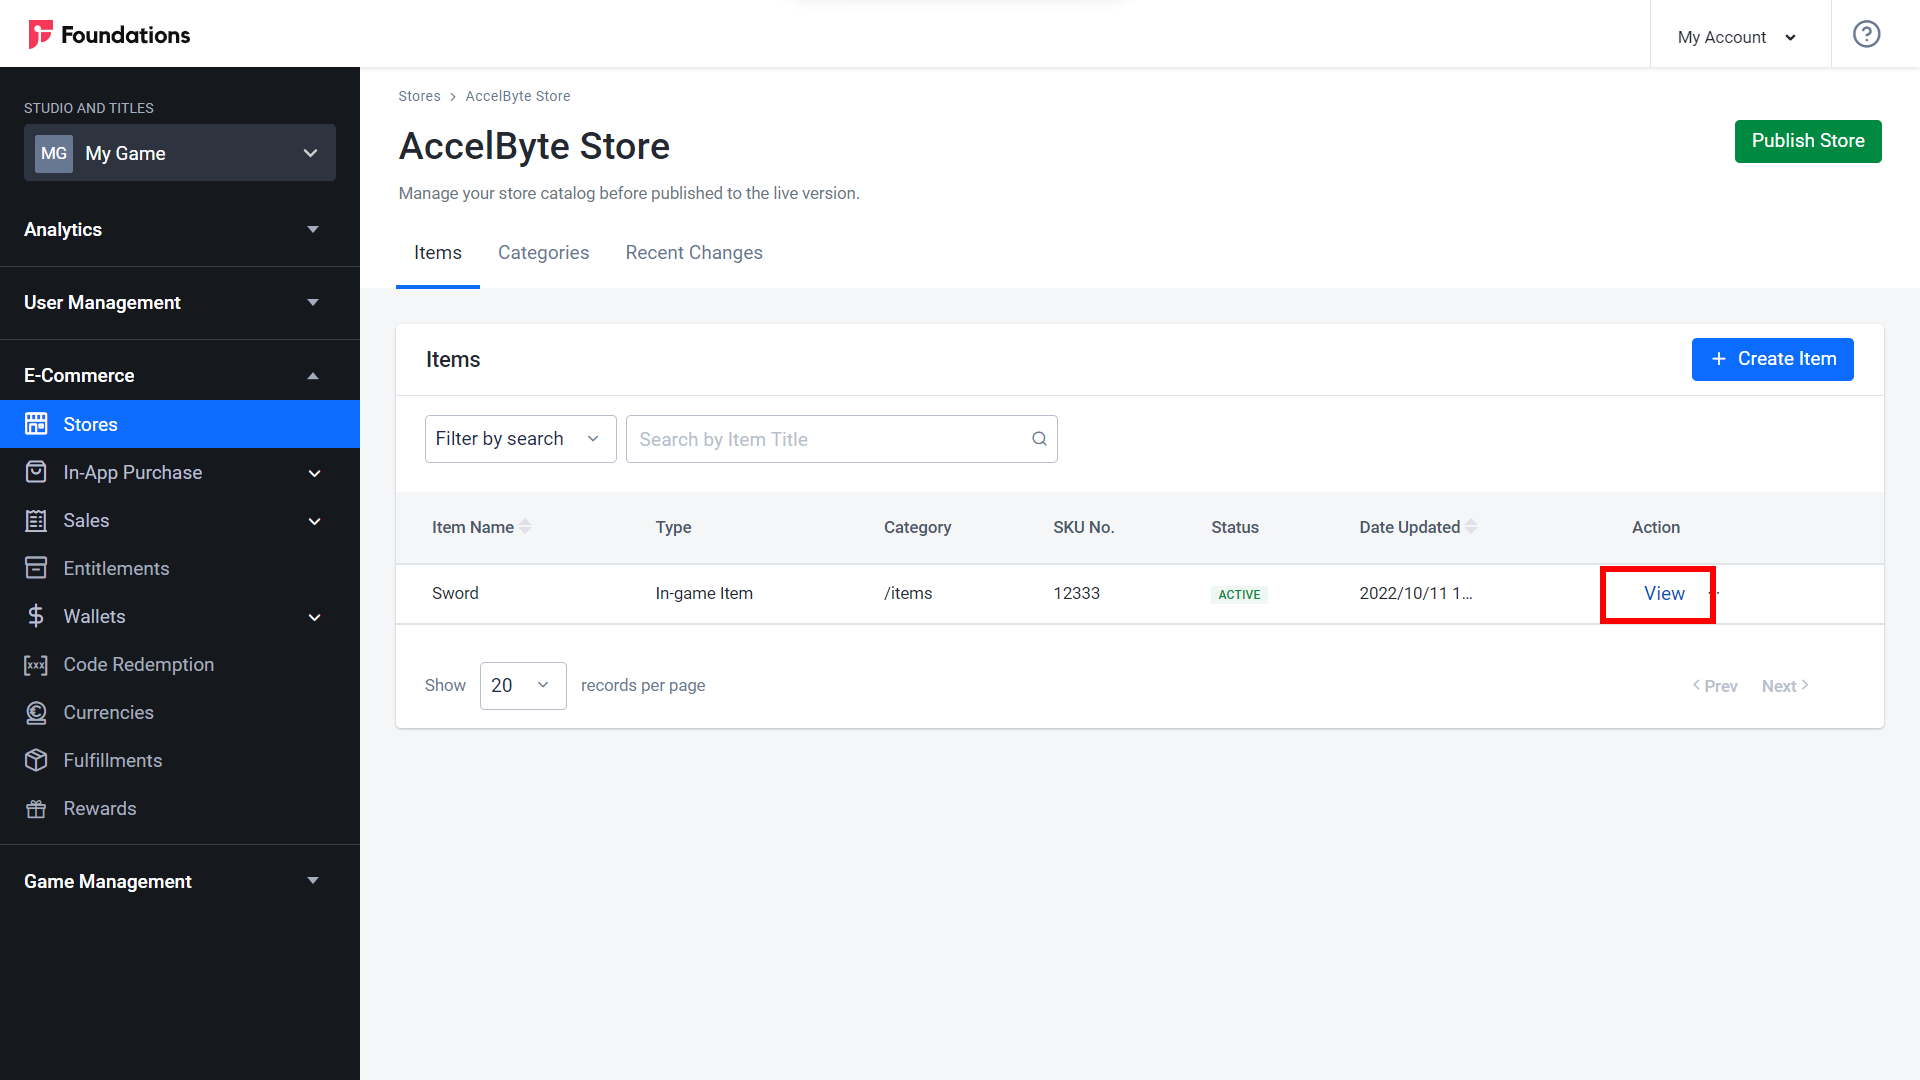
Click View in the Action column to open the item.
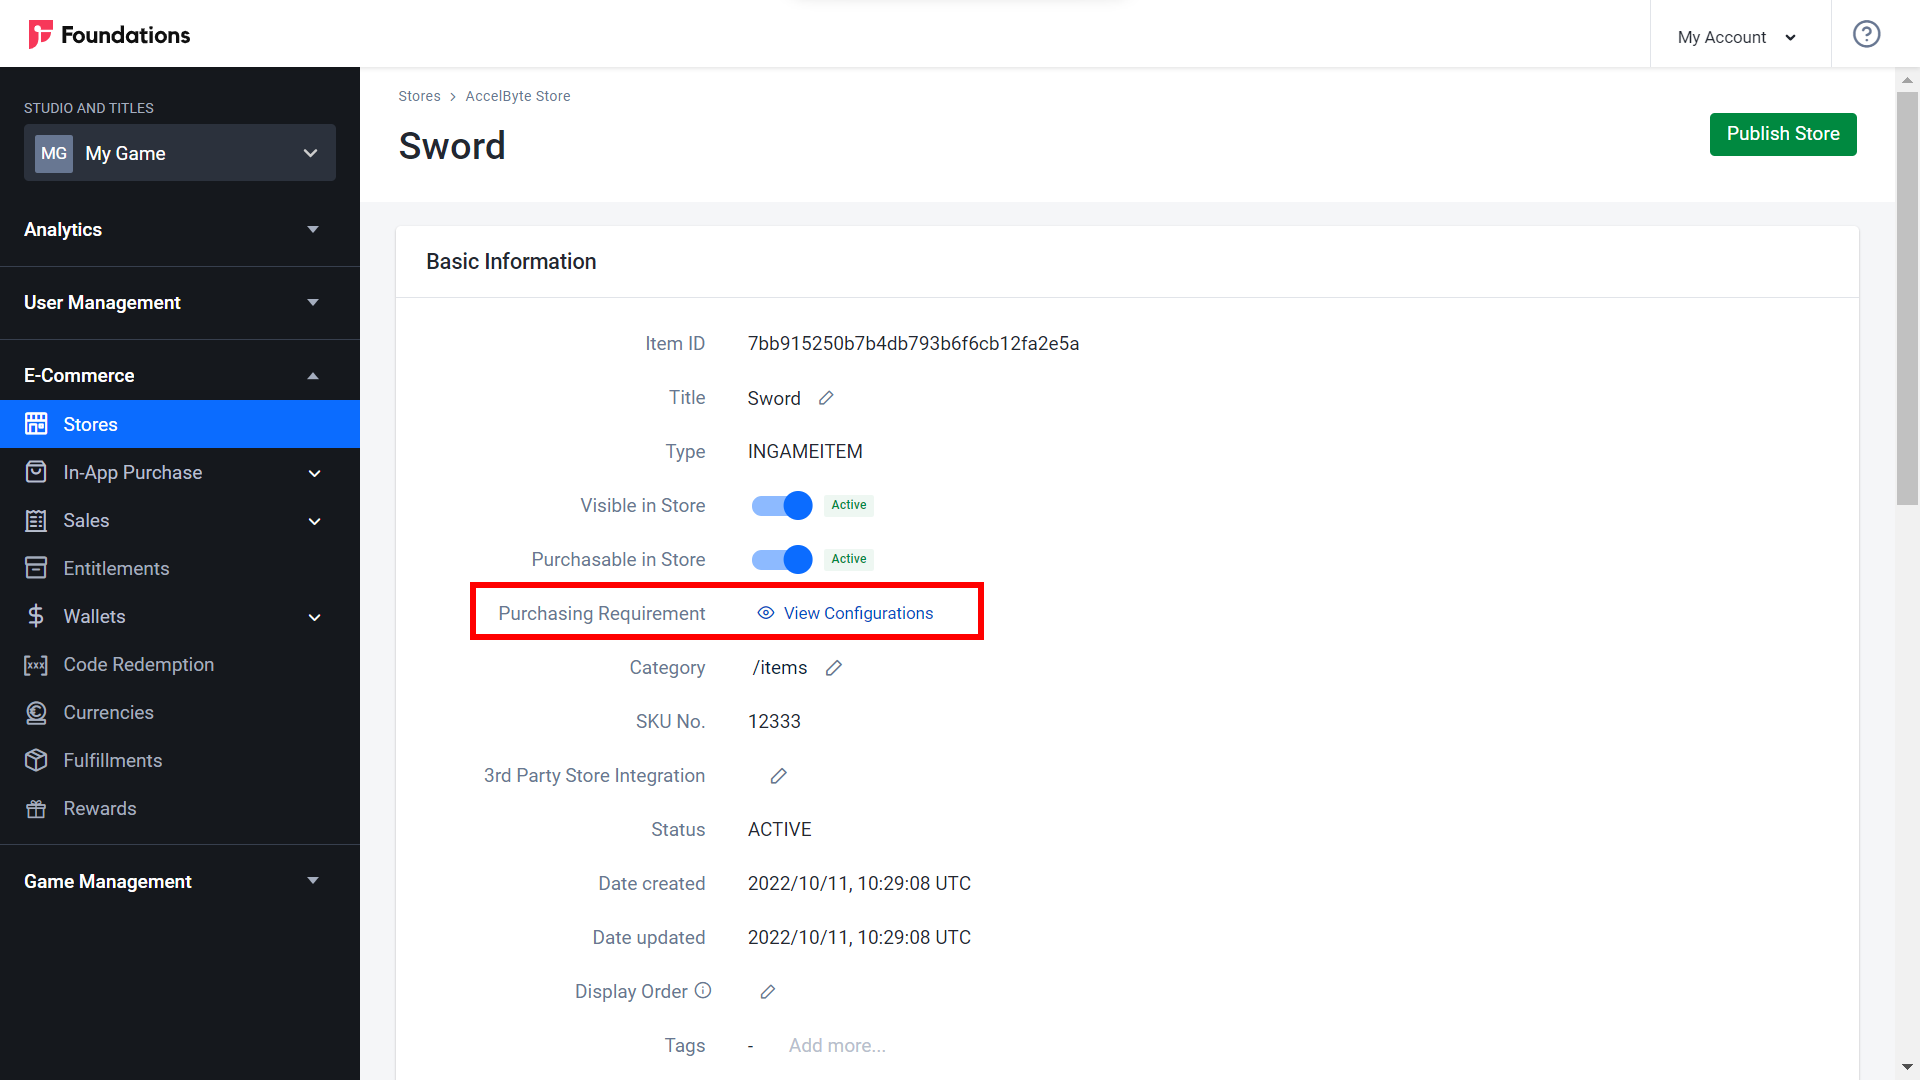
In the Basic Information section, next to the Purchasing Requirement, click View Configurations.
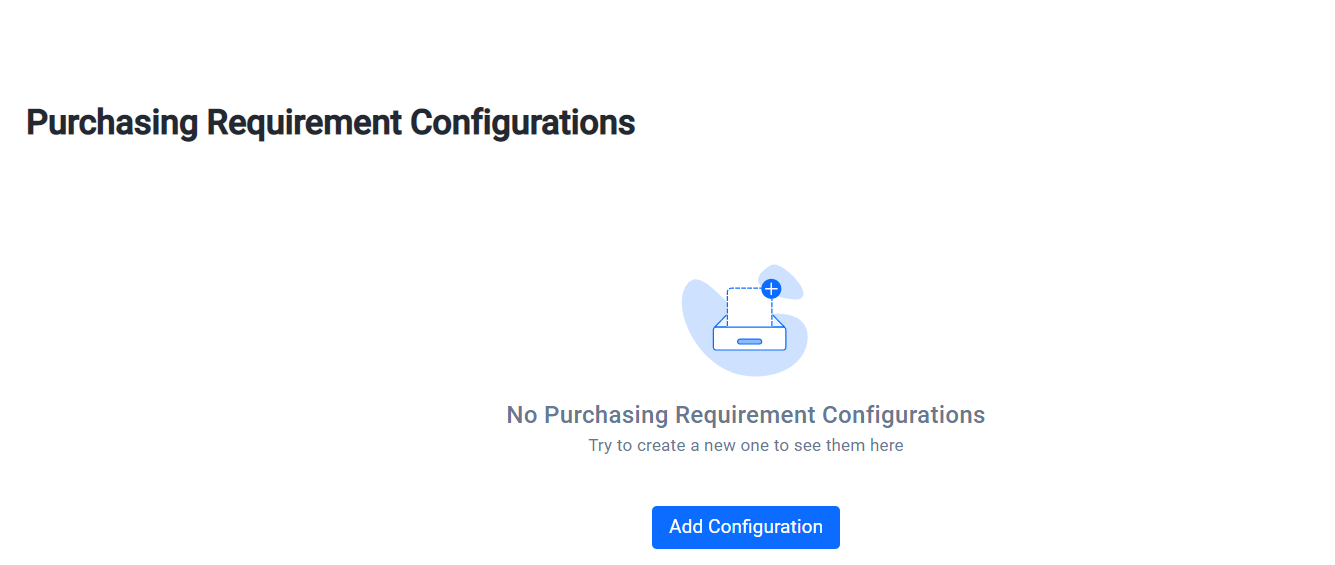
Click the Add Configuration button.
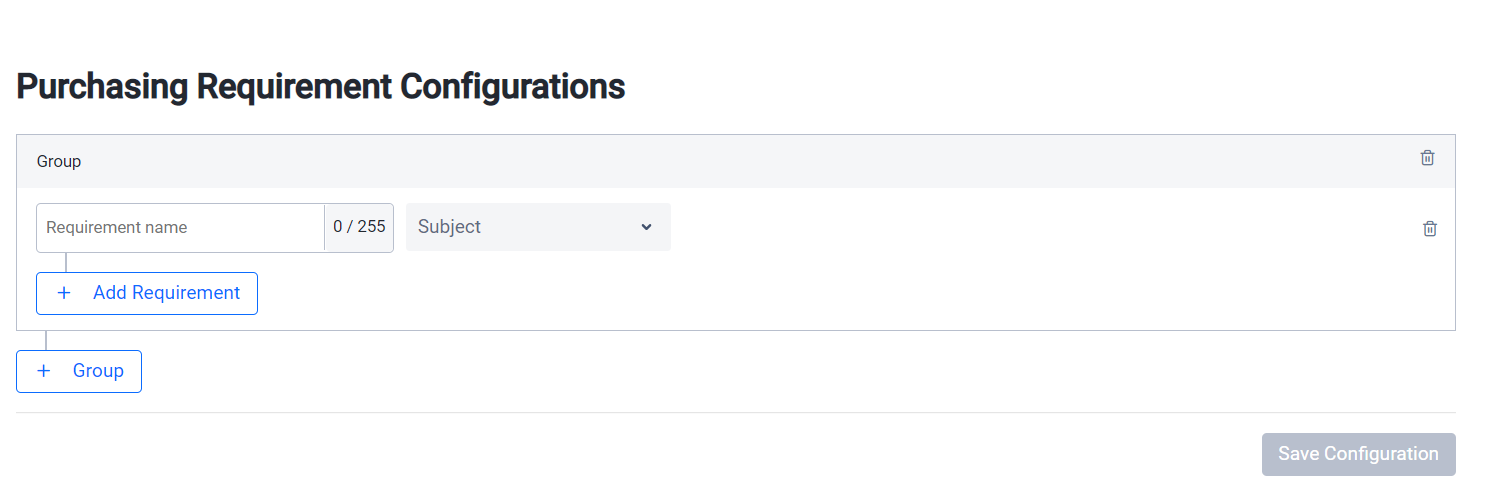
A new group appears in the form. Enter the Requirement name and choose the Subject of the requirement from the dropdown.
 NOTE
NOTECurrently the only Subject you can choose is Entitlement.
Three more fields display in the row. These are all connected to each other and are used to specify the requirements for the group .
- Include: to choose to include or not include an item in the group.
- Any: to select how many of the specified items to include or not include.
- Item Selected: Tto specify the items to be included or not included.
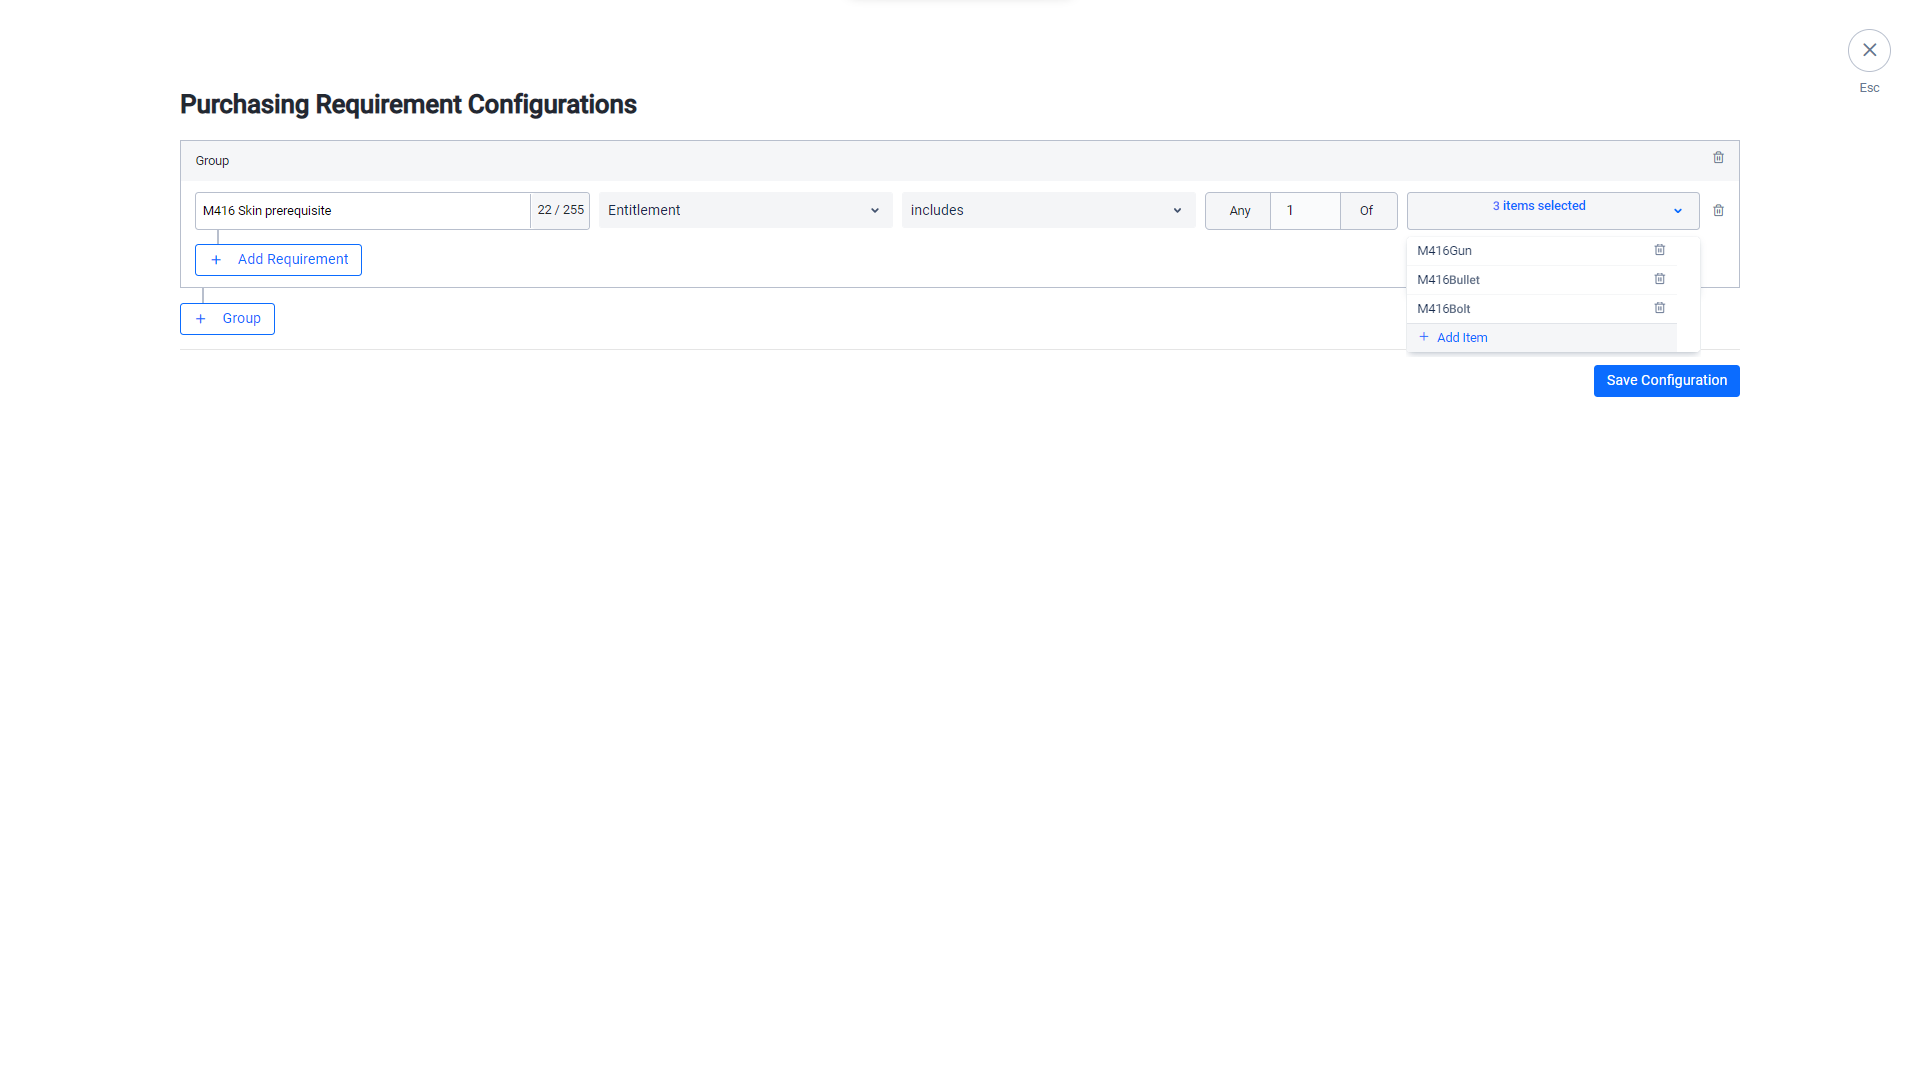
Here are some examples:
- You define include any 1 of the list of three items. If the player only has one of the three items in the list, the requirement is already satisfied.
- You define include any 3 of the list of three items. This means that the player has to own all three items from the list to satisfy the requirement.
- You define not include any 1 of the list of three items. If the player has any one of the three items in the list, the requirement is not satisfied.
Choose between include or not include from the dropdown.
Enter the number of items in the any…of field.
Add an item to the list by clicking the Item Selected dropdown, then click Add Item.
The Add Item form appears. Fill in the following information:
- Choose the Item Type from the dropdown.
- Choose the Item you have already created from the dropdown.
When you have finished, click Add.
To add new requirements to a group, click the Add Requirement button.
Click the Group button to add another group.
Create the requirements inside that group.

When you have finished creating the purchasing requirements, click the Save Configuration button.
User Validation
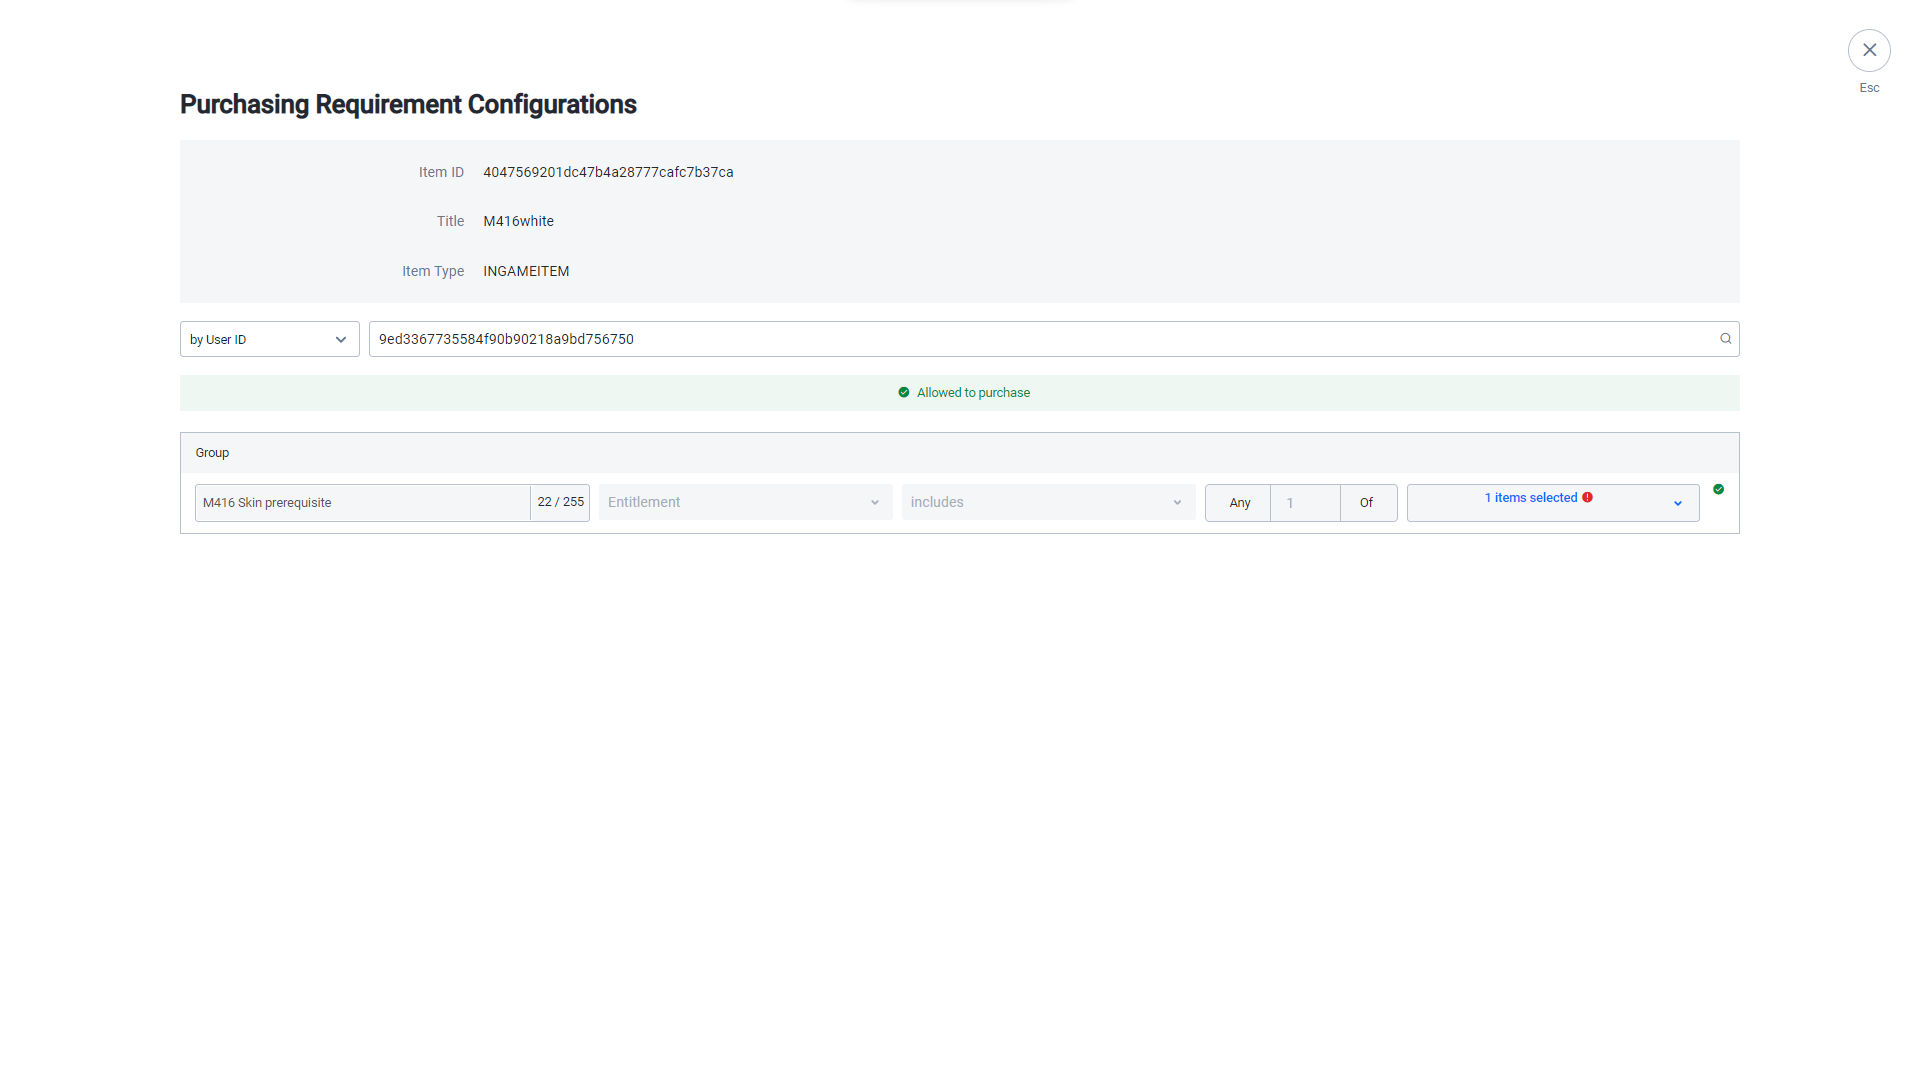
To check which players that can purchase the requirements, do the following:
In the Admin Portal, go to your published store and find the item you want to do the user validation check for.
Open the item by clicking View in the Action column.

In the Basic Information section, next to the Purchasing Requirement, click User Validation.
Select whether you want to search by Email or by User ID.
Type the player’s account information.
Press Enter.
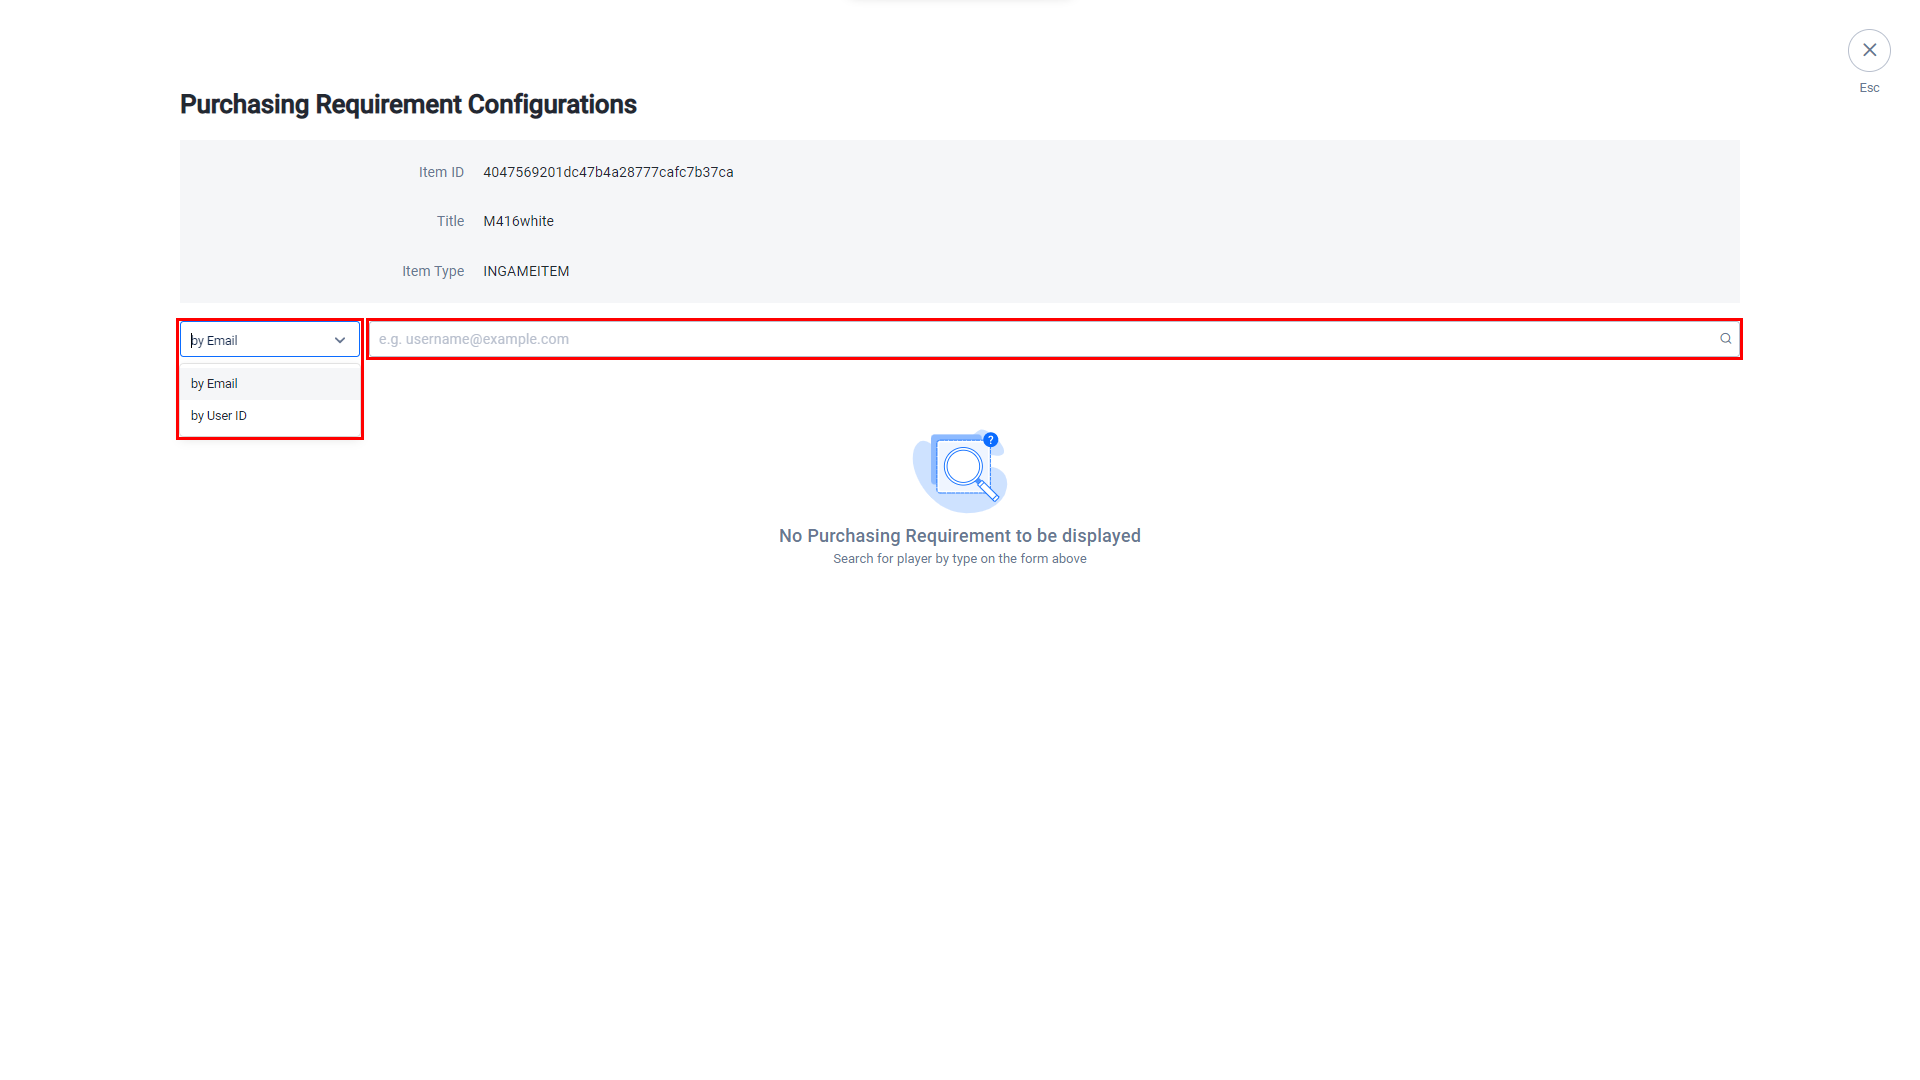
The purchasing requirements for that player display.
Add Items to a Bundle
After you’ve created a bundle, add items to the bundle by following the steps below:
Go to your draft store and find the bundle you want to add items to.
Open the bundle by clicking in the Action column next to the item and selecting View.
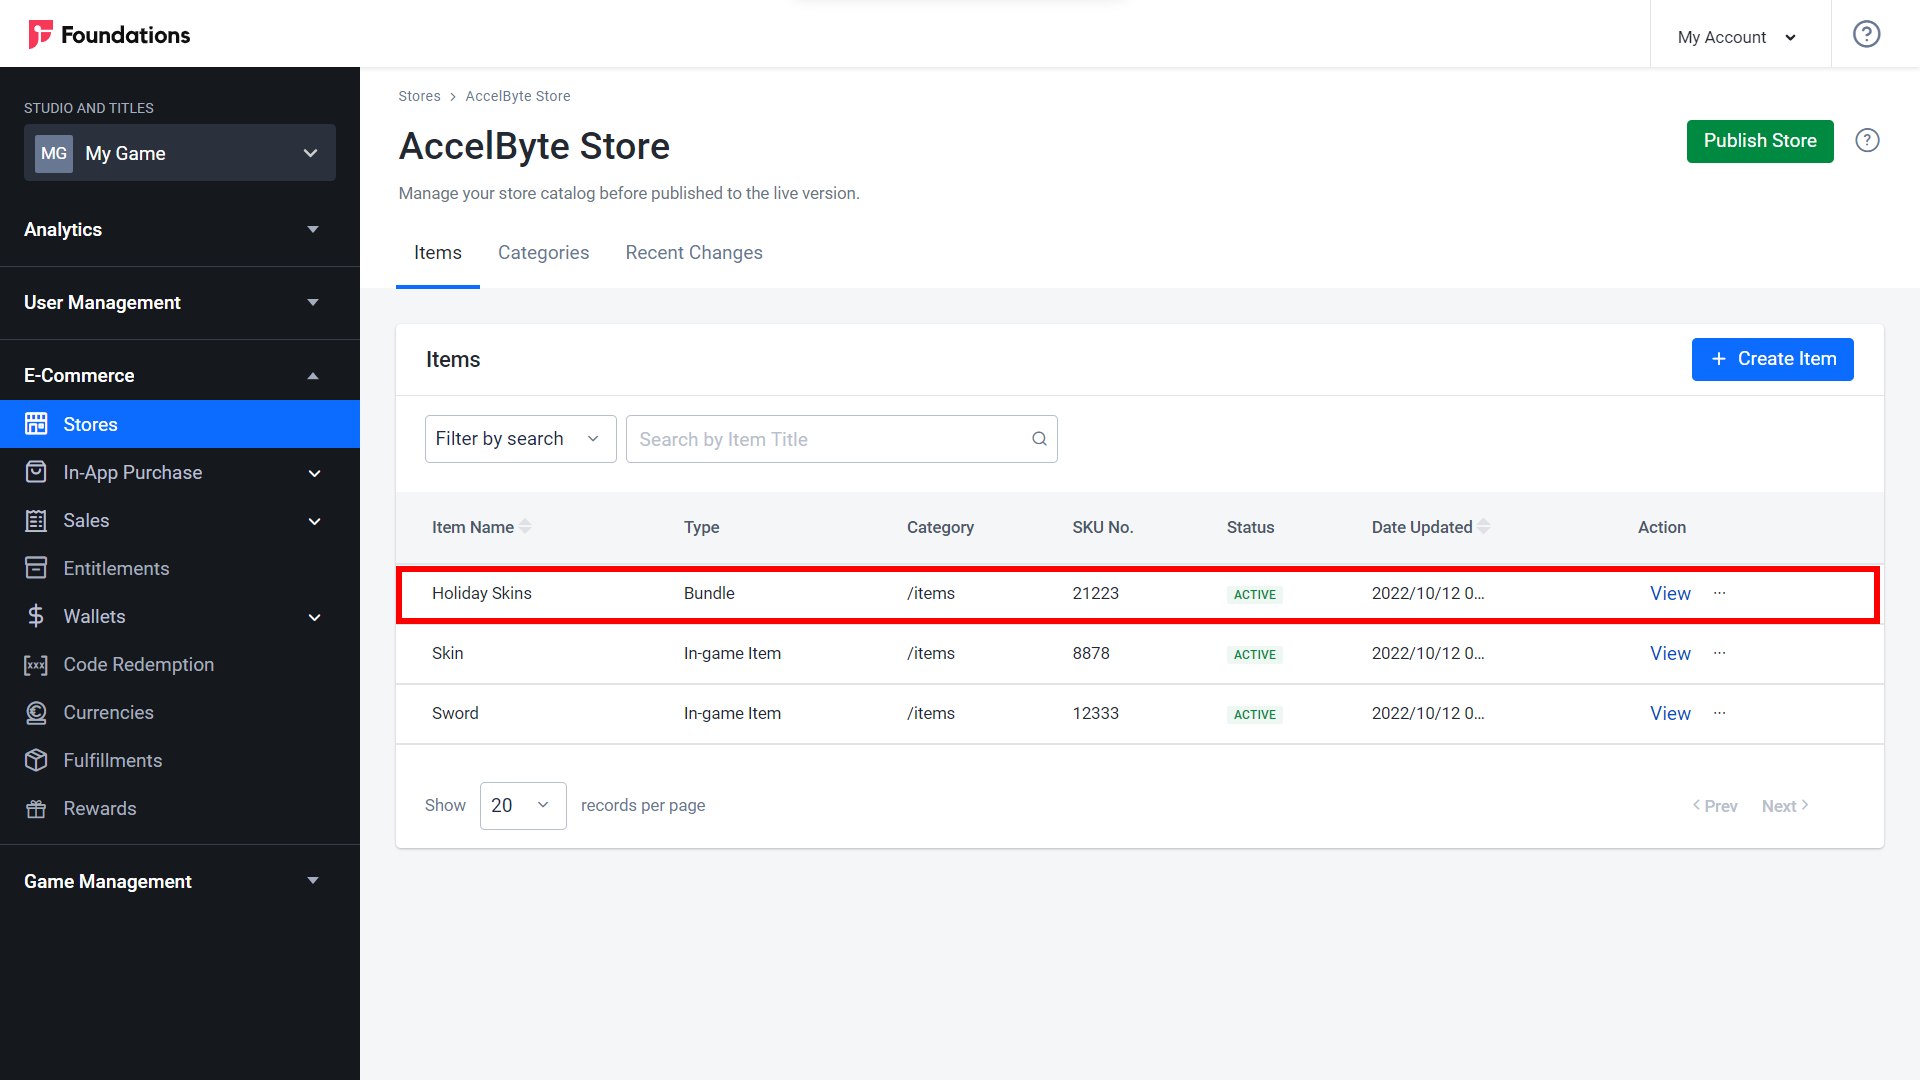
Here you can see detailed information about the bundle. Scroll down to Bundle Items to see the list of items contained within that bundle.
To add or edit items, click the Add/Edit Item button.
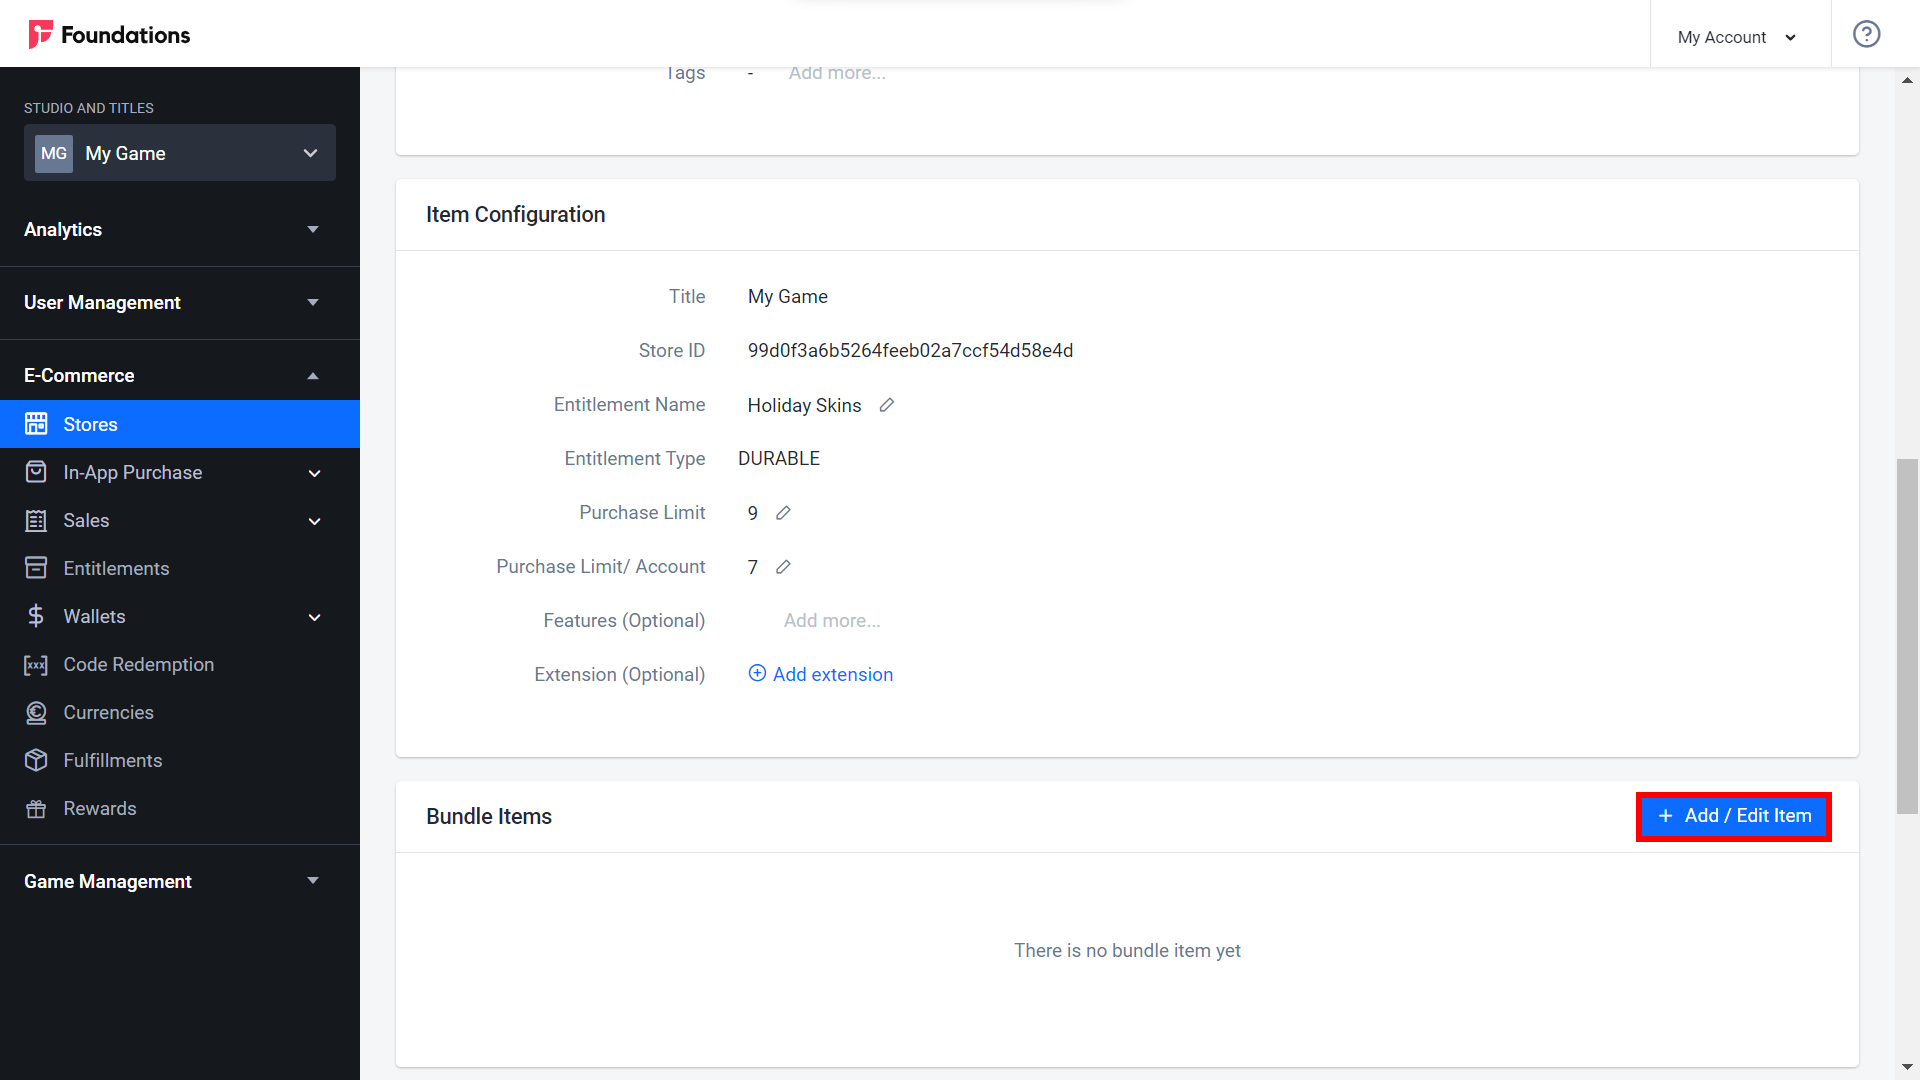
The Add/Edit Item form appears. Select the items you want to add to the bundle.
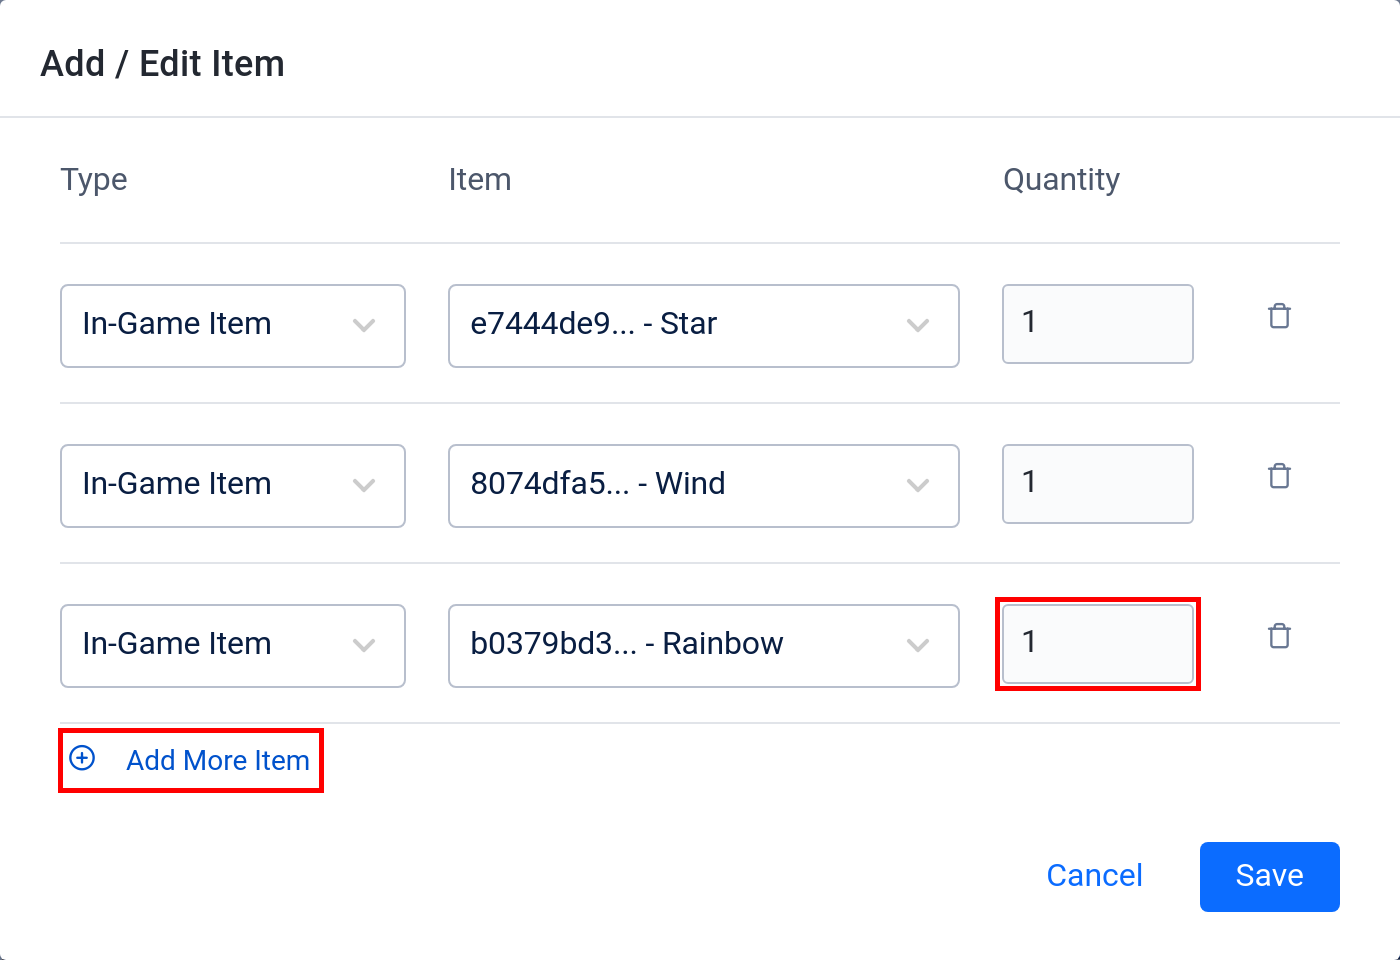
- Type: select the type of the item to add to the bundle, such as In-Game Item, Coins, Season Pass or Season Tier.
- Item: specify the item you want to add to the bundle by typing the name of the item.
- Quantity: enter the quantity of the item you want to add. You can add multiple copies of in-game items or coin packs to a bundle. but you cannot add more than one of App, Season Pass, or Season Tier item.
- To add more items, click Add More Item and fill out the fields for the new item as per above.
When you have filled in the fields, click the Save button. The items you added appear in the Bundle Items panel.
Add a Regional Price to an Item
By default, your item’s price is set in the country for your store. To add different prices for different regions, follow the steps below:
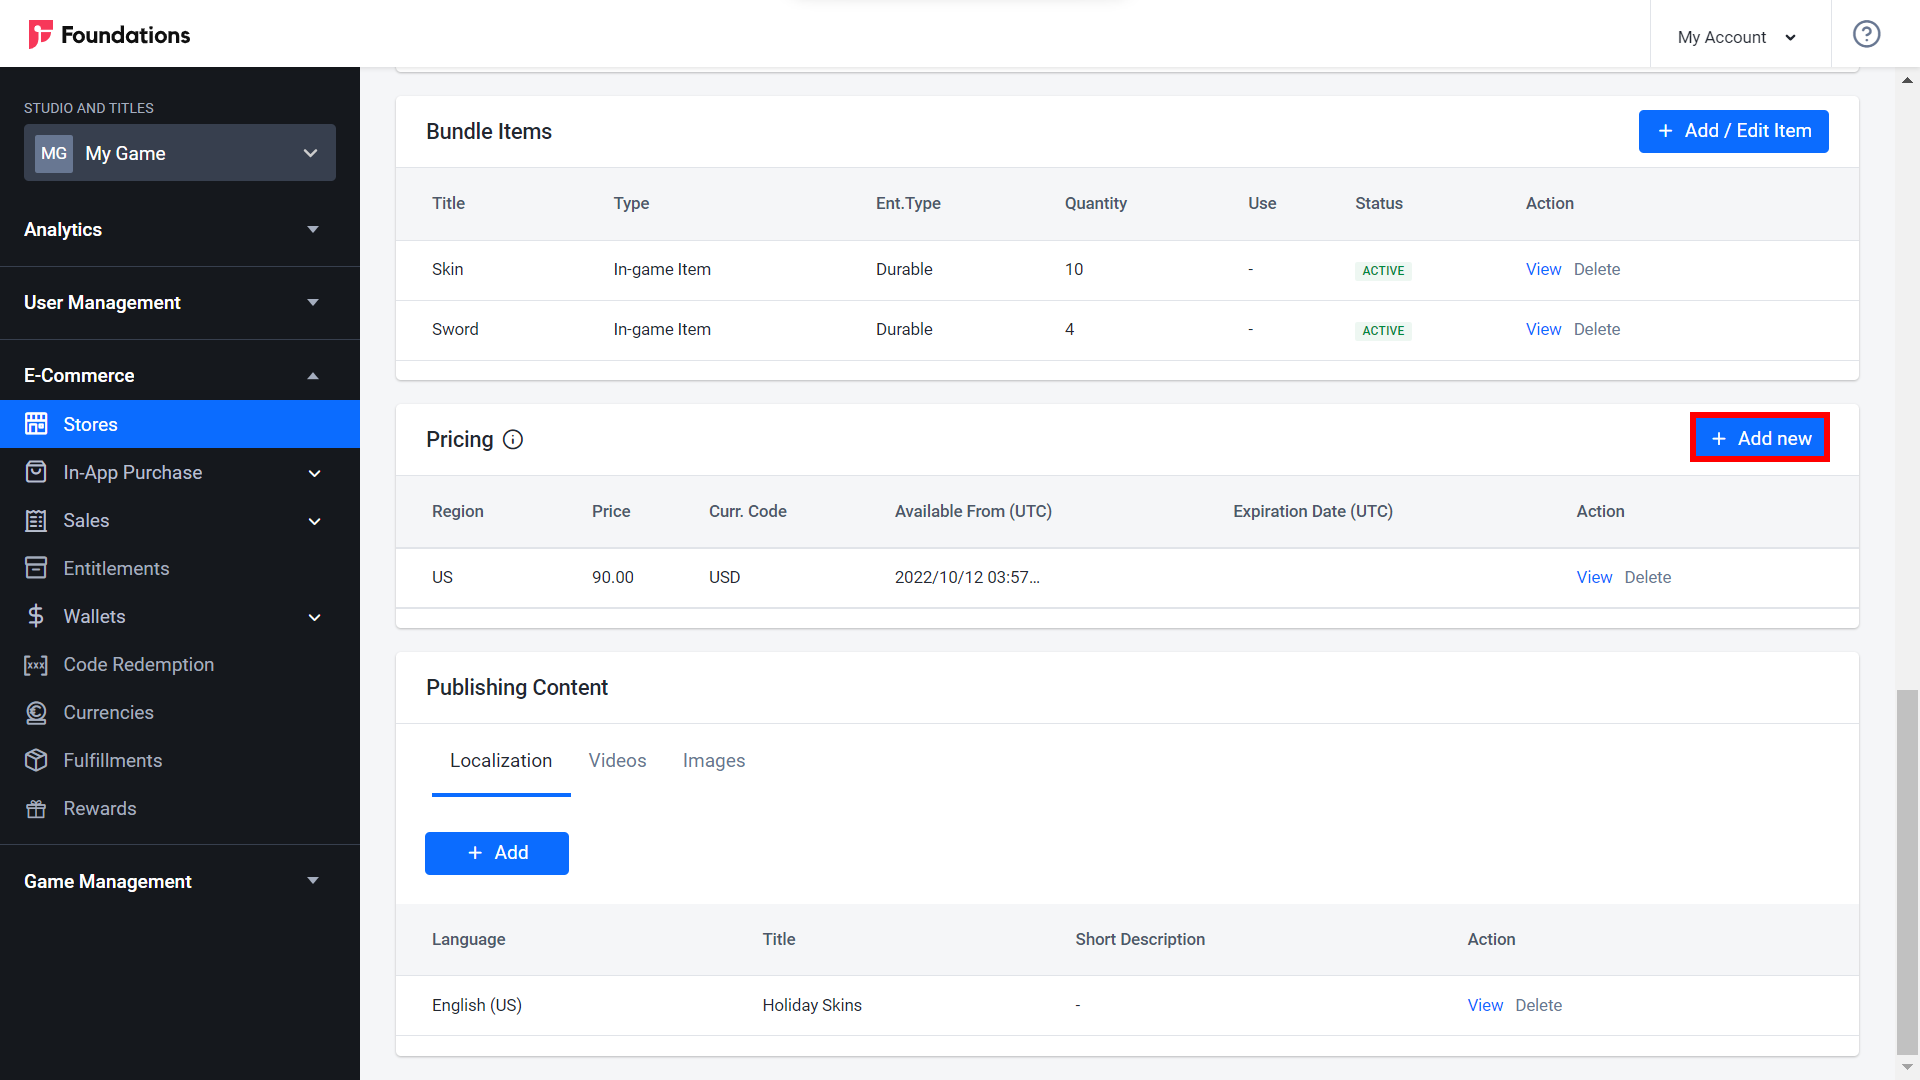
Go to Stores, and open your item details. In the Pricing panel, click Add new to add new pricing.
The Add Price form appears. Fill in the following information:
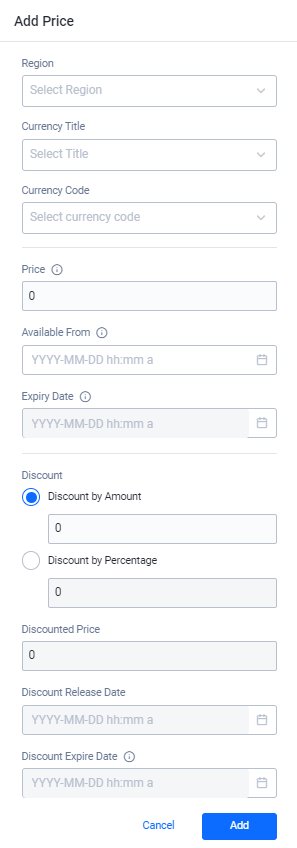
- Region (required): select which region’s price you want to use. If you can’t find the region you need, you can edit the store to add the region to it.
- Currency Title (required): select the game title as the Currency Title.
- Currency Code (required): choose the currency code from the list.
- Price: input the price of the item. If you are making a free item, set the price to 0. To set a price in real currency, set the last two digits as decimals, i.e., if you have selected $ as your current symbol, 1.99 will set your item as $1.99 in your store.
- Available From: set the date the item will be available on the store. Otherwise, the item will appear as soon as the store is published. You can also set when the item will be removed from the store in the Expiry Date field. If the field is left empty, the item will never expire.
- Discount: set the discount price if you want to give your item to be discounted. You can choose to discount by either an amount or by a percentage.
- Discount Release Date: set when your discount begins. Meanwhile, the Discount Expiry Date determines when your discount ends.
When you have provided all the information, click the Add button and the price is updated.
Set Up the Publishing Content
Publishing content consists of the information and media used to show and describe your items, such as the item descriptions, images, and videos. Follow the steps below to set up the publishing content:
Still in the Basic Information page, go to the Publishing Content section.
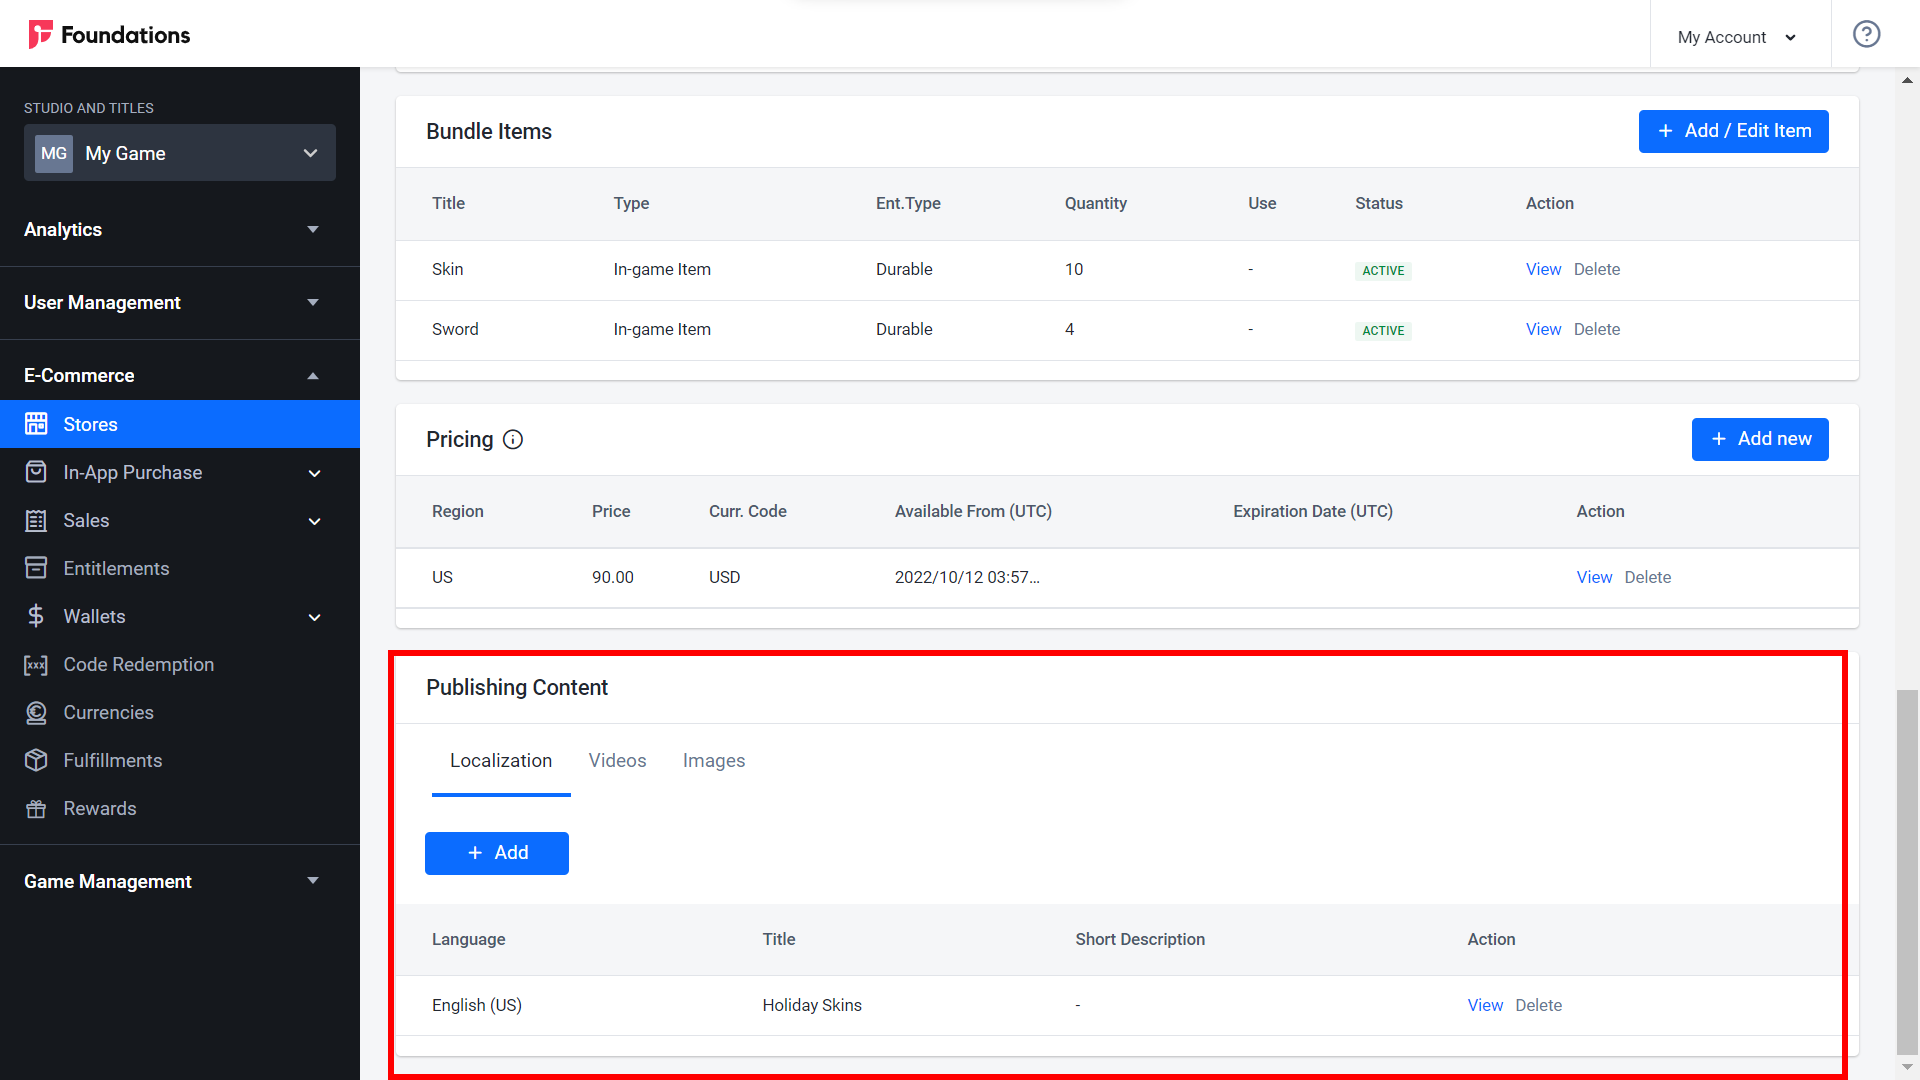
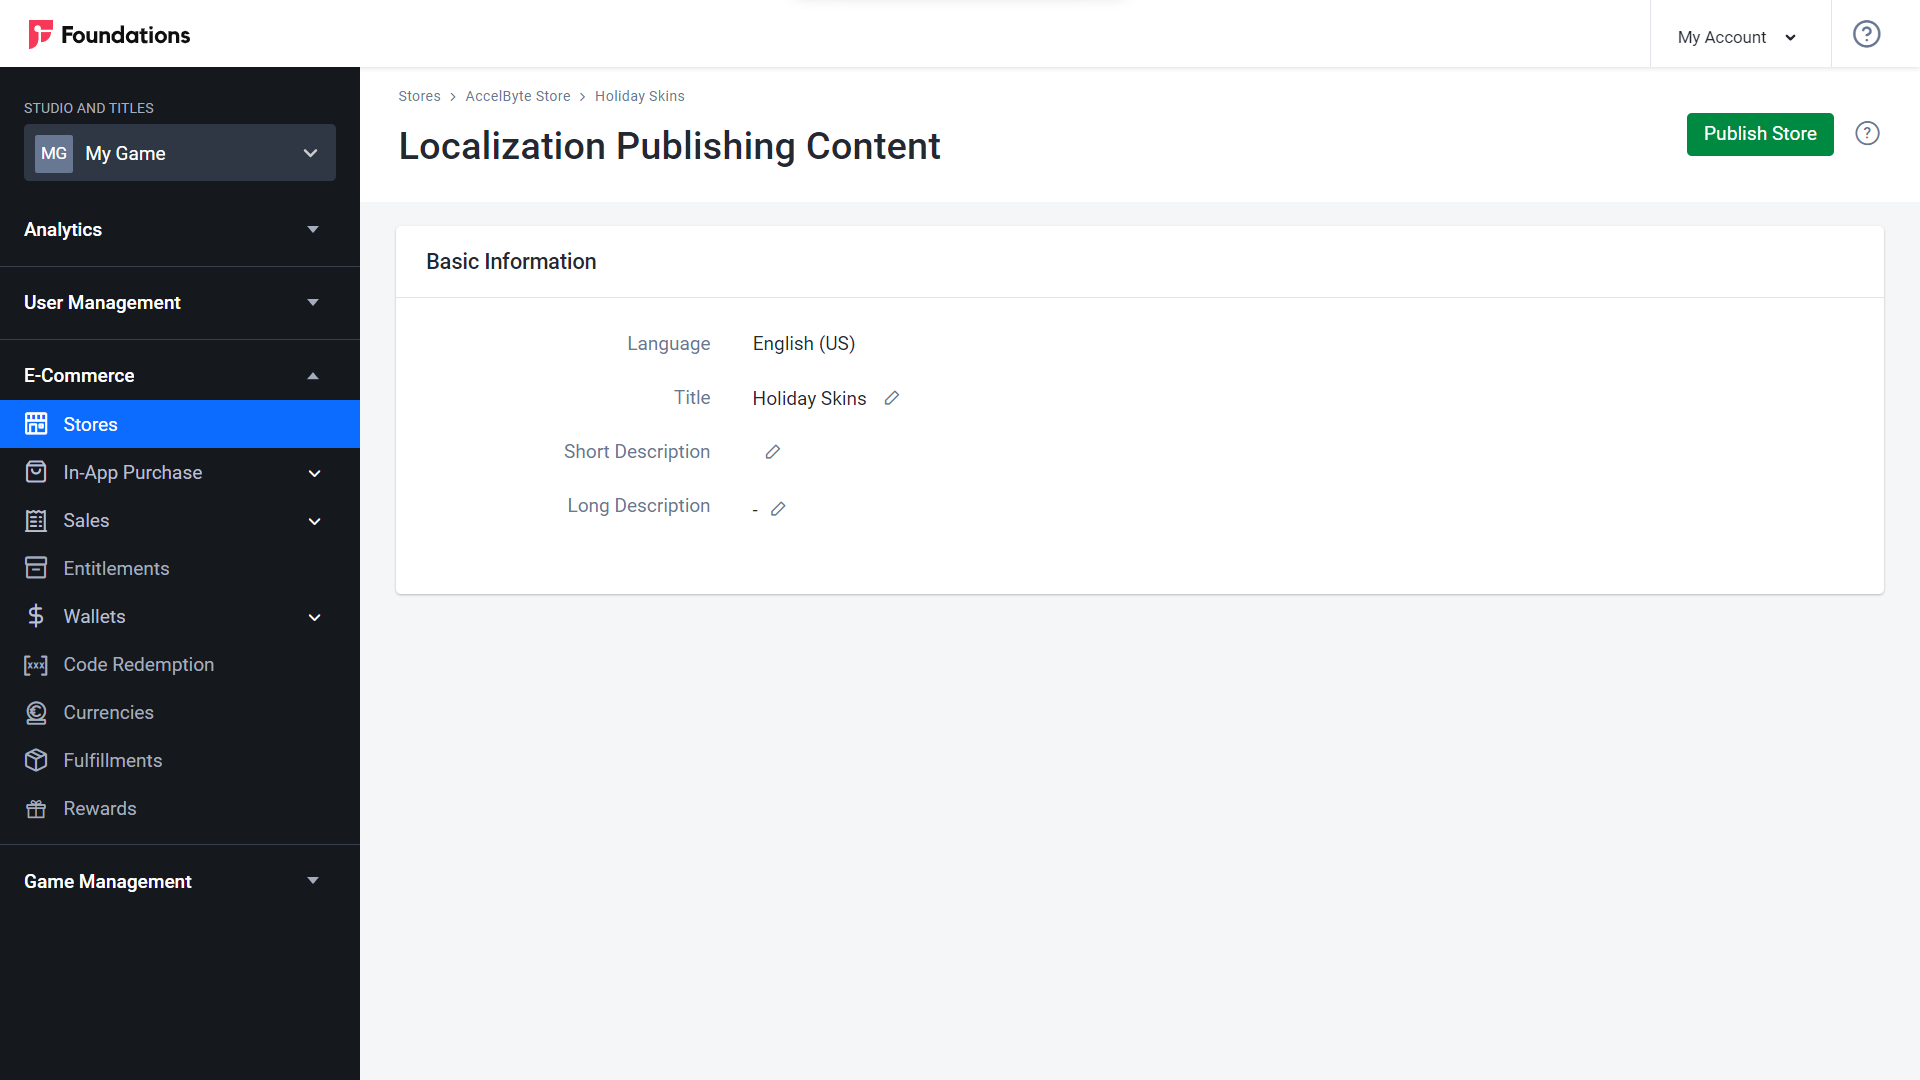
In the Localization section, click the View button to add basic information for the item.

You can input both a Short Description and Long Description.
To add a description in other languages, go back to the Localization section and click the Add button.

The Add Language Data form appears. Fill in the required fields.
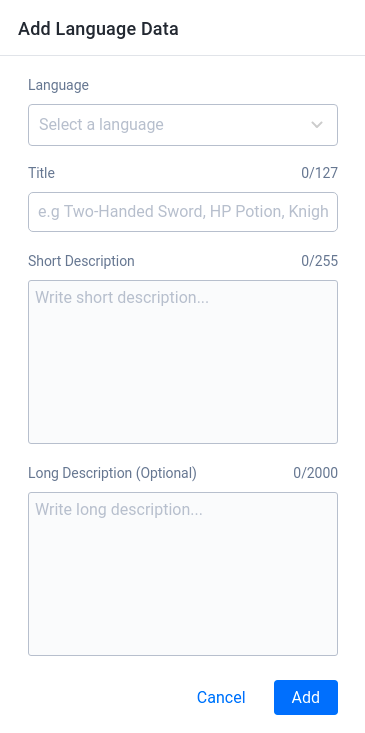
- Select the Language you want the description to be in from the drop-down list.
- Input the Title of the content.
- Input the Short Description of the content.
- Input the Long Description of the content. This is optional.
Click Add to save your changes.
Configure Images and Videos for Your Store
In the Publishing Content panel, you can add videos or images to further show off your item details.
Open the Image tab and click Upload to add a new image from your local directory. The image cannot be bigger than 2MB. You can also set the image for a particular purpose in the Set as field, e.g., product-banner.
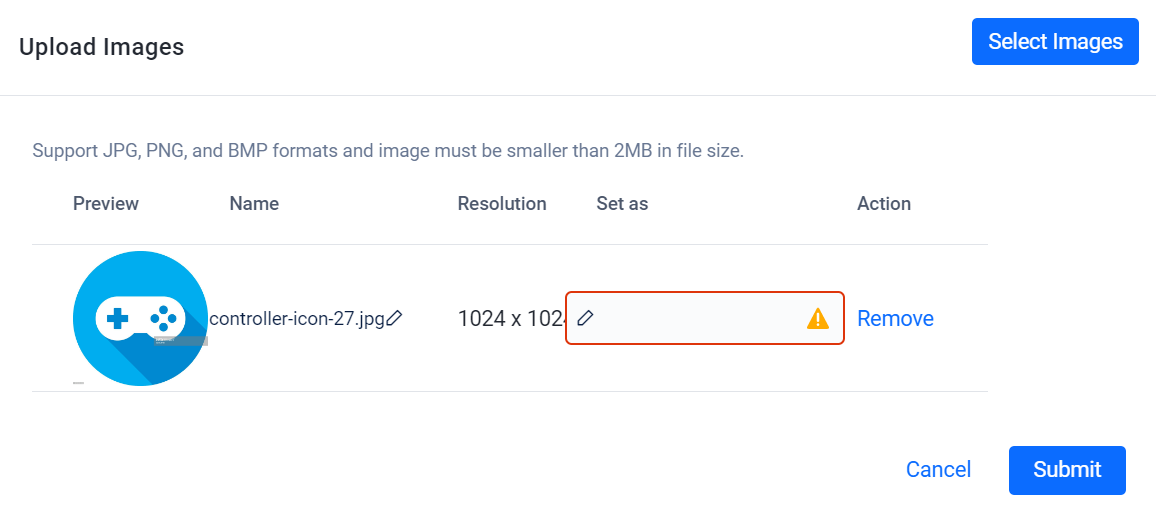
Click Submit and your image is added to the Publishing Content section. You can add as many images as you need.
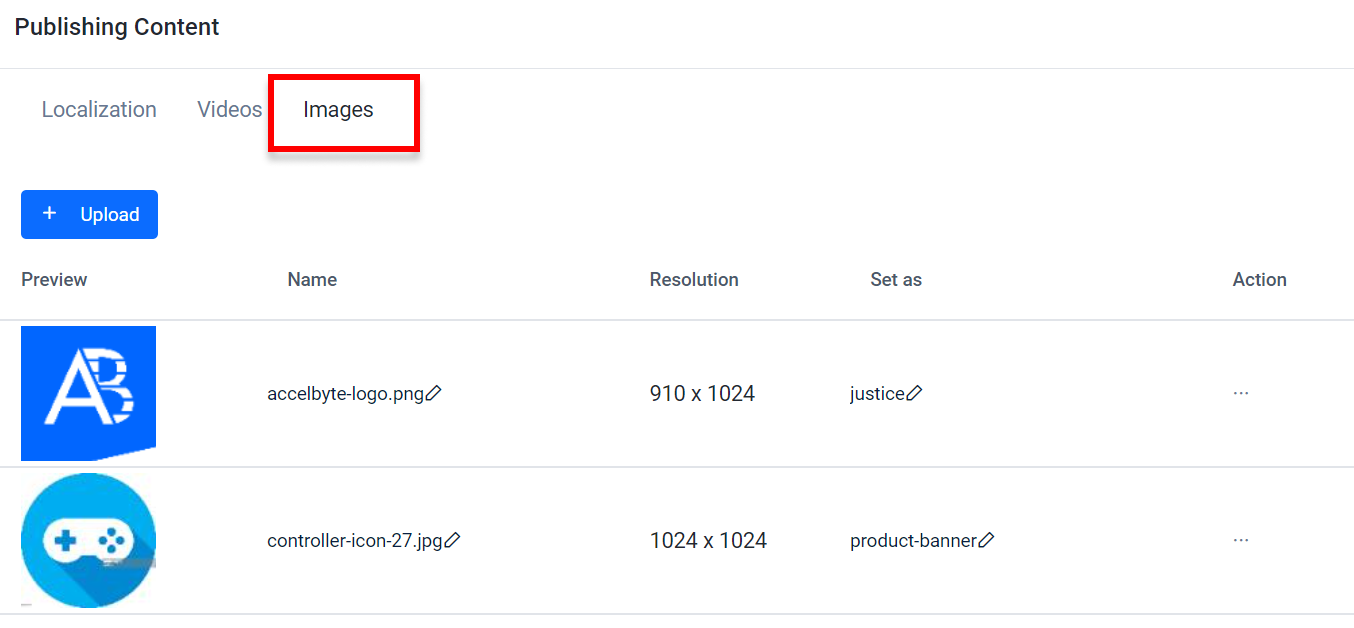
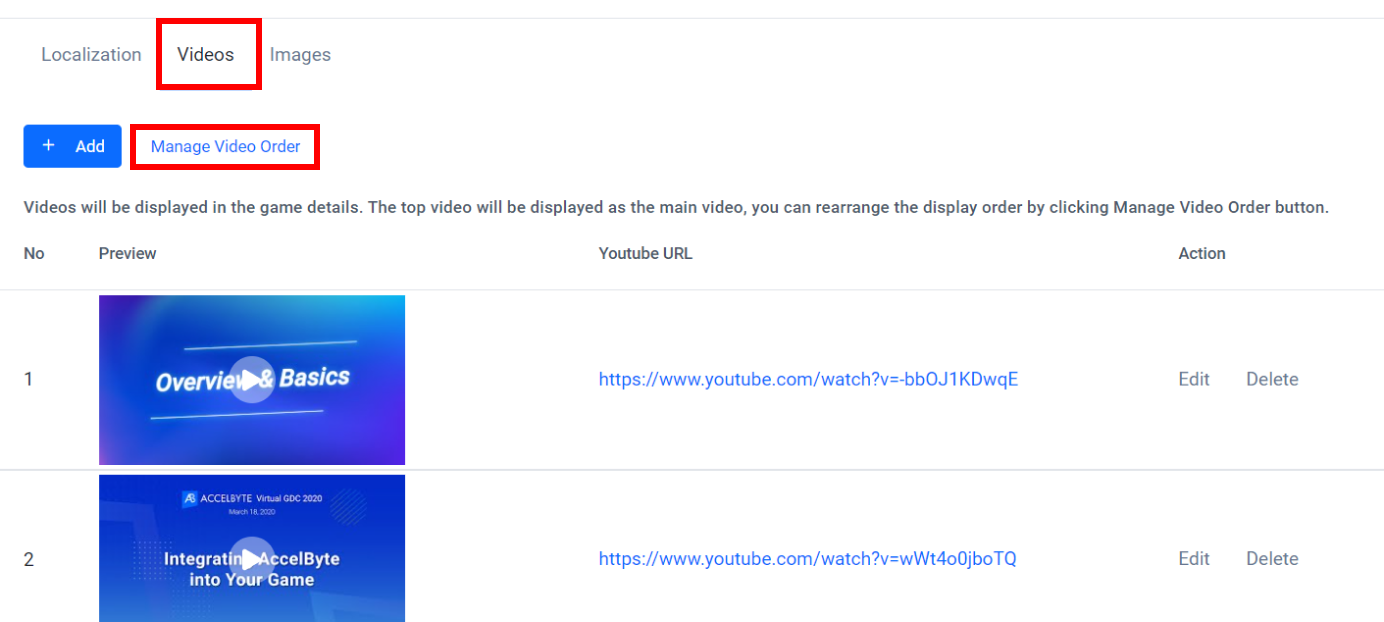
Click the Videos tab to add a YouTube video.
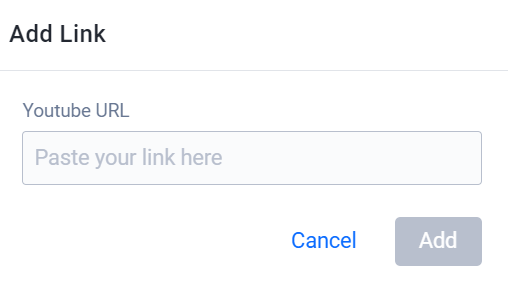
Your videos appear in the game details. If you upload multiple videos, the top one is displayed as the main video.
You can rearrange the order by clicking the Manage Video Order button.
Recent Changes
To see your recent store-related changes, open the desired game title and go to your draft store.
Click the Recent Changes tab. In this tab, you can see all the changes made in your draft store before publishing. Every time your draft store is published, the changes list is wiped, and then refreshed if any subsequent changes are made.
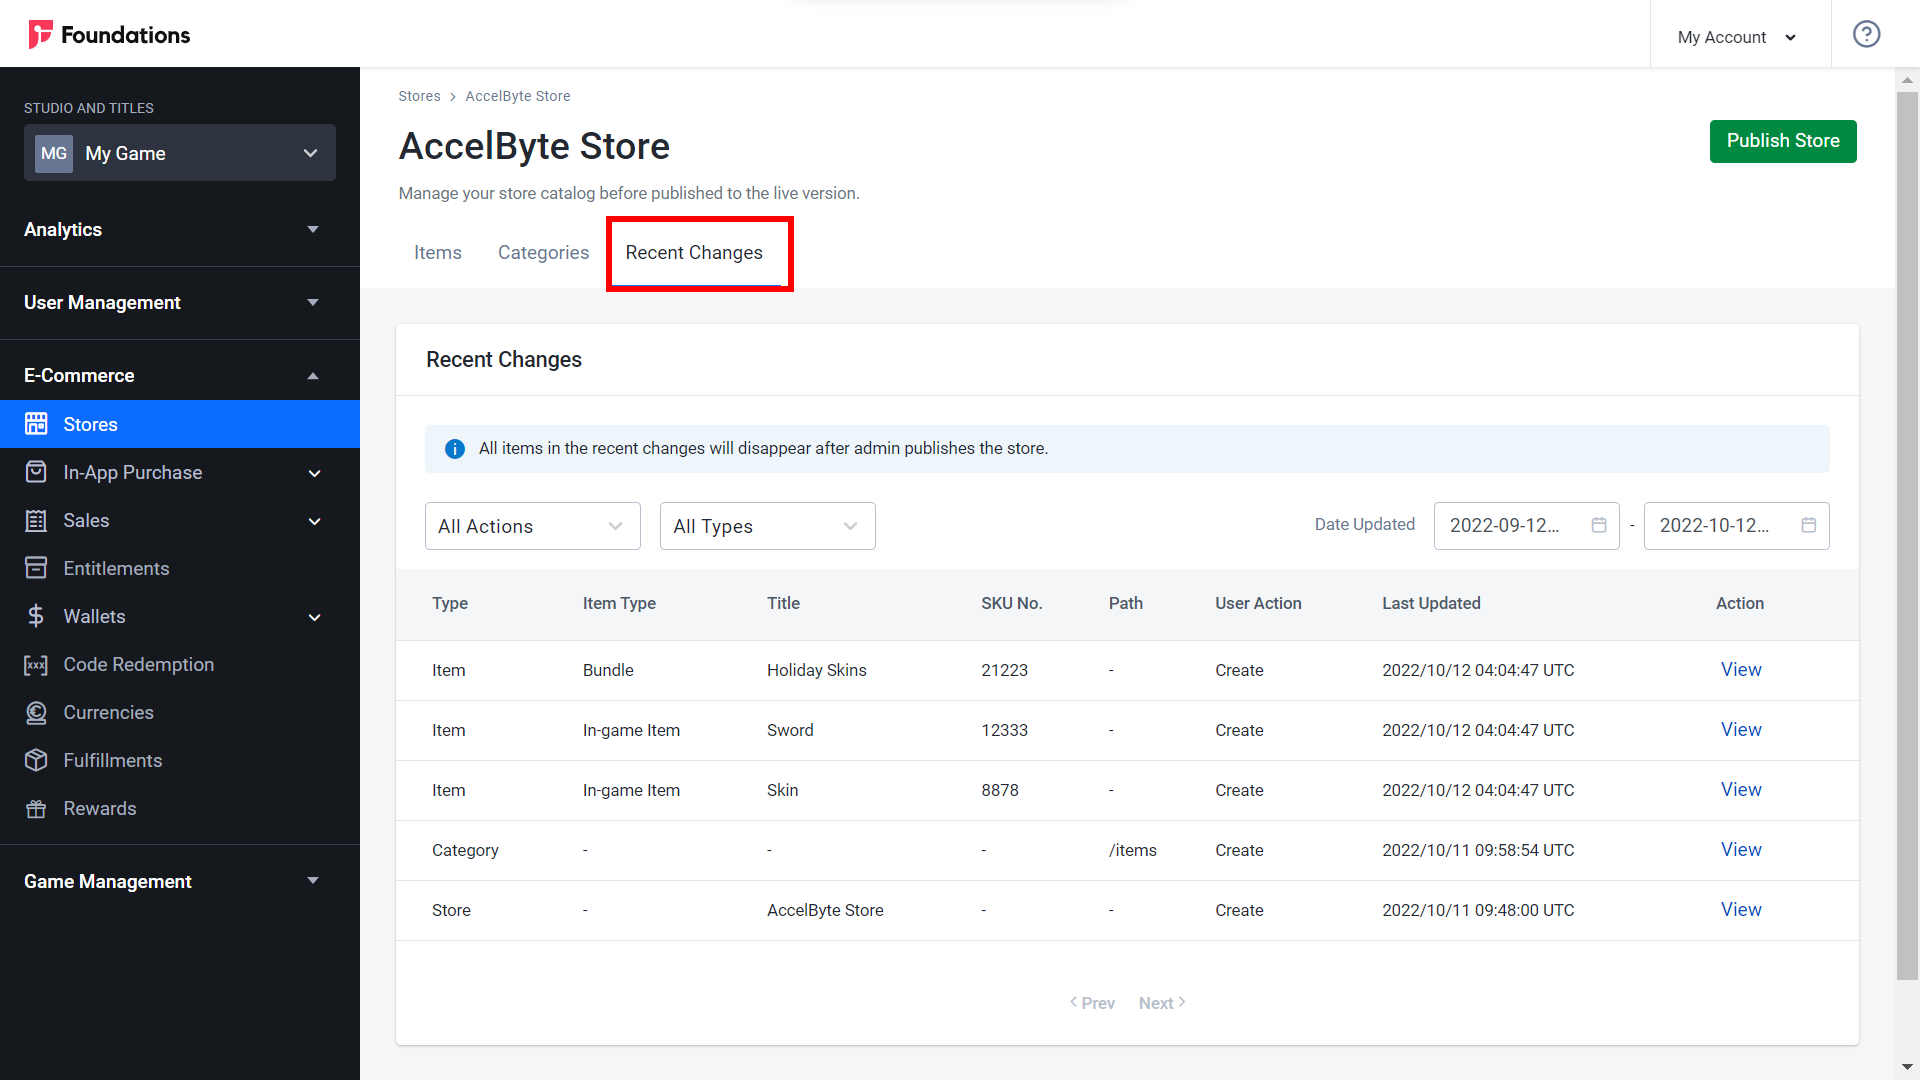
You can filter the Recent Changes list by:
- Action: list changes by All actions, or by Create, Update, or Delete actions.
- Type: list changes by All types, or by Store, Category, or Item.
- Date: the date filter can be set to a maximum range of one month.
Publish a Store
You can publish all the changes you’ve made in a store or just selected changes.
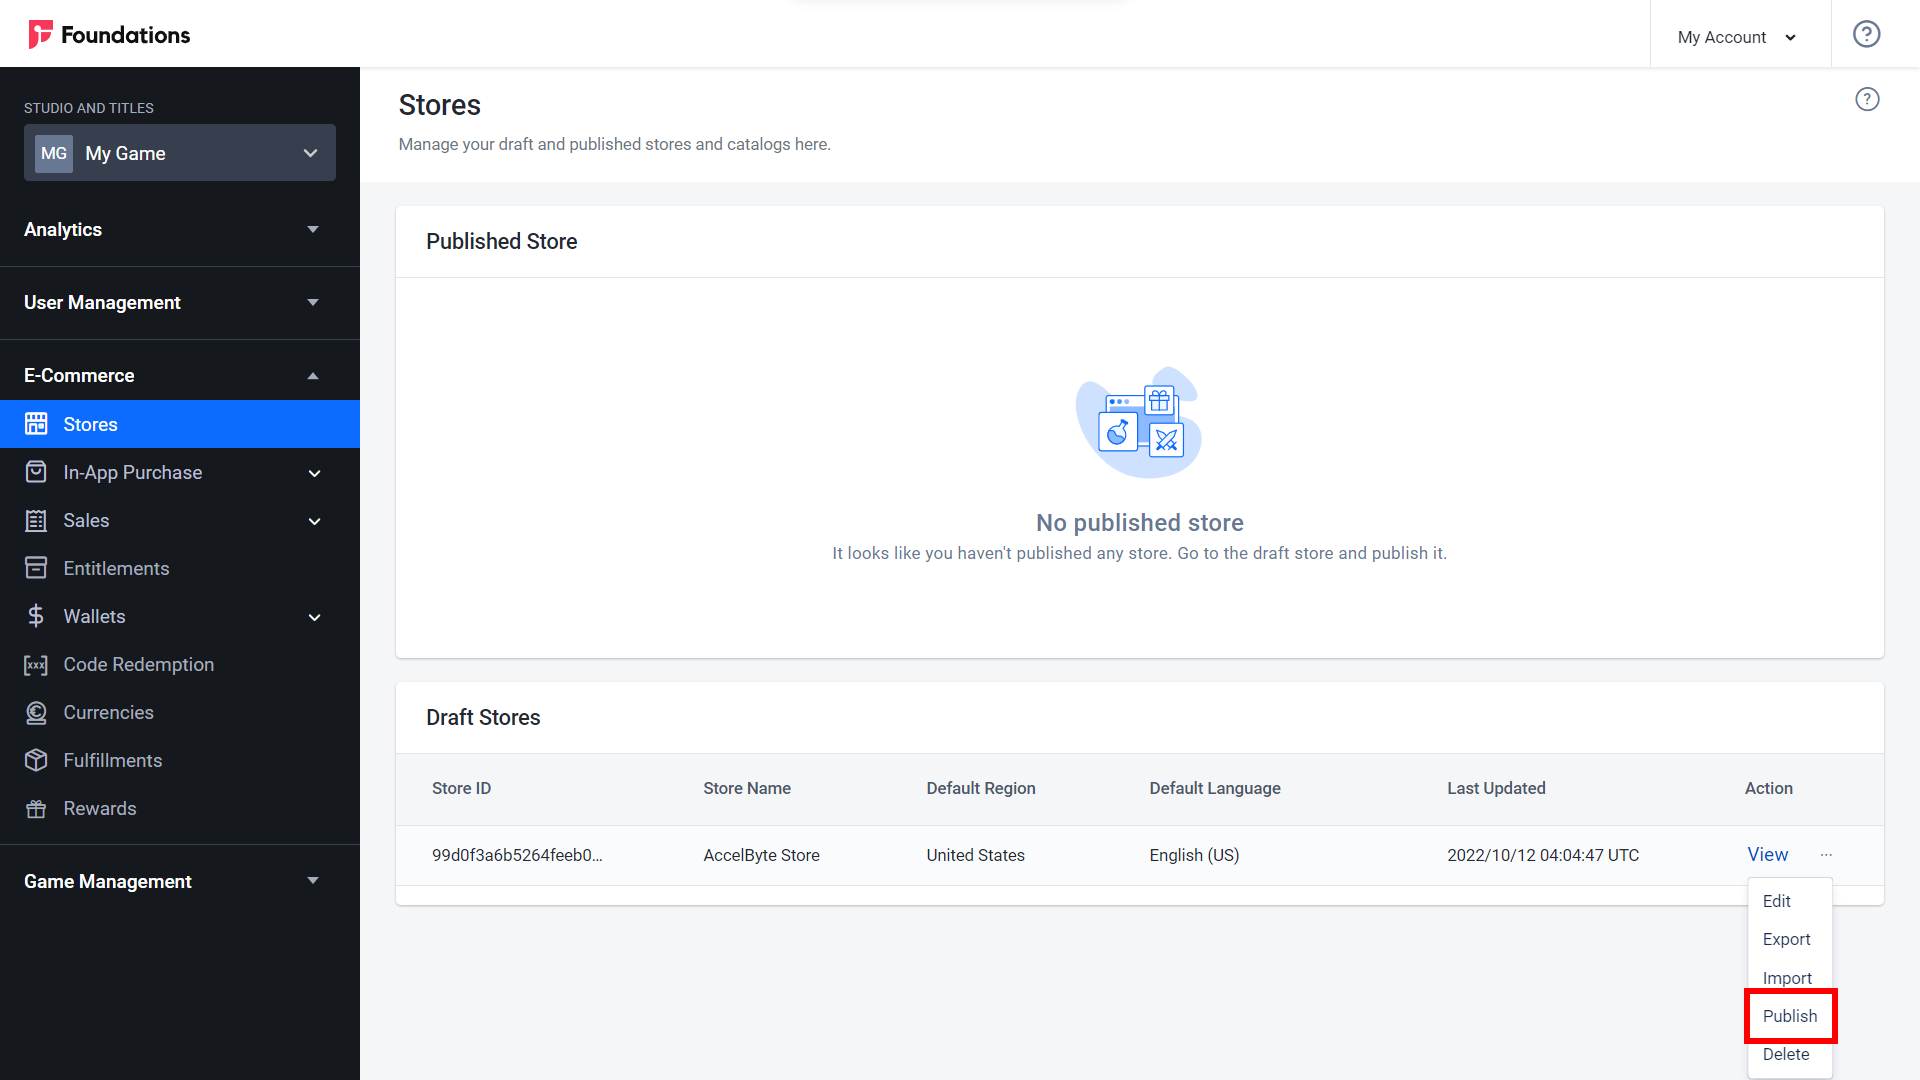
In the Draft Store section, click in the Action column next to the store and select Publish.
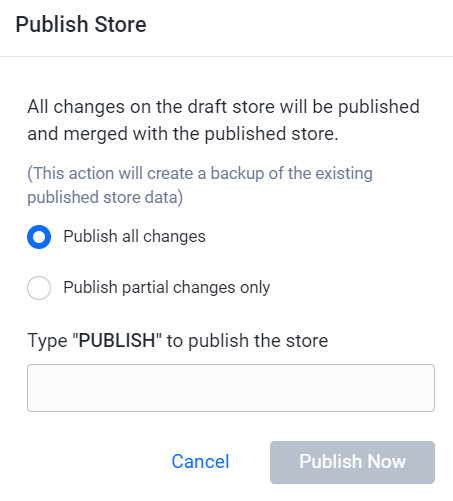
In the Publish Store form :
- To confirm that you want to publish the store, type PUBLISH.
- To only publish all changes listed in the Recent Changes section, click the Publish Now button.
- To publish changes that are not listed there, click Publish all.
After you have published a draft store, the draft store will still exist as a draft. You can make further changes without affecting the published store.
Clone a Store
You can clone a published store if you want to create a new draft store but don’t want the hassle of starting from scratch. You can then add, delete or modify the existing items as you wish.
In the desired game title, select the Store you want to clone.
Click in the Action column next to the store and select Clone to Draft.
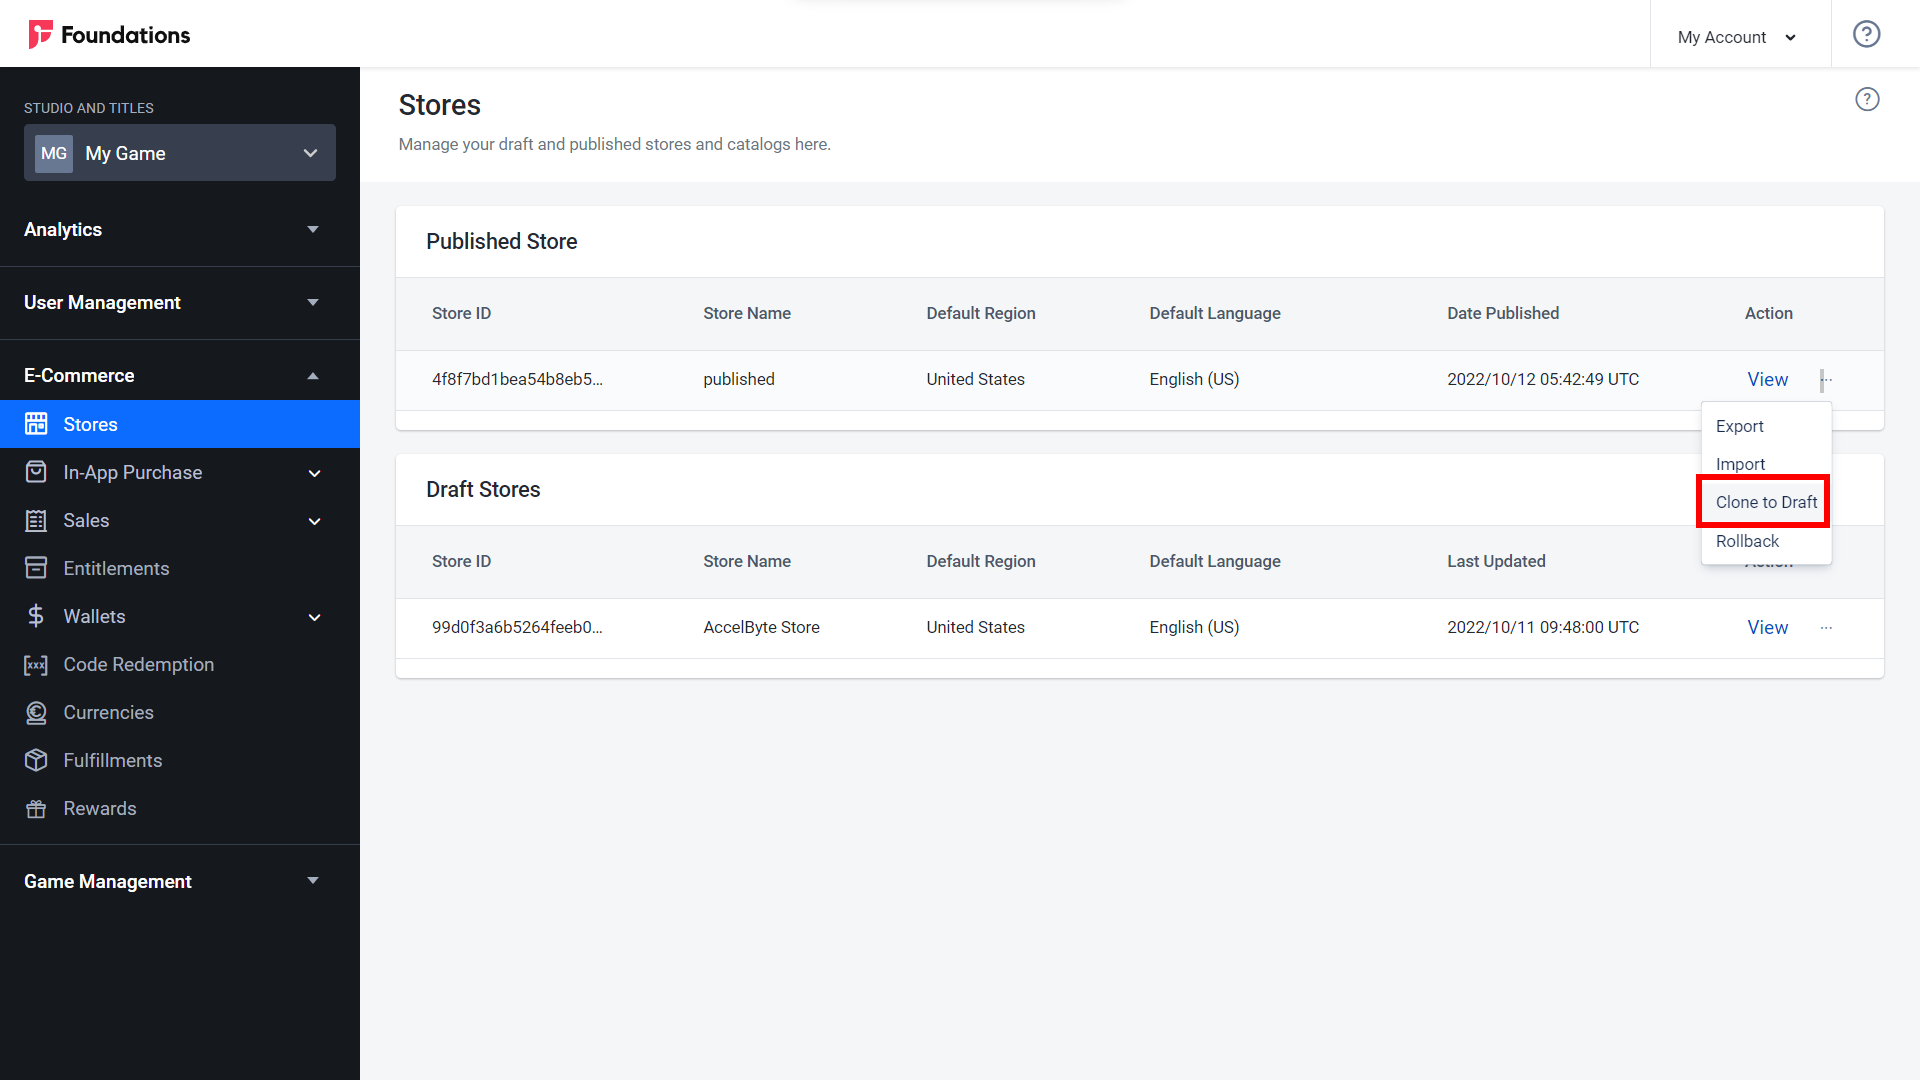
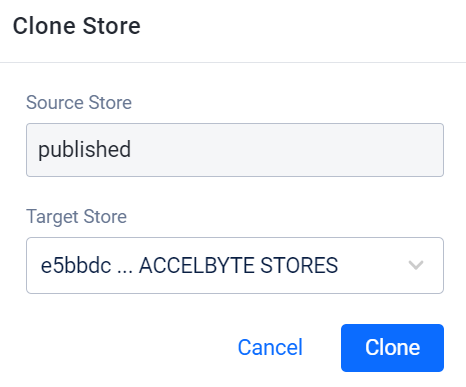
The Clone Store form appears.
Select the Target Store from the list, then click Clone. The target store receives the cloned data from the source store. The cloned store appears in the Draft Stores section.
Import or Export a Store
As an administrator, you can also import or export a store to or from the Admin Portal, where it can be used by another administrator.
Export a Store
Select the Store you want to export.
Click in the Action field next to the store, then choose Export from the dropdown menu.
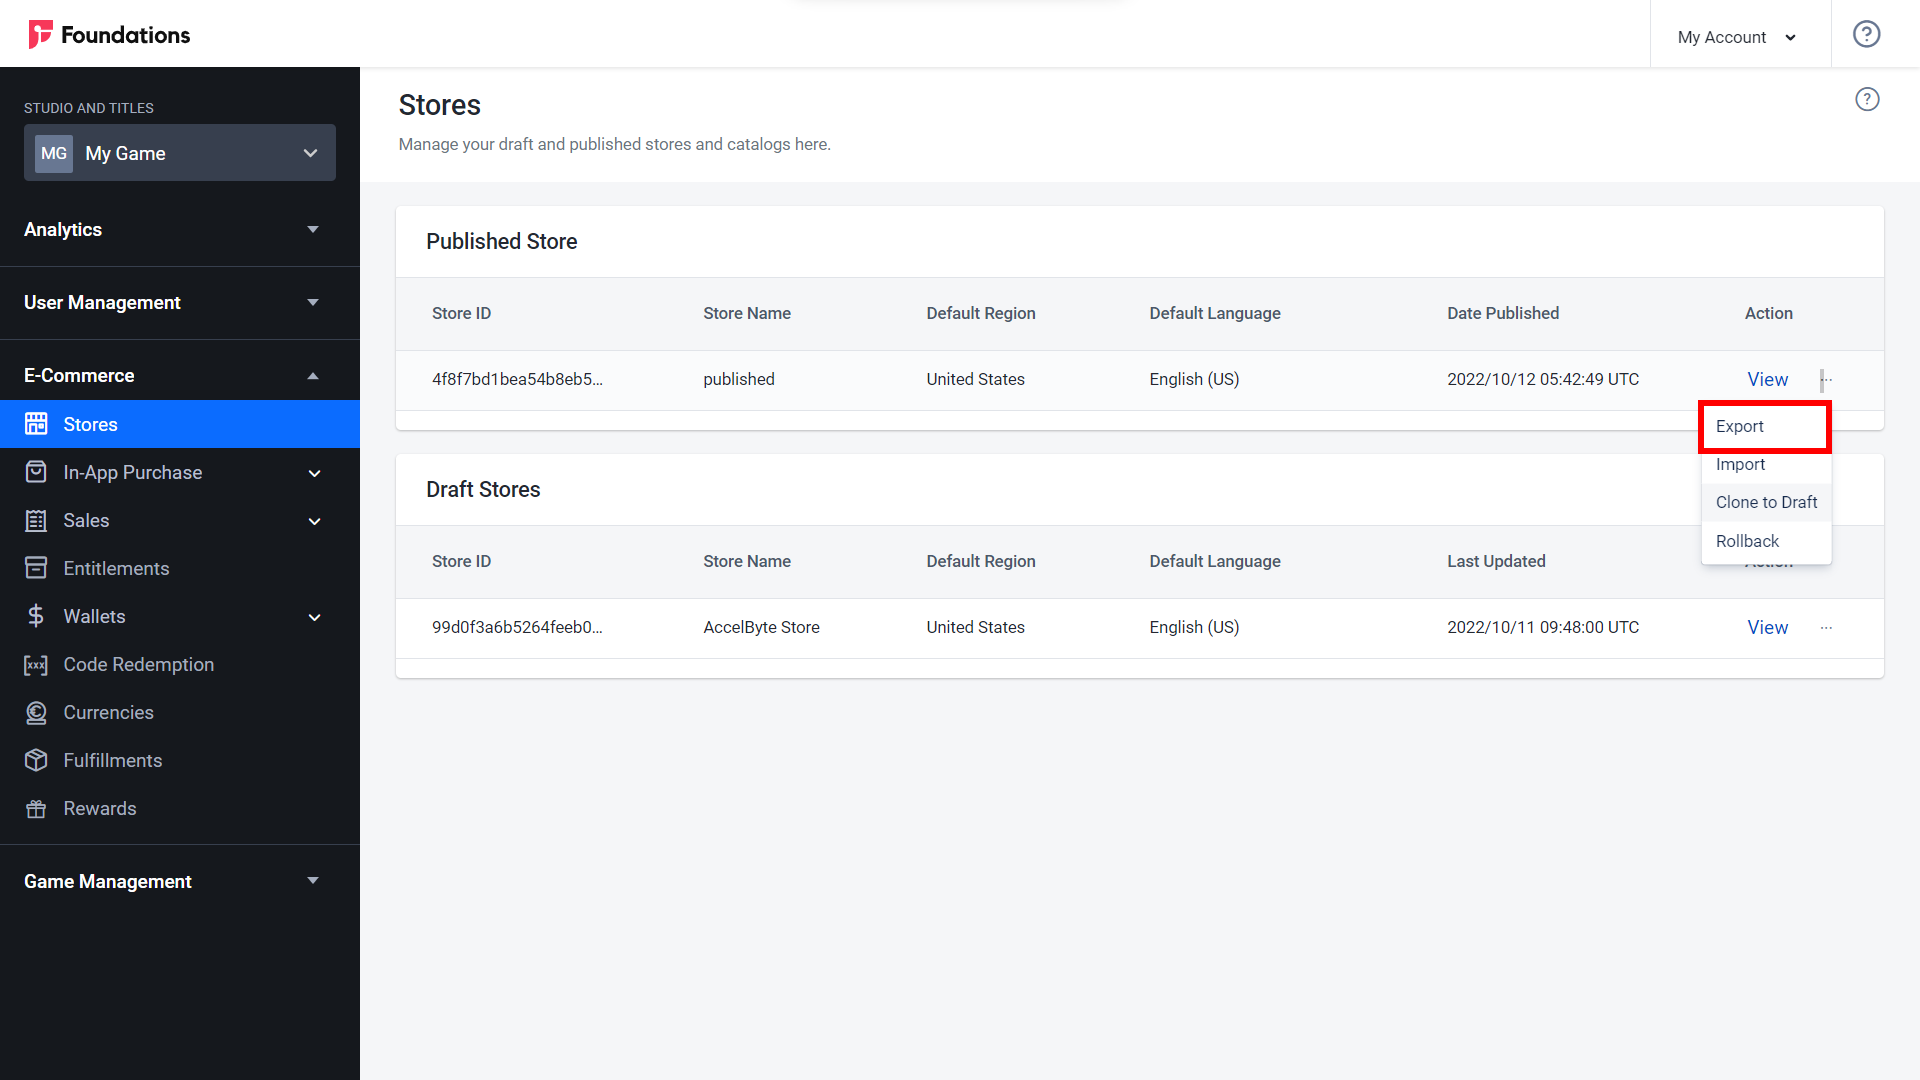
The store is exported as a ZIP file, which when extracted will produce a JSON file containing your store data.
Import a Store
Before you import a store, do the following:
Make sure a target store exists. If it does not, create a new one.
Make sure the default language and region of the imported store and the target store are the same.
Click in the Action field next to the store you want to import store data into, then choose Import from the dropdown menu.
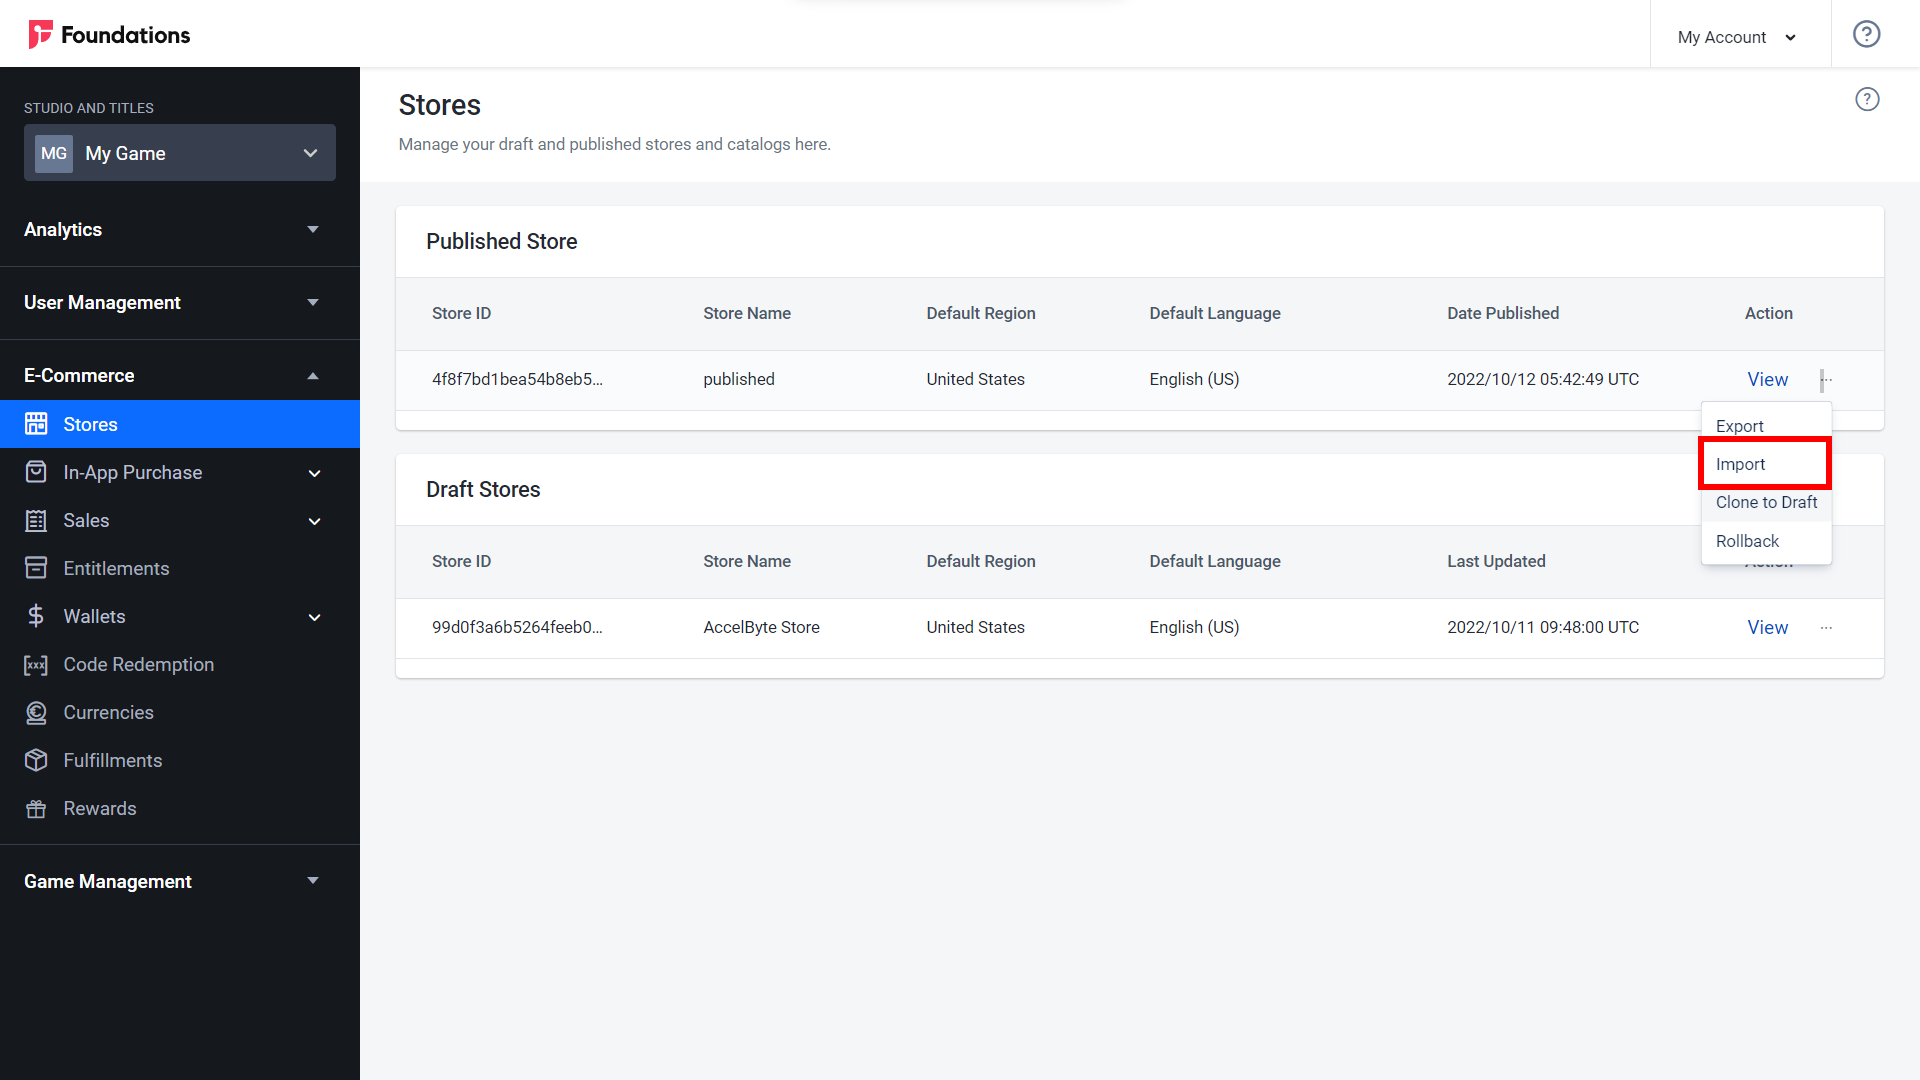
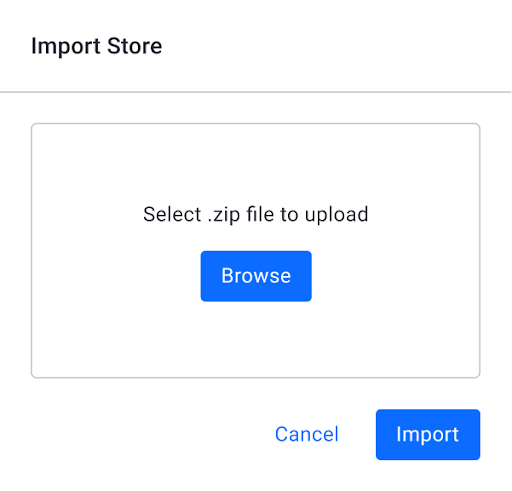
The Import Store panel appears. Click the Browse button to search for the store you want to import data for.
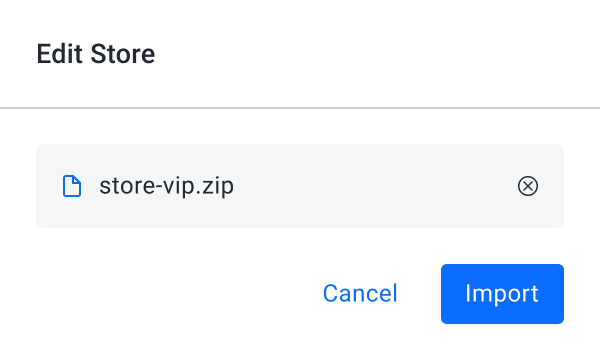
Select which store you want to upload from the list. After the store has been uploaded, click the Import button. The target store now contains the imported data.
Implementing E-Commerce using Client SDKs
Store Category
The store category is useful for organizing items in your store catalog into groups. The category APIs can be called by using the functions on AccelByte::FRegistry::Category.
Retrieve Store Root Categories
Retrieve root or top-most level categories.
- Unreal Engine
- Unity
AccelByte::FRegistry::Category.GetRootCategories(
  /* specified language code */
  ,
  THandler < TArray < FAccelByteModelsCategoryInfo >> ::
  CreateLambda(
    [](TArray < FAccelByteModelsCategoryInfo > Result) {
      /* do something when succeeded */
    }),
  FErrorHandler::CreateLambda([](int32 ErrorCode, FString ErrorMessage) {
    /* do something when fails */
  })
);
string language = "en";
AccelBytePlugin.GetCategories().GetRootCategories(
  language,
  result => {
    if (result.IsError) {
      Debug.Log($"Failed to get root categories: {result.Error.Message}, code: {result.Error.Code}");
    } else {
      Debug.Log("Success to get root categories");
    }
  });
Retrieve Store Category
Retrieve information on a specified category.
- Unreal Engine
- Unity
AccelByte::FRegistry::Category.GetCategory(
  /* specified category path */
  ,
  /* specified language code */
  ,
  THandler < FAccelByteModelsCategoryInfo > ::
  CreateLambda(
    [](FAccelByteModelsCategoryInfo Result) {
      /* do something when succeeded */
    }),
  FErrorHandler::CreateLambda([](int32 ErrorCode, FString ErrorMessage) {
    /* do something when fails */
  })
);
string language = "en";
string categoryPath = "/equipment/weapon";
AccelBytePlugin.GetCategories().GetCategory(
  categoryPath,
  language,
  result => {
    if (result.IsError) {
      Debug.Log($ "Failed to get category: {result.Error.Message}, code: {result.Error.Code}");
    } else {
      Debug.Log("Success to get category");
    }
  });
Retrieve Store Child Categories
Retrieve a list of subcategories that are one level below a specified category.
- Unreal Engine
- Unity
AccelByte::FRegistry::Category.GetChildCategories(
  /* specified language code */
  ,
  /* specified category path */
  ,
  THandler < TArray < FAccelByteModelsCategoryInfo >> ::
  CreateLambda(
    [](TArray < FAccelByteModelsCategoryInfo > Result) {
      /* do something when succeeded */
    }),
  FErrorHandler::CreateLambda([](int32 ErrorCode, FString ErrorMessage) {
    /* do something when fails */
  })
);
string language = "en";
string categoryPath = "/equipment/weapon";
AccelBytePlugin.GetCategories().GetChildCategories(
  categoryPath,
  language,
  result => {
    if (result.IsError) {
      Debug.Log($ "Failed to get child categories: {result.Error.Message}, code: {result.Error.Code}");
    } else {
      Debug.Log("Success to get child categories");
    }
  });
Retrieve Store Descendant Categories
Retrieve a list of subcategories that are multiple levels below a specified category.
- Unreal Engine
- Unity
AccelByte::FRegistry::Category.GetDescendantCategories(
  /* specified language code */
  ,
  /* specified category path */
  ,
  THandler < TArray < FAccelByteModelsCategoryInfo >> ::
  CreateLambda(
    [](TArray < FAccelByteModelsCategoryInfo > Result) {
      /* do something when succeeded */
    }),
  FErrorHandler::CreateLambda([](int32 ErrorCode, FString ErrorMessage) {
    /* do something when fails */
  })
);
string language = "en";
string categoryPath = "/equipment/weapon";
AccelBytePlugin.GetCategories().GetDescendantCategories(
  categoryPath,
  language,
  result => {
    if (result.IsError) {
      Debug.Log($ "Failed to get descendant categories: {result.Error.Message}, code: {result.Error.Code}");
    } else {
      Debug.Log("Success to get descendant categories");
    }
  });
In-Game Item
The Item APIs can be called by using the functions on AccelByte::FRegistry::Item and the APIs can be used to get an item from specific Id, get items that match some criteria, search items with specific keywords.
Get Item Info
Get an item information from the published store by specifying itemId parameter.
- Unreal Engine
- Unity
AccelByte::FRegistry::Item.GetItemById(
  /* specified item id */
  ,
  /* specified language code */
  ,
  /* specified country code */
  ,
  THandler < FAccelByteModelsPopulatedItemInfo > ::
  CreateLambda([](FAccelByteModelsPopulatedItemInfo Result) {
    /* do something when succeeded */
  }),
  FErrorHandler::CreateLambda([](int32 ErrorCode, FString ErrorMessage) {
    /* do something when fails */
  })
);
string itemId = "<some_item_id>";
string region = "US";
string language = "en";
AccelBytePlugin.GetItems().GetItemById(
  itemId,
  region,
  language,
  result => {
    if (result.IsError) {
      Debug.Log($ "Failed to get item: {result.Error.Message}, code: {result.Error.Code}");
    } else {
      Debug.Log("Success to get item");
    }
  });
Query Item by Criteria
Get a list of items from the published store that match specific criterias/filters. Available criterias include:are like the following:
- ItemType: Allows enumeration values from the enum class EAccelByteItemType. There are five5 item types available which are: COINS, INGAMEITEM, BUNDLE, APP, CODE.
- AppType: Allows enumeration values from the enum class EAccelByteAppType. There are five5 item types available which are: GAME, SOFTWARE, DLC, DEMO.
- Region: Definea an item’s region. Usesing current store region settings when unspecified.
- Language: Defines an item’s language. Using current store language settings when unspecified.
- CategoryPath: Sets an item’s category path. For eExample: “/equipment/weapon”.
- SortBy: Allowa string values. There are 11 sorting types available which are: name, name:asc, name:desc, createdAt, createdAt:asc, createdAt:desc, updatedAt, updatedAt:asc,updatedAt:desc, displayOrder, displayOrder:asc, displayOrder:desc.
- Tags: Defines item tags.
- Unreal Engine
- Unity
FAccelByteModelsItemCriteria itemCriteria;
itemCriteria.ItemType = EAccelByteItemType::COINS;
itemCriteria.Region = “US”;
itemCriteria.Languge = “en”;

AccelByte::FRegistry::Item.GetItemsByCriteria(
  itemCriteria,
  /* specified offset */
  ,
  /* specified limit */
  ,
  THandler < FAccelByteModelsItemPagingSlicedResult > ::
  CreateLambda([](FAccelByteModelsItemPagingSlicedResult Result) {
    /* do something when succeeded */
  }),
  FErrorHandler::CreateLambda([](int32 ErrorCode, FString ErrorMessage) {
    /* do something when fails */
  })
);
ItemCriteria itemCriteria = new ItemCriteria {
  region = "US",
    language = "en",
    itemType = ItemType.COINS
};
AccelBytePlugin.GetItems().GetItemsByCriteria(
  itemCriteria,
  result => {
    if (result.IsError) {
      Debug.Log($ "Failed to get item by criteria: {result.Error.Message}, code: {result.Error.Code}");
    } else {
      Debug.Log("Success to get item by criteria");
    }
  });
Search Items
Search for items from the published store by using keywords in the title, description, and long description. The function is language constrained, which requires a language code to properly function. If items don’t exist in the specified region, items in the default region items will be are returned. When offset and limit value is less than 0, the default values will be used which isare 0 for offset and 20 for limit.
- Unreal Engine
AccelByte::FRegistry::Item.SearchItem(
  /* specified language code */
  ,
  /* specified keywords */
  ,
  /* specified offset */
  ,
  /* specified limit */
  ,
  /* specified country code */
  ,
  THandler < FAccelByteModelsItemPagingSlicedResult > ::
  CreateLambda([](FAccelByteModelsItemPagingSlicedResult Result) {
    /* do something when succeeded */
  }),
  FErrorHandler::CreateLambda([](int32 ErrorCode, FString ErrorMessage) {
    /* do something when fails */
  })
);